When you try to save your credit in the photo then you need to know How to Make a Watermark in Photoshop. Whether it is for personal uses or the professional sector, images have become important for every field.
According to statistics, people are sharing more than 3 billion images daily. Within this huge crowd, the protection of the image has become a concern.
One can easily use your image without your permission. Thinking about preventing those things and maintaining your ownership? Adding a watermark can be the best solution here.
Though it doesn’t give 100% assurance of protecting the image, it will be difficult to use that image without your concern. Most people don’t know how to make a watermark. Are you also one of them? Well, this article is going to be very helpful for you.
Within a few minutes, you will learn how to make a watermark in Photoshop. You don’t need to have a broad knowledge of Photo Retouching to follow the tutorial. You can easily follow the procedures without having superior knowledge of Photoshop.
So, let’s dive forward.
Table of Contents
What is Watermarking?
First of all, I would like to give you a clear idea about watermarking. When we put a logo or text on an image, it is called a watermark. It is important to use a watermark with an image when you are going to publish it online.
Especially for the people who are connected with E-commerce, watermarking is very important. You can get some advantages from using a watermark. Do you know about these? Alright, permit me to describe.
Advantages of Watermarking
By using a watermark on your image, you can control the ownership of that image. As you are making images available online, anyone can download that image and use that image for their purpose. But when you add a watermark with the image, it indicates that the images belong to you.
So, the chances of getting misused are reduced by a huge margin. If you learn how to make a watermark, you can protect your images from misuse.
It also keeps uniqueness alive for E-commerce Product Images. A watermark represents your business or company. It helps the business with marketing and promotion. You might be thinking that, are there disadvantages of watermarking? Permit me to give you the answer.
Disadvantages of Watermarking
Everything in the world comes with pros and cons. Watermarking also has some cons. Sometimes, it can be the reason for losing the distraction of the viewers. Viewers might not be able to focus on the actual object of the picture. It depends on watermark color, size, and placement.
If you are going through a busy schedule, you might not get enough time to make a watermark in Photoshop. In that case, you can take Photo Editing Service for the post-processing work of your picture.
Know More: How Much to Charge to Edit Photos in 2022
Overall, adding a watermark to a picture has more advantages than its few disadvantages.
Why is It Important to Add A Watermark to Your Pictures?
- If you are a photographer, the client will know about your photography business by looking at your taken photos. It does marketing for your business.
- When someone shares the photos with a watermark, your ownership stays alive.
- You get credit for your work when someone publishes the photos on other websites.
- Your business becomes more visible to its audience.
After knowing all of these, I think you are getting excited to make a watermark in Photoshop. Let’s jump on the procedures.
How to Make A Transparent Watermark in Photoshop
Whenever we think about any kind of photo editing method, Photoshop comes as the first choice. Permit me to show you how you can easily make a transparent watermark in Photoshop.
Step 1: Pick horizontal type tool
In the beginning, open the picture in Photoshop on which you would like to add a watermark. After that, select “Horizontal Type Tool” from the left side of your screen.

Step 2: Type the text
Secondly, type the text for the watermark. You will find different types of font options at the top. On the right side of the font, there will be a font size option.
Set your favorite font and standard size. Next to this, click on the arrow icon from the top. It will allow you to change the position of the text.

Step 3: Decrease text layer’s fill value
At this point, the text is clearly visible. To convert it into a transparent watermark, you have to set the layer’s Fill value to 0%. The option is available right at the top of the layer panel.
Your written text will be invisible after performing that action. Don’t be tense. Soon it will reappear as a watermark. Let’s jump into the 4th step.

Step 4: Customize layer style
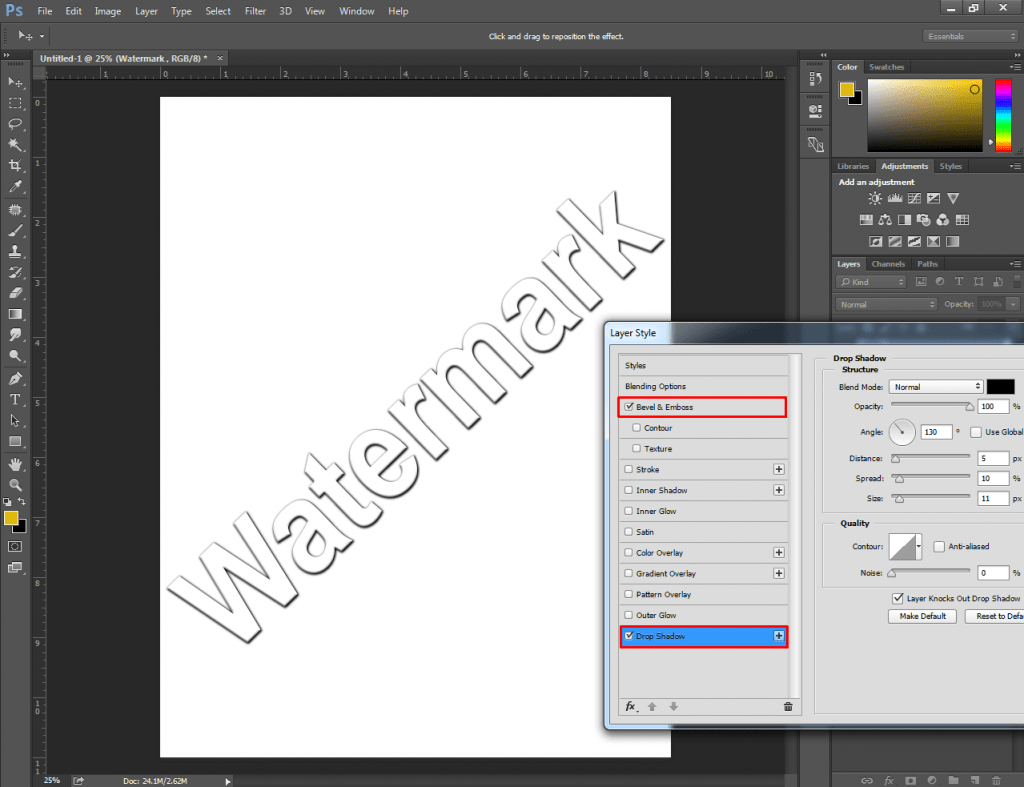
Double-click on the text layer for customizing layer style and a new layer style box will appear on the monitor. Choose the 2nd option from that box named “Bevel and Emboss”.
From that menu, set the style option to “Outer Bevel”. The depth will be 500%. Then, set the size and soften the value according to the requirements. It is better to set it within 3 to 7.

On the shading section, put a pick on ‘Use Global Light”. The angle needs to be set at 30 degrees and remove the selection from Anti-aliased. Also, you have to choose the linear Gloss Contour.

Set both Highlight mode and shadow mode as normal. Choose white color for the highlight and black for the shadow. Along with this, change the opacity into 90% and 100%. After that, you will notice that you have almost made a watermark in Photoshop. We are just one step behind.
Step 5: Customize drop shadow
To improve the look of the watermark, click on the drop shadow from the layer style menu. At the top, there will be a blend mode option. Change the blend mode into normal and set the maximum opacity. Don’t forget to set the color as Black.
Next to this, there will be an angle option. Put 130 degrees on that box. Now, remove the selection from “Use Global Light”. For drop shadow, there is no need to enable that option.
Below these options, you will see distance, spread, and size options. Set those values according to the requirements of your image. I have set those values as 4 px, 9%, and 10 px.

When you are okay with everything, hit on the OK and close the layer style box.

See, we have created a watermark in Photoshop. By clicking on the arrow option, you will be able to move the watermark and change its position. Place it where it looks suitable.
Hopefully, you have learned the procedures. From now on, you should be able to make a watermark in Photoshop.
But, many people question how to make a transparent watermark in Google Docs. Allow me to clarify this.
How to Make A Transparent Watermark in Google Docs
Sometimes, you may have to add a watermark with a text file. Can we do this in Google Docs? Thankfully, I’ve found the trick of how to create a transparent watermark in Google Docs. I am going to share the trick with you. Let’s get started.
Step 1: Go to google drawing
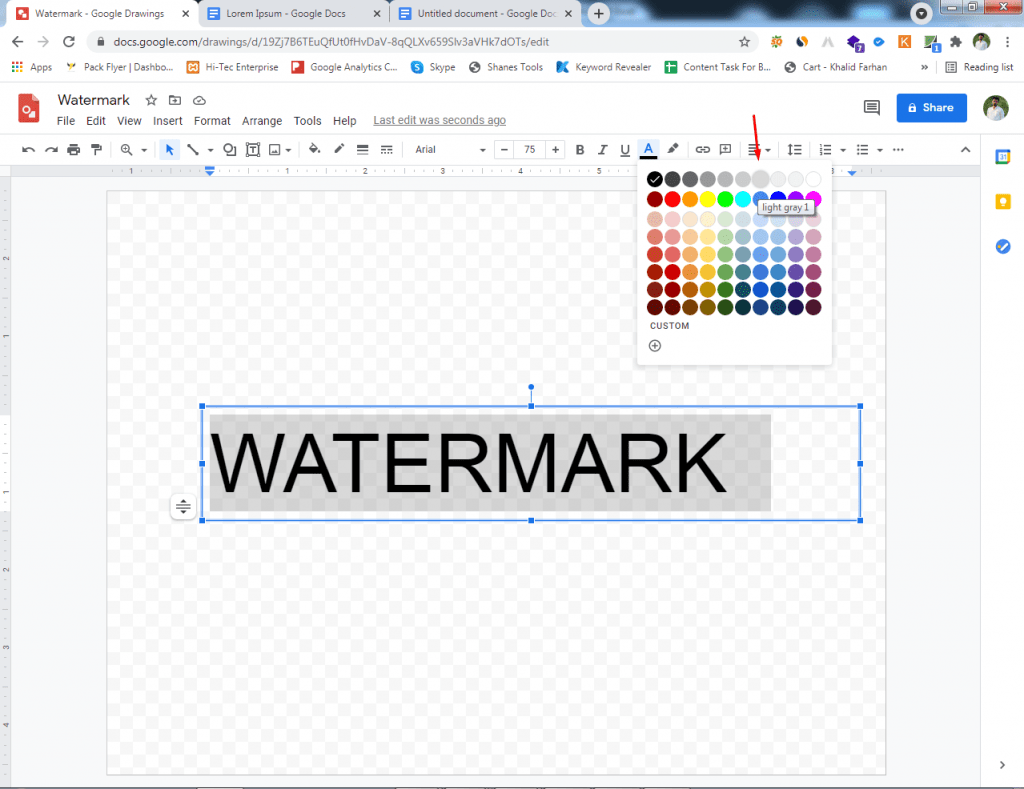
Firstly, you need to open Google drawing. This is a useful feature from Google. Click on the text box and type the text that you want to use for watermarking.

After typing the text, increase the size of the text. Then, place it in the middle position of the frame or elsewhere you want. Change its color to light gray.

Step 2: Copy your text
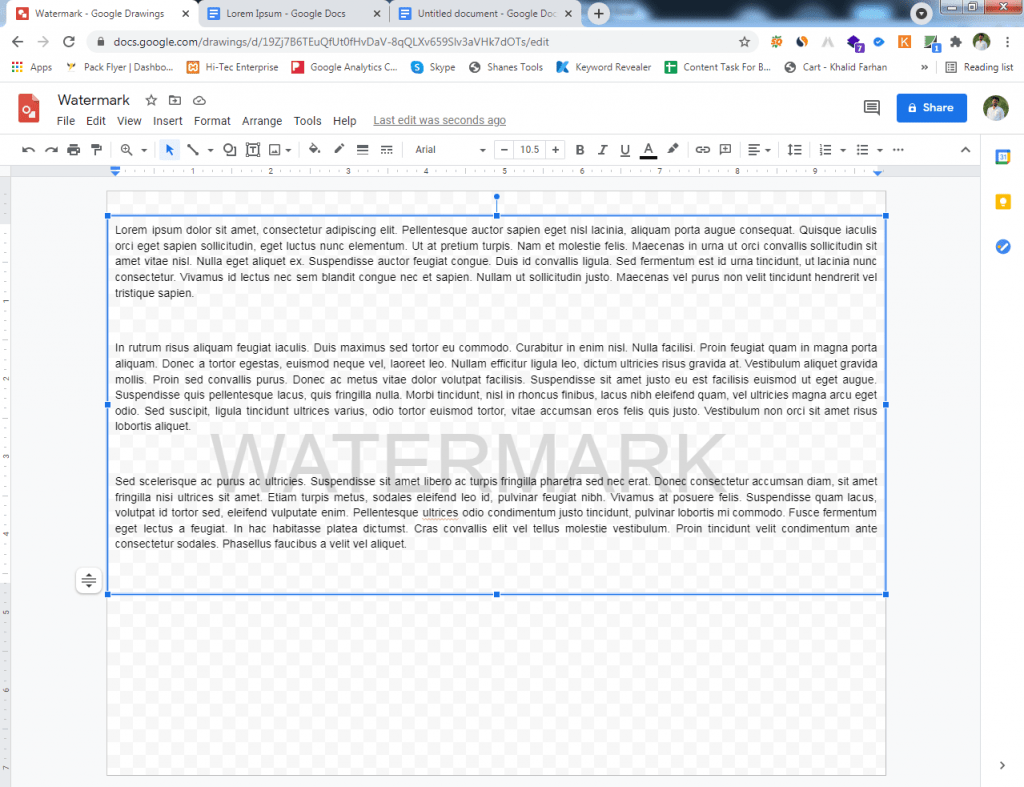
In the 2nd step, open Google Doc or the text file on which you want to add a watermark. Use the shortcut “CTRL + A” to select all text. Then, make a right-click on the mouse and select “Copy”. Again go back to Google Drawing and take a new text box. After that, press CTRL + V to paste the copied documents.

You can see that we have got a watermark with our text. Now, we need to import that document into Google Docs. So, let’s do it.
Step 3: Create a new document
Create a new document in Google Docs. On the top, you will find the “insert” option. Click on that option and select “Drawing” followed by “From Drive”. Then, you can see the document of Google Drawing. Select that document and press enter.

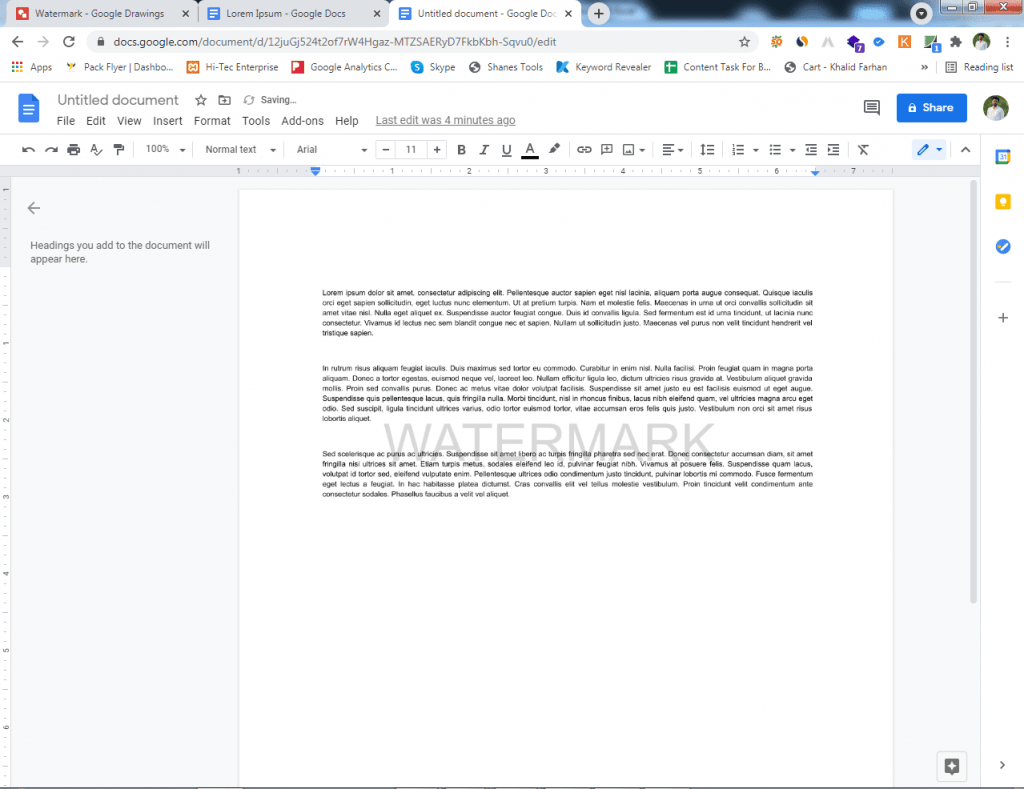
It will open that document in Google Docs. Let me show you my text document.

That’s it. We have added a watermark in Google doc. How was the trick? I think you will be happy after knowing the trick.
For writing purposes, Microsoft Word is the most used application all over the world. Can we make a transparent Watermark in Word without using any internet connection?
You will be happy after knowing it is possible. You just need to follow some simple methods. Permit me to show you.
How to Make A Transparent Watermark in Word
Step 1: Select page layout
Most probably, it is the easiest way to make a transparent watermark in Word. Open a new text document in the Microsoft Word application and choose the page layout option from the top.

Step 2: Select custom watermark
After that, you will see the watermark option at the top of the document. Click on that option and find “Custom Watermark” on the bottom side.

After this, you will see this type of box on your screen.

Click on the “text watermark” and select your preferred language. Here, I am using English (United States). Next to the language option, you will find a text box. In that box, you have to type the text that you want to add as the watermark.
Step 3: Select font and size
After typing the text, choose your preferred font from the font selection box. Later on, you need to set the size for the watermark. If you are confused about the size, you can set it to “Auto”. From the color option, you can change the color of the watermark. When you are okay with everything, click on the “Apply” button.

You can see the result. You can also make a watermark in Word by following this easy technique.
Now, you can make a watermark in Photoshop, Google Docs, and Microsoft Word. By using those techniques, you will be able to add a watermark to images and text documents.
What about the presentation? Do you want to learn how to make a transparent watermark in PowerPoint? I am here to get you introduced to that procedure.
How to make a transparent watermark in Powerpoint?
Step 1: Go to slide master
Firstly, create a new Microsoft Office PowerPoint Presentation. Secondly, click on the “view” option from the top of the window. Choose the “Slide Master” option from its menu.

Step 2: Select format background
After going into the Slide Master View, right-click on the top slide and select “Format Background”.

Step 3: Choose image file
In the 3rd step, you have to insert the image file that you want to use as a watermark. From the fill option, select Picture or texture fill.

After clicking on the insert, the image file will be visible on your presentation. To make the image transparent, change the transparency option from 80% to 90%.

Step 4: Close slide master view
After changing the transparency, you will get a transparent watermark on your presentation. To get back to the normal mode, click on the “Close Master View”.
If you feel that the watermark is not positioned correctly, you can change its position using the left, right, top, and bottom options from the format background menu.

That is the procedure of making a transparent watermark in PowerPoint. By following these simple methods, you can add a watermark to your PowerPoint Presentation.
How to Create and Add A Text Watermark?
Step 1: Create a new layer for the watermark
After running Photoshop, click on the “Horizontal Type Tool” from the left sidebar. When you start typing, it will automatically create a separate new layer for the watermark.
Step 2: Add the text for your watermark
You need to left-click anywhere on the image and type the text for your watermark. You can also paste any copied text by pressing “CTRL + V”. After adding the text, reduced the fill opacity of the text layer to 0%.
Step 3: Turn your text watermark into an action
Finally, you have to double click on the new text layer to enable the Layer Style Option. From that menu, put a tick on the “Bevel and Emboss” option. Also, click on the drop shadow and set the blend mode to normal.

That’s it. It will create a watermark. To add this text watermark to other photos, you have to open that image. Then, drag the text layer and release it on the layer panel of the new image. The watermark will be visible on that image.
How to Turn A Logo Into A Watermark?
Step 1: Open and copy your logo
Firstly, take a new 300 × 300 Px blank document. Load your logo on that document. Next to this, you have to right-click on the layer and select ‘Rasterizing Layer”. Later on, select the entire image and click on the “Define Brush Preset”.

Step 2: Add the logo to your image
In the 2nd step, open the image in Photoshop to add a watermark on this. All you need to do is select the brush tool. From the top, you will find your Logo on the brush preset. You need to click on this and left-click anywhere on your image.

Step 3: Adjust your logo as needed
In the final step, you need to make adjustments to your transparent logo. If you change the color of the foreground color, it will change the color of the logo watermark. Want to change the size of the watermark? You can change the brush size to change the size of the watermark.

In this method, you can add as many watermarks as you want just with a single click. Now, let me show you how to create a Custom Brush to apply on Watermark.
How to Create A Custom Brush to Apply Your Watermark?
Step 1: Prepare the logo
First of all, open the logo in Photoshop. Right-click on the layer and hit on the ‘Rasterizing Layer”. Use the shortcut “CTRL+L” to bring the level option and make the logo darker. Let’s have a look at this logo.

Step 2: Convert your logo to a brush
Now, we are going to convert this logo to a brush. For doing this, go to the edit option and select “define brush preset”. Type a name for the brush or you can also keep the default name.
Step 3: Using your logo brush
Finally, your custom brush is ready to apply for watermarking. Open an image in Photoshop and select the brush tool. You just have to choose the brush preset that you have created. Then, you can start using the logo brush, isn’t it an excellent process? I think so.
Final Thoughts
We have come to the end of the article. Hopefully, you have learned everything about how to make a watermark. You can create a watermark in Photoshop and do it with PowerPoint, Google Docs, and Word.
For those people who are busy with their tight schedules, it becomes difficult to manage time for editing photos. In that case, we can assist you with our retouching task.
If you have bulk images, we will offer you special discounts. Want to judge our quality? You can ask for a free trial now.
Thanks for being here.
FAQ’s – I’ve Got Some Questions
You can create a watermark in Photoshop using the “Bevel and Emboss” option from Layer Style.
To create a transparent watermark in Photoshop, you need to decrease the fill opacity of the watermark.
You can create a watermark for your photos by using a custom brush preset.
You can create watermarks by using Photoshop, PowerPoint, Google Docs, and Word.


