Whenever we want to highlight some points from a text, using a bullet point is one of the best methods to do that. In Microsoft Word, you can easily find the bullet point option.
But, what about adding bullet points in Photoshop? Sometimes, it becomes mandatory to highlight some points in Photoshop.
In Photoshop, there is no straightforward option to do bullet points. Then, how can we do that? You might be thinking about Outsourcing Photo Editing Service.
Don’t have to worry, I have found the solution for you.
Through this article, I am going to reveal how to do bullet points in Photoshop. Getting excited to know about the process? Permit me to start.
How to Do Bullet Points in Photoshop?
Step 1: Bullet points in Photoshop make a new document
Right at the beginning, you have to take a new document or open a picture where you want to add texts. To add a new document, go to the “File” option followed by “New”.
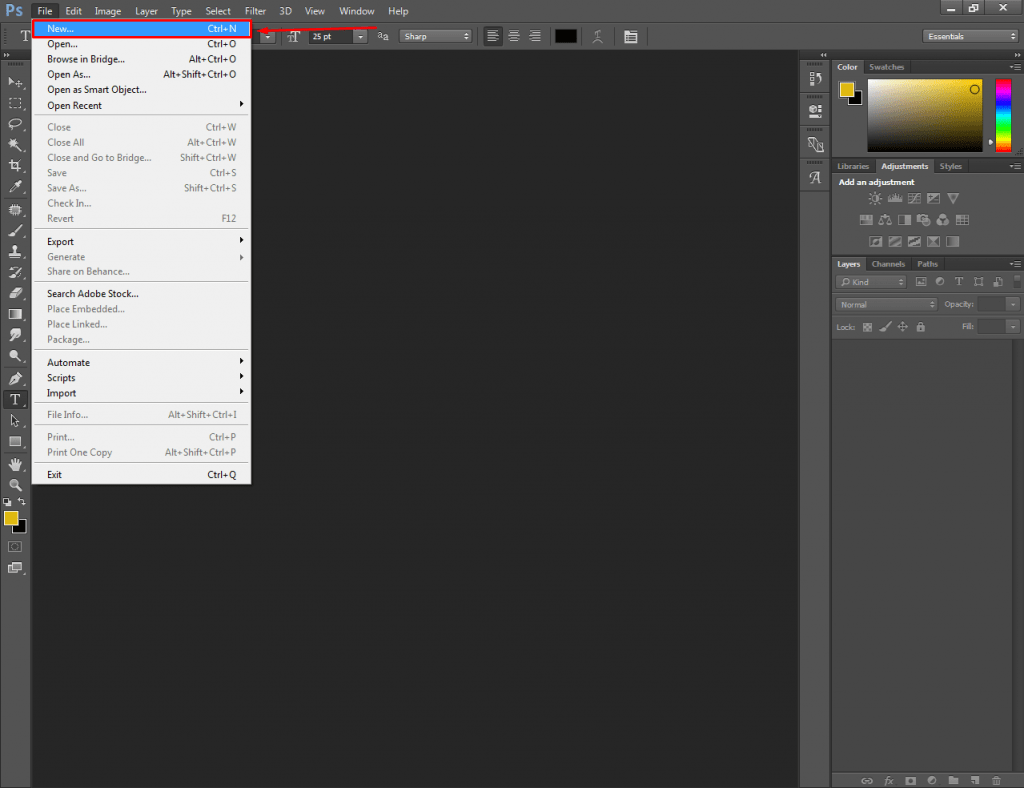
After that, you will be asked to set the size of that new document, choose your preferred size from the screen. Want to use the shortcut method? Okay, press “CTRL + N”.
Know More: Complete Amazon Product Photography (Must See)
Step 2: Bullet points in Photoshop: Enable text option
Secondly, you have to left-click on the “text” icon from the left side and enable the text editing option.
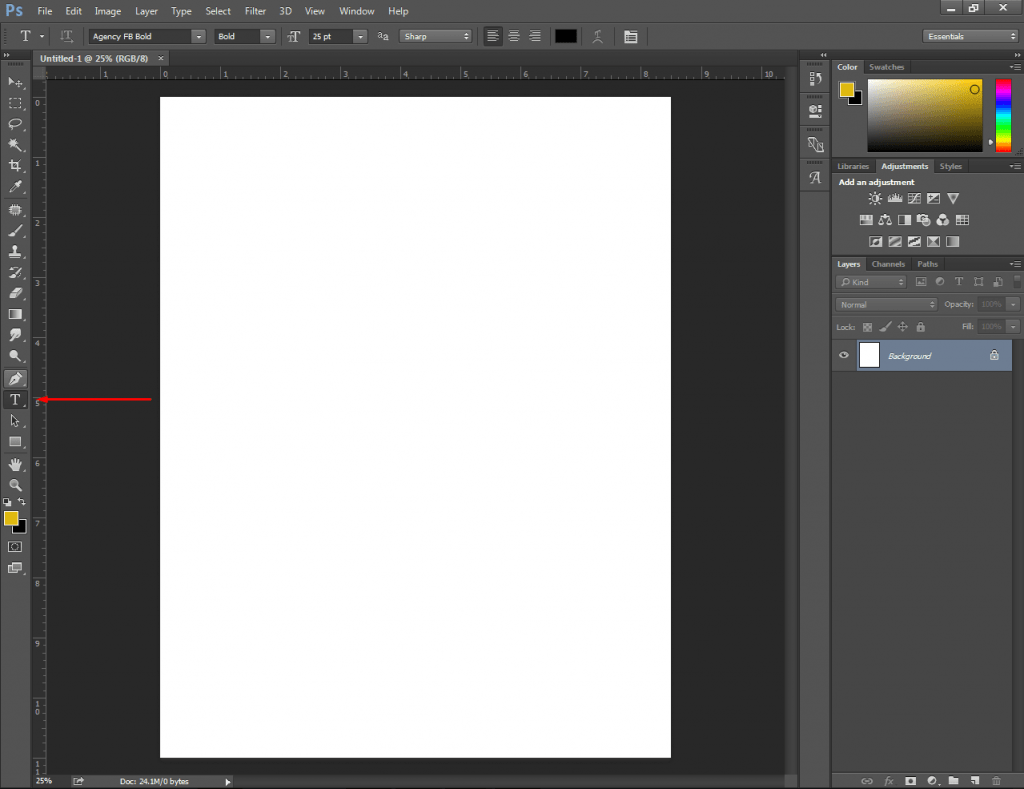
At this stage, we have to create a text box. For doing that, simply you need to press and hold the left mouse. Then, drag it down to create a box. Next to this step, write the texts that decide where you want to add bullet points in Photoshop.
Let me show you, I have to add four bullet points in those indicated areas.
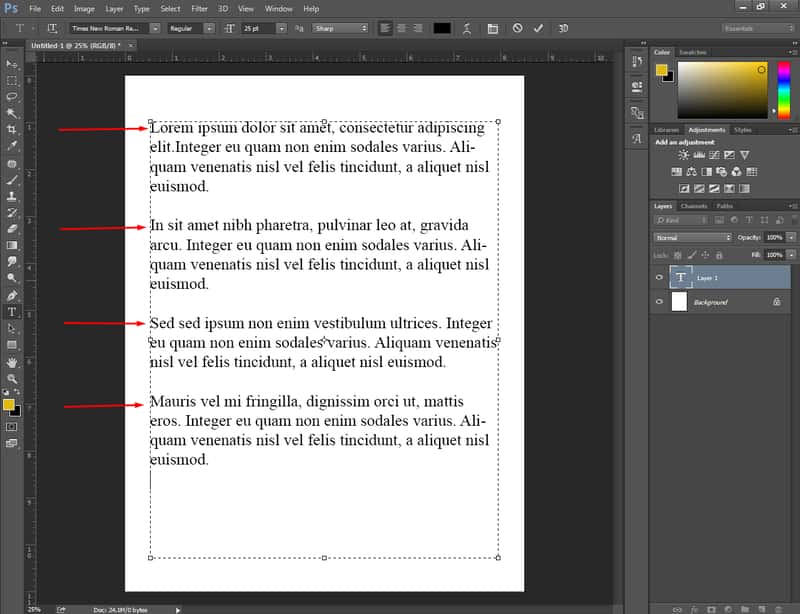
Have you also written your text? Alright, let’s move to the next step.
Step 3: Bullet points in Photoshop, Go to glyphs panel
As I have already mentioned in the intro, there is no straightforward option available in Photoshop to add bullet points. So, we have to add it manually. At this step, go to the “Type” option from the top.
Know More: How to Replace Color in Photoshop | How To Copy A Mask In Photoshop, only 2 minute
Right there, you will find the “Panel” option. Click on that option and hit on the “Glyphs Panel”.
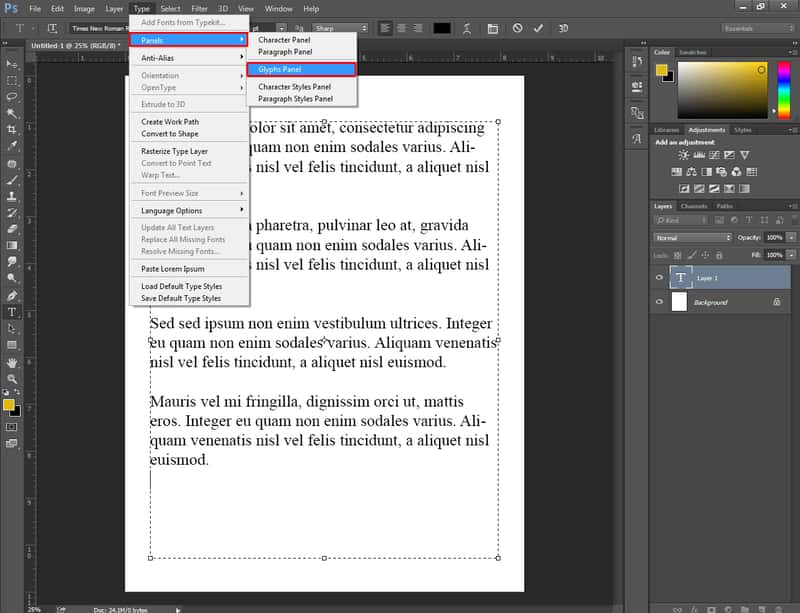
In the Glyphs panel, you will find lots of letters, numbers, and symbols. Go to the below side and you will find the bullet points.
Double click on it to do bullet points in Photoshop. After that, a bullet point will be added to your text.
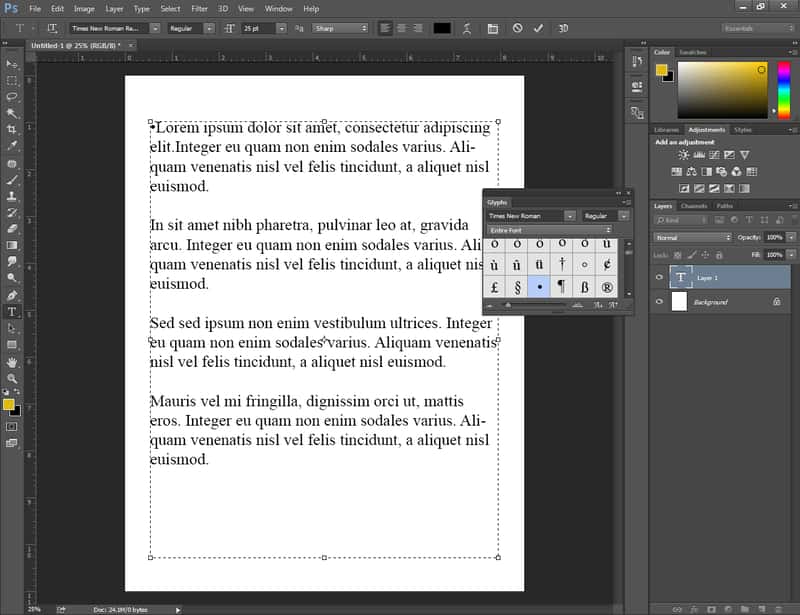
Still, it doesn’t look too catchy, isn’t it? Let’s align the text beautifully so that it looks professional and eye-catchy. Press on the spacebar and create a space after the bullet point.
Then, copy the bullet point along with space and paste it at the beginning of those lines where you want to put bullet points in Photoshop.
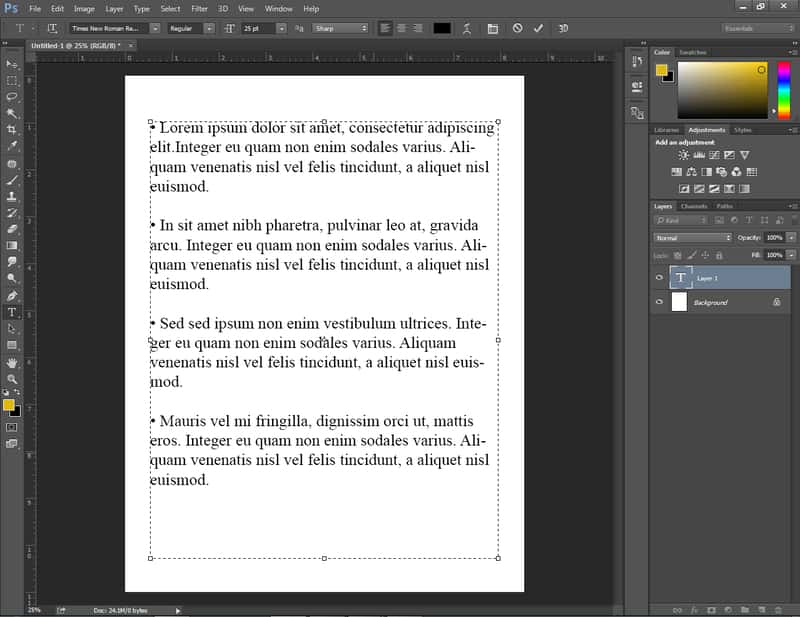
Step 4: Bullet points in Photoshop, align texts according to the bullet points
Want to bring a more vivid look into the text? Then, you ought to align texts according to the bullet points. Don’t worry about that. I am going to explain it easily.
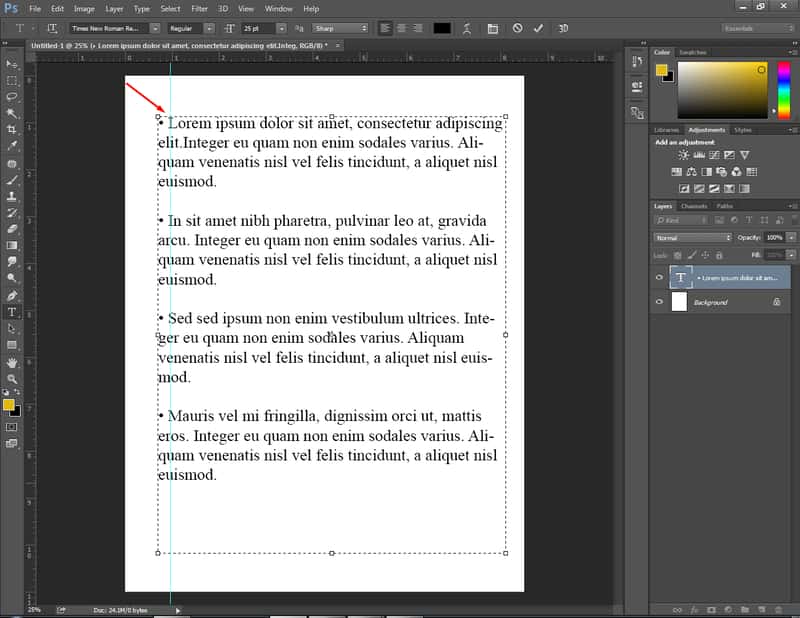
You need to select entire texts by pressing “CTRL + A”. Then, take a ruler from the right side and put it on the beginning of the lines just after the bullet points.
Have you found the ruler option? If you haven’t found it, then press “CTRL + R” to bring a ruler.
Step 5: How to bullet points in Photoshop: Open paragraph window
Now, it is time to make an alignment of the texts according to the bullet points. We have to bring a ruler so that we can do it precisely. Go to the “Windows” option from the top and choose “Paragraph” from the long list.
You will find there the “Indent Left Margin” and ‘’First Line Indent” options. Before we jump to those options, type the first letter of the 1st line at the beginning of the 2nd line.
It will make things much easier. Within a few minutes, you will understand why I am telling you to do that.
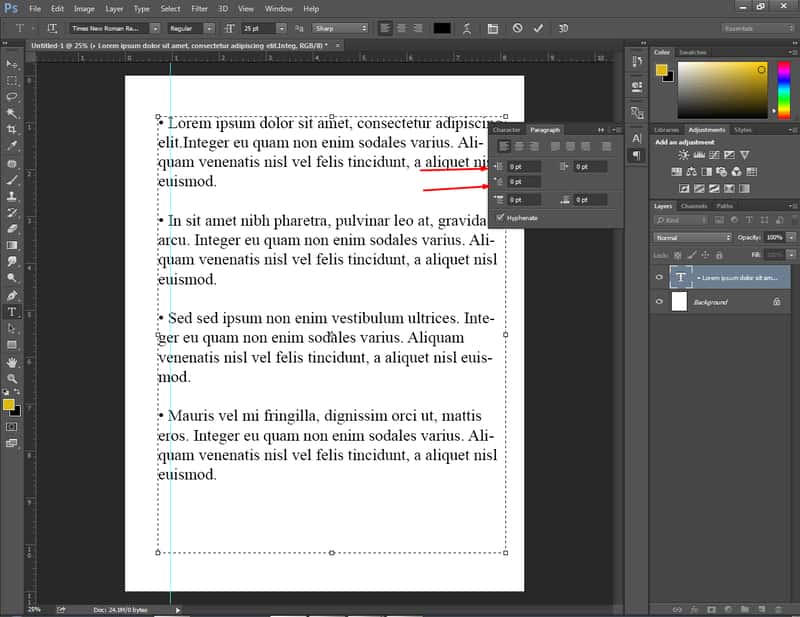
Later on, go to the “Indent Left Margin” and align those bullet points with the line. When you are okay with that step, place that negative value on the “First Line Indent” option. Suppose that you have got 20 pt values for the “Indent Left Margin”. So, you have to put -22 pt on the ‘’First Line Indent” box.
Step 6: How to bullet points in Photoshop, Set the value for entire texts
This is the final step of how to do bullet points in Photoshop. Once again, Select the entire texts and put the value that you have got from the previous step on the “Indent Left Margin” and “First Line Indent” boxes. That’s it. It will align the whole text beautifully.
You can also separate the bullet points by using the ‘Space after Paragraphs” option from the Paragraph panel.
Want to have a look at my texts? Here you go.
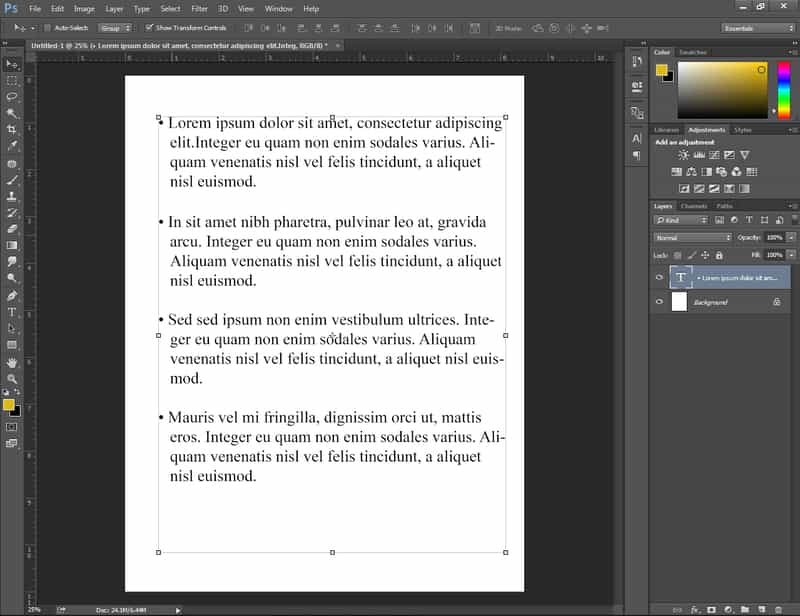
This is looking clean and catchy, isn’t it? So, we have done it. From now on, I hope you will be able to add a bullet point in Photoshop. Suppose you want to resize the texts now.
If you change the size of the text it will lose its alignments. Permit to inform you briefly how you can get rid of that problem.
How to Resize Texts in Photoshop without Losing Alignment?
I am going to share a cool trick with you that can help you to resize the text without compromising with the alignment. Simply press “CTRL + T” and it will enable the free transform option.
As a result, the shape of the text alignment won’t change when you resize the text. You can change the size of the text by pressing shift and dragging the text box.
Final Thought
That was all for today. We have come to the bottom of the article about how to do bullet points in Photoshop. Hopefully, you have learned the procedures and got the answers to all of your questions regarding this topic.
Want to get more exciting articles about Outsource Image Editing in Photoshop? Stay connected with us Clipping Way. We will make you please with more helpful articles about photo editing.
Thanks for being here.
FAQ’s- I have Got Some Questions
How can you make a bulleted point list in Photoshop?
To make a bulleted point list in Photoshop, you have to manually add bullet point symbols from the Glyphs panel.
How do i insert a symbol in Photoshop?
From the Glyphs panel, you can insert symbols in Photoshop.
Can i add a single bullet point in Photoshop?
Yes, you can add a single bullet point in Photoshop.
How do you change the bullet point style?
InGlyphsPanel, lots of symbols are available. From there you can change the bullet point style.
How can i change the color of the bullet points in Photoshop?
By changing the text color, you can change the bullet point’s color in Photoshop.
