While seeing an image, what’s the first thing you notice? The common answer will be color balanced and grading. Without proper color, a picture never looks perfect. More than often, photographers become unhappy with the default color adjustment of a Raw image.
How to get rid of this problem? Color correction technique can be the solution at this point. Using Photoshop, you can adjust the color changing of an image.
Are you enthusiastic to know about Color Correction Photoshop? Within a few minutes, you will learn about Image color correction and tone.
I am going to share a step-by-step tutorial on how to make color corrections in Photoshop. Before we jump on the tutorial, you should have a basic idea about image color and tone adjustment. Let me give you a quick overview of that.
Image Color and Tone Adjustment- A Quick Overview
In order to bring a perfect look to a photo, we should adjust the image color and tone. Most of us don’t know how to make color corrections in Photoshop properly. This quick overview will help to perform it better. Adobe Photoshop offers two options to color correct an image.
The first method is to adjust the layer. Editing in Adobe Camera Raw is the 2nd method to adjust image color. So, which one is the better option? Both of these two methods give the photo editor control over color adjustment.
Know More: How To Change The Color Of A Shirt In Photoshop
These two image color correction methods are non-destructive. It means you can undo the steps while color correcting an image in Photoshop.
In the first method, photo editors create several layers for color correction. Layer Mask, Brush, Healing Brush, and Clone Stamp tools are used in this procedure.
Also, you can use the Curves, Levels, Selective Colors, Hue, and Saturation tool for color adjustment in Photoshop. You’ll know more about that in the tutorial section.
The 2nd method of image color and tone adjustment is following the Adobe Camera Raw technique. This is a special Photoshop plug-in used for color correction.
Are you getting confused seeing the name “Raw”? Well, you can use this plug-in to edit JPEG and PNG files too along with the raw formats.
It has an exciting feature named Preset. After editing an image, you can save the changes for applying to other images. That sounds cool, doesn’t it? Have you got a quick overview of Image color Correction and Tone? I think so.
Now, you are ready to make a jump on the Photoshop color correction tutorial.
Step by Step Tutorial of Color Correction Photoshop
Step 1: Customize The Levels
First of all, we’ve to start with customizing the Levels. From here, you can find the level option.
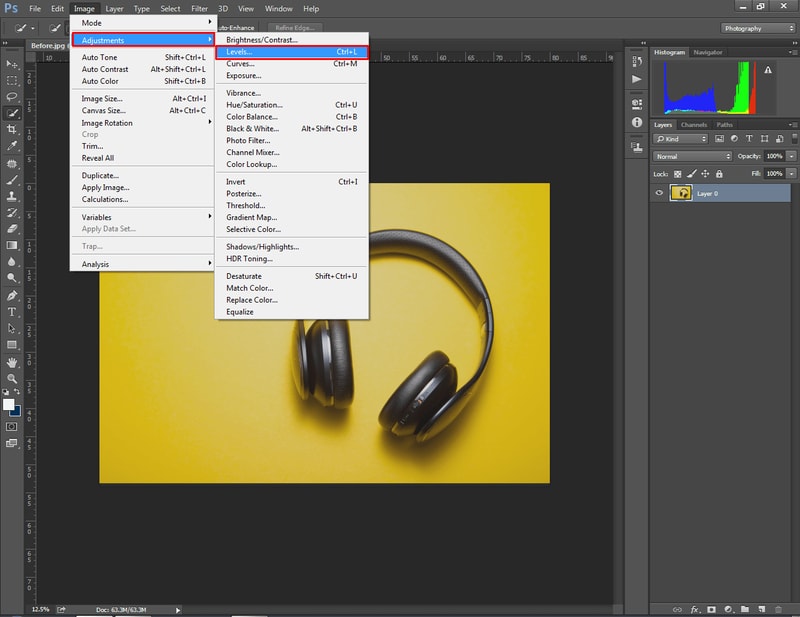
After bringing that option, you have to double click on the dropper icon. There will be three eyedropper options. You’ve to select the first one from the right side.
After doing that, you’ll get the color picker option on your screen. You need to find out the RGB option from the pop-up box. Select the value 245 for those three colors.
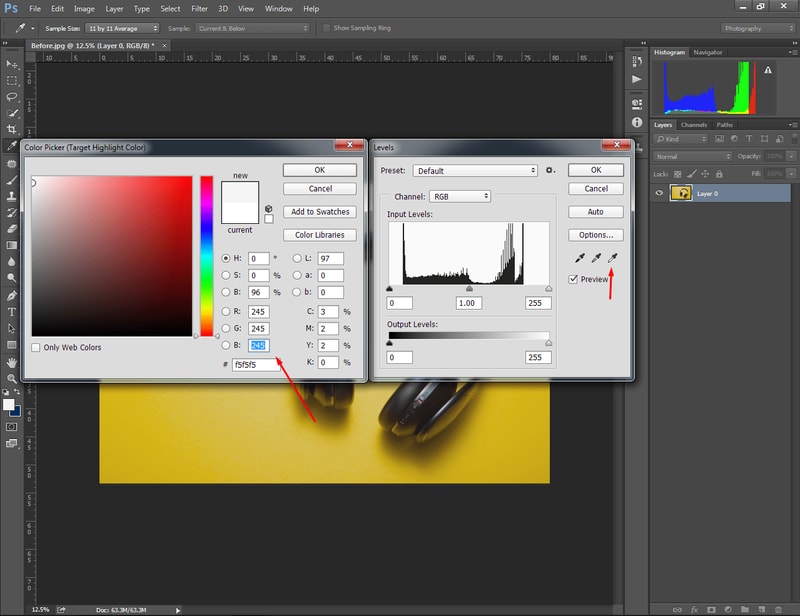
Want to know why we have to set the value 245? Well, It’ll make the color correction procedure easier for the light colors of an image. An image has different types of colors.
Making color correction for the light area becomes a bit difficult. This small trick will make it easier for us. Press Ok after doing that. Next to this, you have to customize the left side eye dropper.
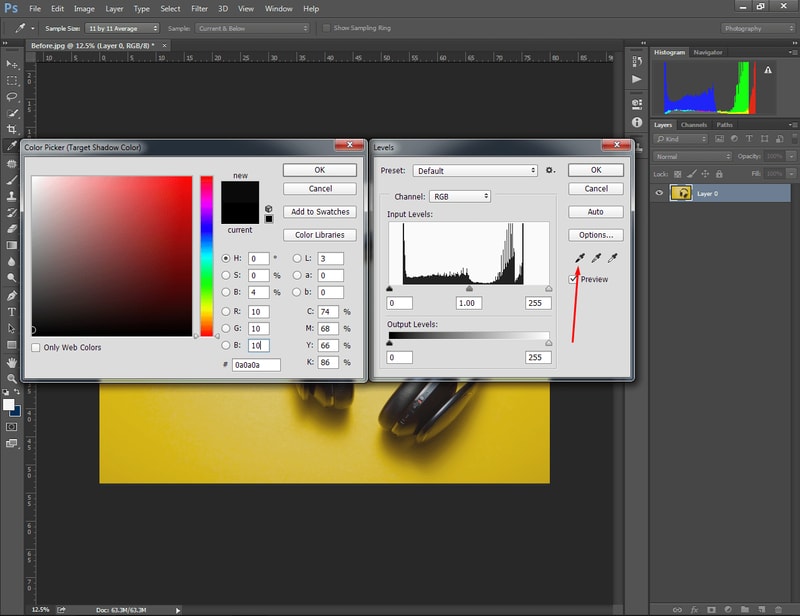
The color picker will appear on your screen. But, this time you have to provide a different value. Set the image value 10 for the Red, Green, and Blue. Can you guess for which portion we are setting this value?
Well, this is for the color coloration of the dark portion of an image. After that, you need to press Enter. You will get a confirmation message. Simply, you have to click on the “yes” option. This is the end of the first step. Let’s move on to the next step.
Step 2: Add A “Threshold” Adjustment Layer
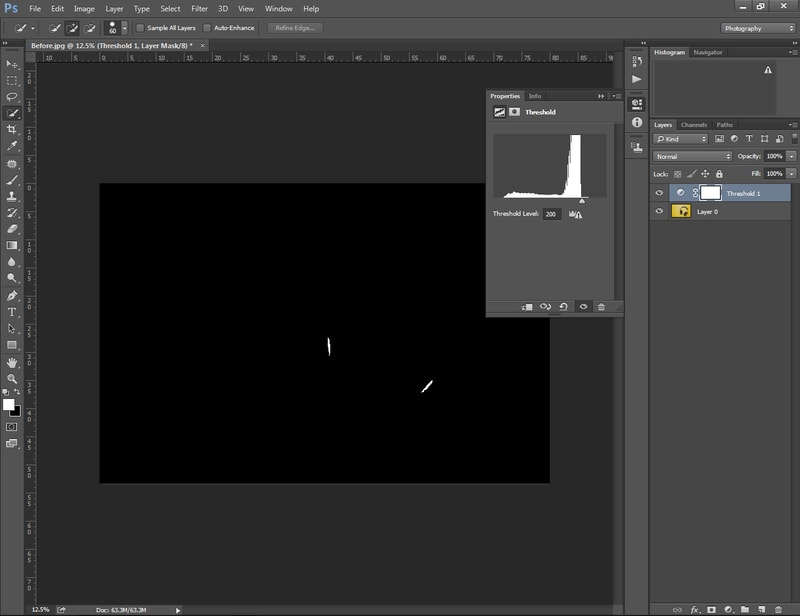
Most photographers find it difficult to adjust the color of the lightest areas. This step is going to assist you in correcting light colors. To do that click on the Adjustment Layer and select “Threshold” options. It’ll bring a new pop-up box. Using the slider, we are going to find the lightest areas of an image.
You need to take the slider right and convert the image to totally black. After that, slowly move the slider to the left side. It will make the light colors visible as white. Here you can see the sample.
Step 3: Place A Target Marker Within White Areas
In the 3rd step, we have to pick a sample color to make the further adjustment. You can move your mouse and position it within white areas. You will find the cursor converted as an eyedropper icon. Hold the “SHIFT” and click within the white area to take a color sample.
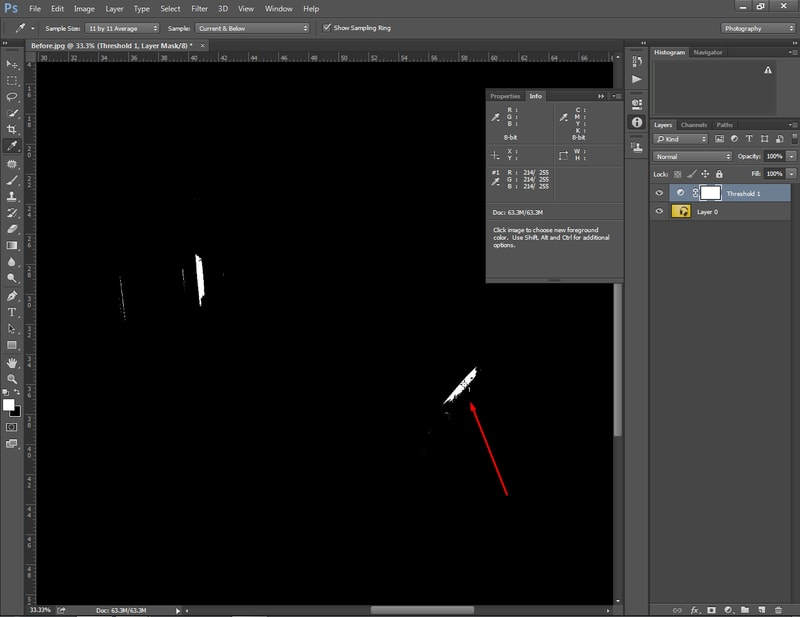
Based on that color sample, we can perform image color correction and tone of the lightest areas.
Step 4: Find the darkest part of the image using threshold adjustment layer
Now, we have to indicate to Photoshop the darkest part of your image. This time, move the threshold slider to the left side. When the entire image is converted to white, you need to take the slider to the right side.
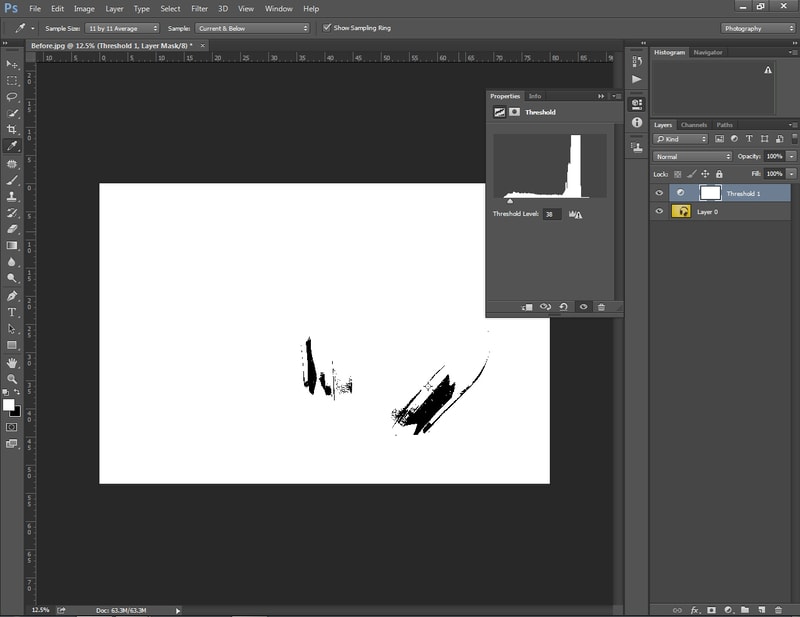
Have you got some black areas? Those are the darkest parts of your images.
Step 5: Place a target marker within black areas
Perhaps, you’ve already assumed what we are going to do at this step. You have to press and hold the “SHIFT”. After that, click within the black areas to place a target marker.
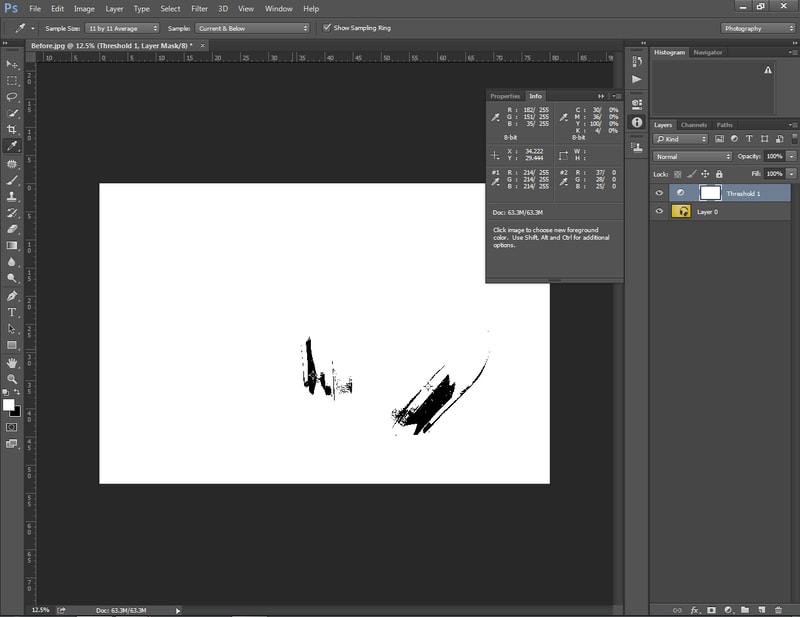
Now, we are going to erase the “Threshold Adjustment Layer”.
Step 6: Delete threshold adjustment layer
We created the “Threshold Adjustment Layer” to detect the darkest and lightest areas of our image. In the previous step, you have got the lightest and darkest areas.
Therefore, you don’t have to keep this layer anymore. Click on the “Cancel” from the top to delete the threshold adjustment layer.
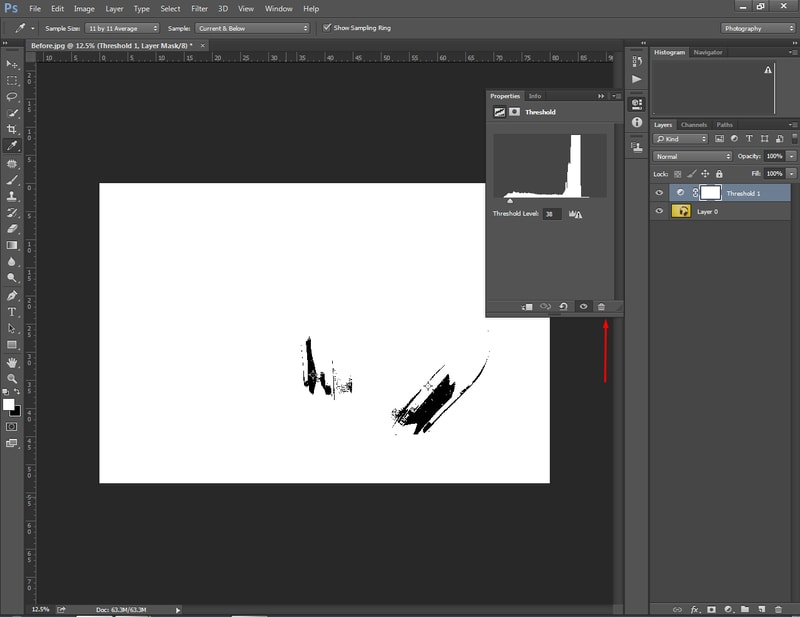
Have the target markers disappeared? No need to worry about that. You’re going to bring them back in the upcoming steps.
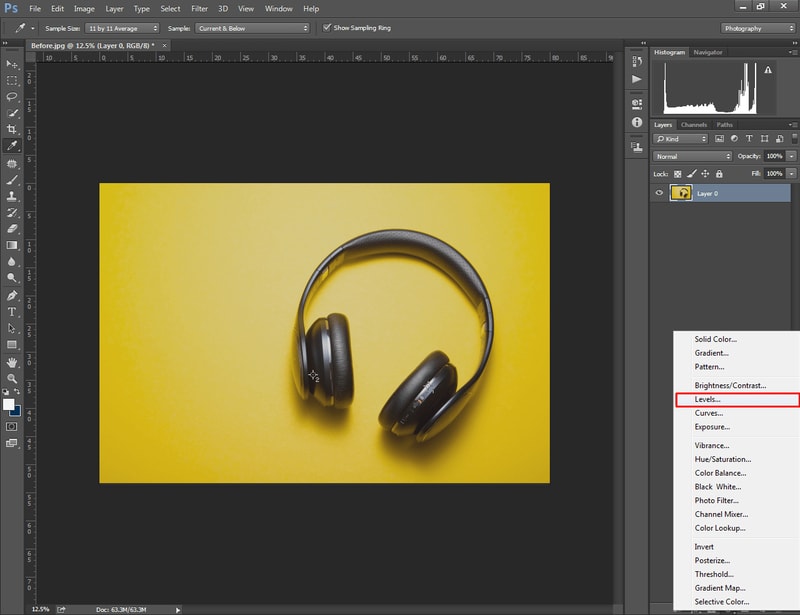
Step 7: Create a new adjustment layer for levels
Now, you have to create a new adjustment layer for levels. Therefore, select “Levels” from the layer adjustment options.
Now, you’ll find your target markers on the image. Let’s have a look here.
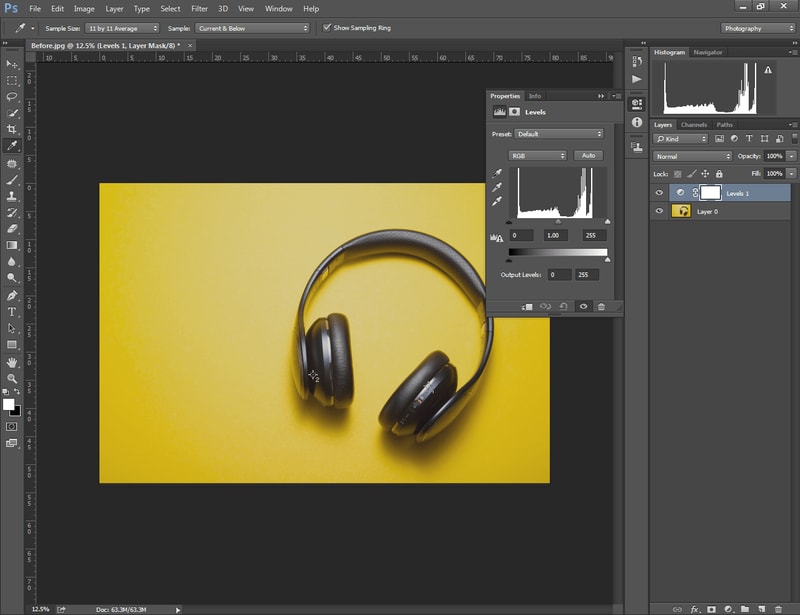
Step 8: Adjust the white point eyedropper
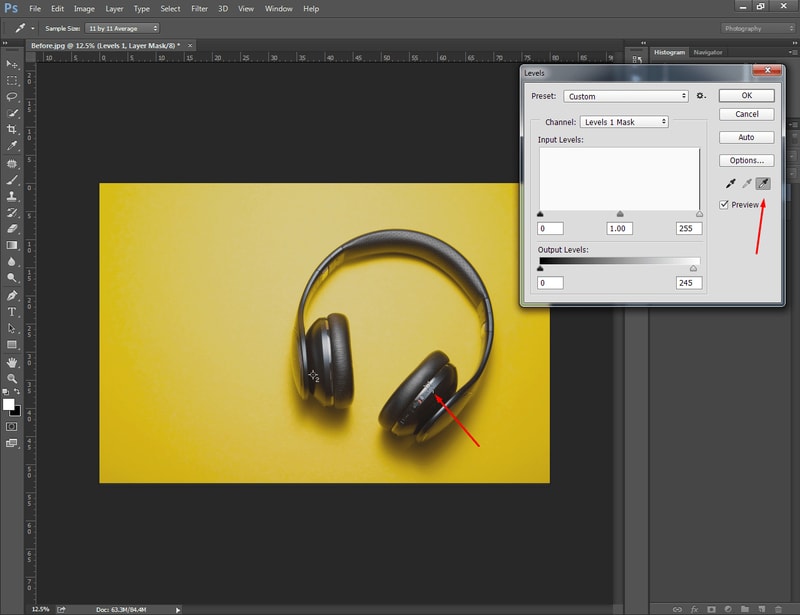
We’re going to start with the White Point Eyedropper adjustment. Select that eyedropper from the right side of the Levels options. Now, you have to click on the 1st target marker.
It’ll fix the color tone of the lightest areas of your image. Want to have a look at the sample image? Well, here you can see.
Step 9: Adjust the black point eyedropper
Now, we need to adjust the black point-eyedropper. The procedure is similar to the previous step. You should select the black point-eyedropper from the left side and click on the 2nd target marker.
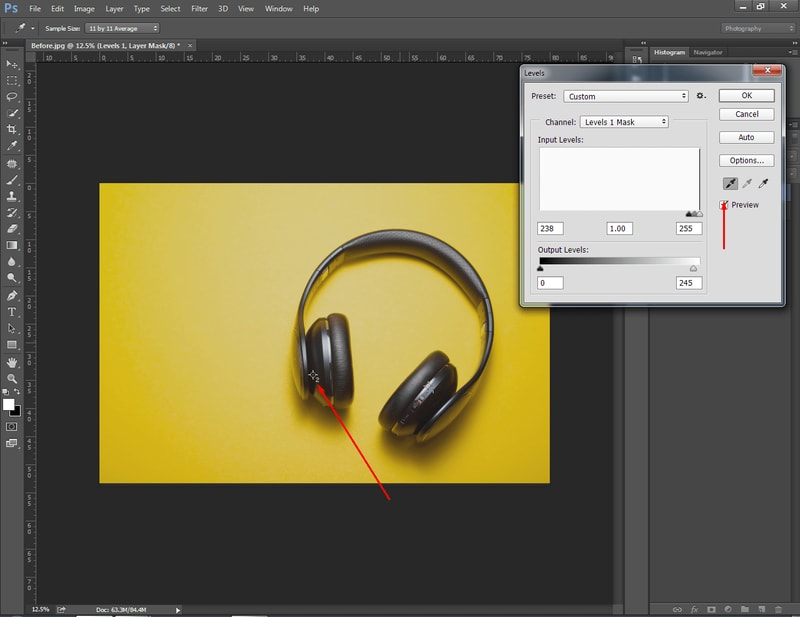
That will adjust the color tone of the darkest areas in your image.
Step 10: Make the midtones brighten
Have you got your image in a dark look? You can brighten the image to get your expected look. Bring the levels on and increase the Midtone. Here is the direction.
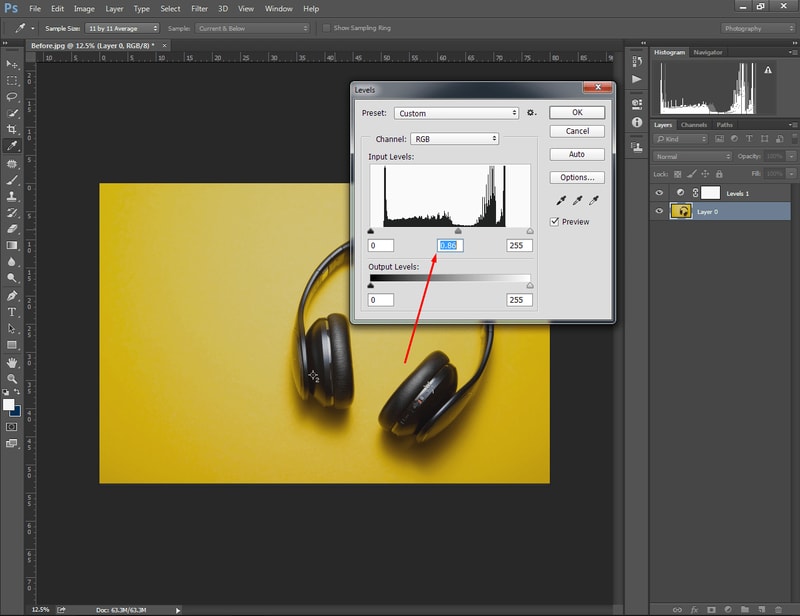
In that case, you may get confused about how much to brighter the image. I have got a great solution for you. You can turn off the Curves adjustment layer to inspect the previous look of your image. It’ll give you a better idea about how much to brighten the image.
Step 11: Remove the target markers
At this stage, you’ve made Color Grading adjustments and Image color correction of your image. So, you don’t need to keep the target markers anymore. To remove the target markers, you have to enable the ‘Color Sampler Tool”. Where to get that option? Let’s see.

After choosing that option, you will get “Sample Size” at the top menu. Click on the clear from the right side and the target markers will be removed. Here is the final look of our image.

Now, you can save the image according to your preferred format.
Conclusion
That was the step-by-step guideline of color correction photoshop. Hopefully, it will be essential for Professional Photographers, Freelance Photographers, and Online Sellers.
Do you have a lot of images to edit? You can try our Color Correction Service. It will be a pleasure for us to assist you.
Contact us anytime to get solutions for product color variants. Stay with Clipping Way to get more valuable articles. Wish you all the best.
FAQ’s
What are some advanced color correction techniques for Photoshop?
Creating adjustment layers for different color tones and editing in Camera Raw are some advanced color correction techniques for Photoshop.
How to get better at color correcting my photographs?
Open your picture in Photoshop. Then, apply image color grading and tone adjustment techniques.
Which software is best for image color correction?
Professionals prefer to use Adobe Photoshop and Lightroom for image color correction.


