Adobe Photoshop CC is a popular photo editing application that has the capability to fulfill any type of photo editing requirement. It’s like an all-in-one application that’s required for perfect image post-processing. It comes with 20 different tools to edit photos conveniently.
Through this article, we are going to explain all Adobe Photoshop CC’s tools to master photo editing techniques in Photoshop. After reading this article, you will learn the usage procedure of all Photoshop tools from the toolbar. It will assist you in editing photos professionally.
Table of Contents
What is Adobe Photoshop cc?
Adobe Photoshop is the most popular raster graphics editing software in the world. This application is a part of Adobe’s Creative Cloud Plan.
Adobe Inc. is the official publisher and software developer of Photoshop CC. This Photo Editing Software is available for both Windows and macOS. You can access this application from any device.
This application is used for Ecommerce Image Editing and other Professional Photo Editing Services. Also, the mobile version of this application is also available for Android and IOS.
How to use All Adobe Photoshop Tools?
In total, 20 different types of major tools are available in Photoshop to perform any type of image editing task. In this section, we are going to cover all those tools so that you can utilize any Photoshop tools according to your photo editing requirements.
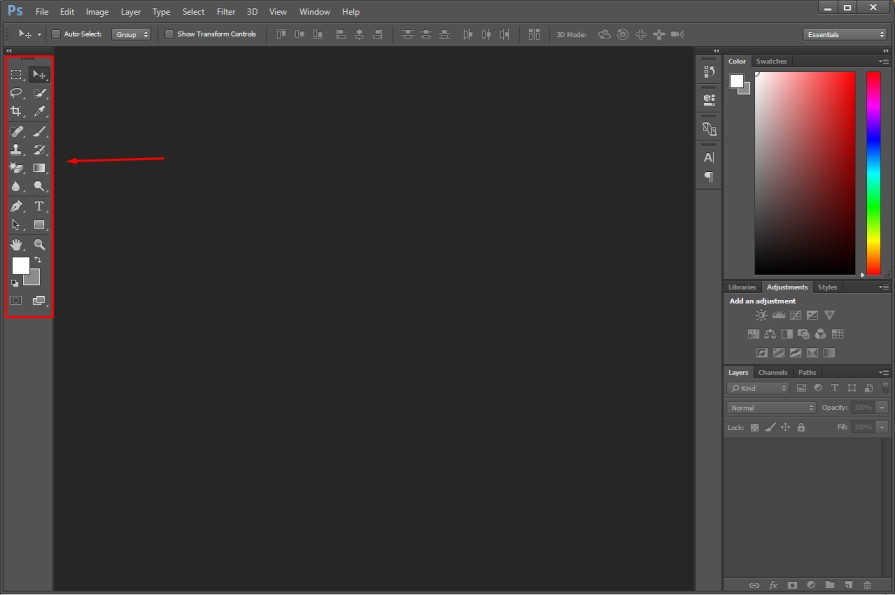
We can promise you that this is the only comprehensive Photoshop tools usage guidelines that will make you a Pro in Photo Editing. We are going to discuss all available tools from the toolbar. Let’s begin with the marquee tool.
Rectangular Marquee Tool
You can get the Marquee too from the top of the toolbar.
Here’s the tool.
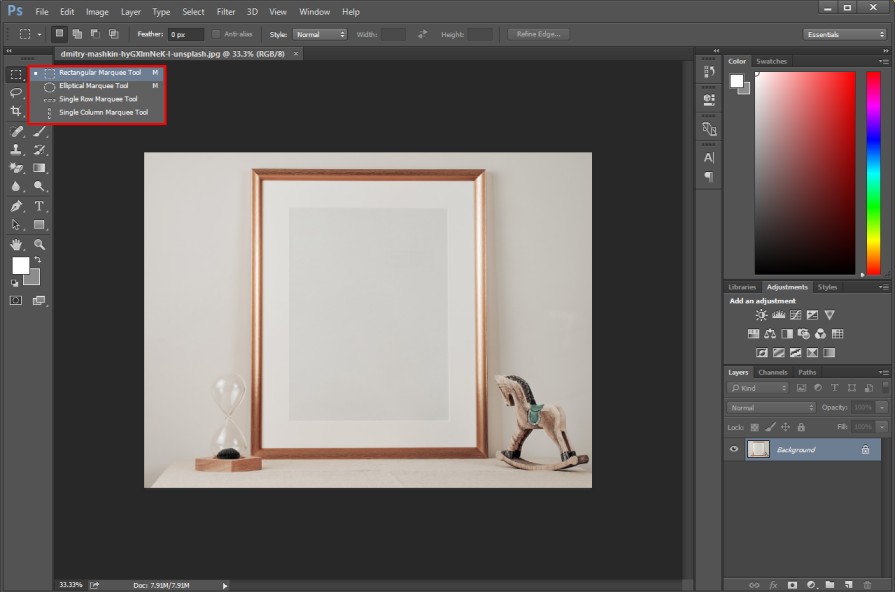
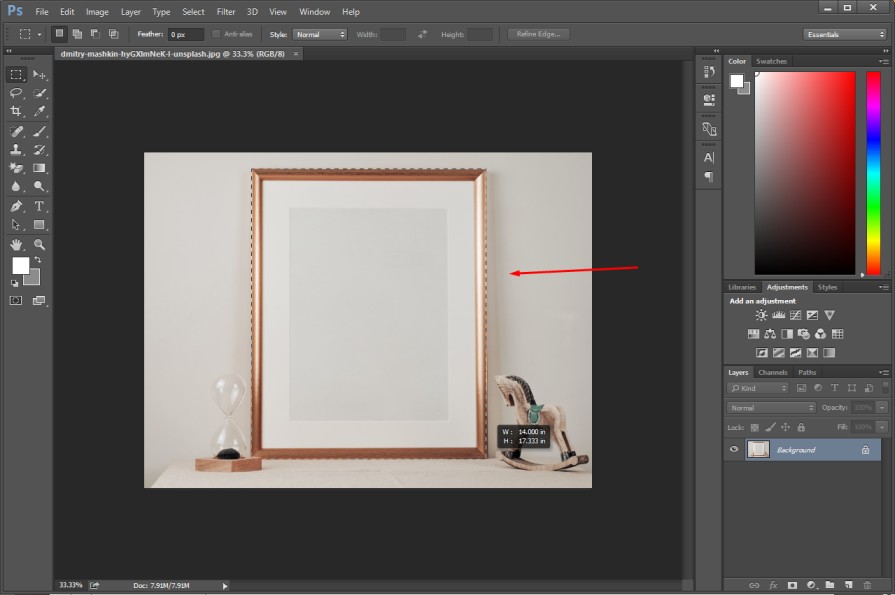
You can create a rectangular selection with the assistance of this tool. You just need to drag the mouse over the object and it will create a rectangular shape.
Here you can see that.
Elliptical Marquee Tool
The Elliptical Marquee Tool is available right at the bottom of the Rectangular Marquee Tool.
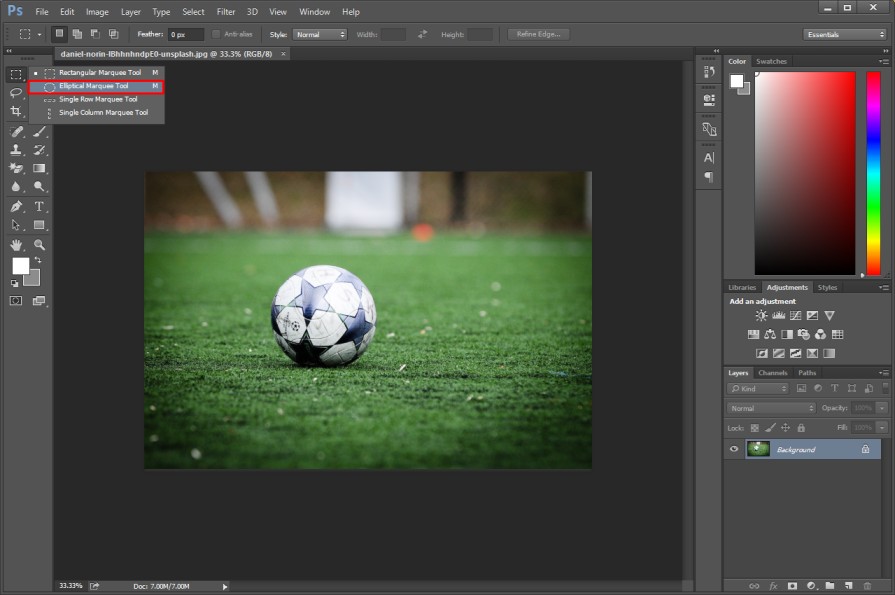
Using that option, you can select an ellipse and a rounded shape object. You just need to drag the mouse over your rounded shape object while pressing the shift key.
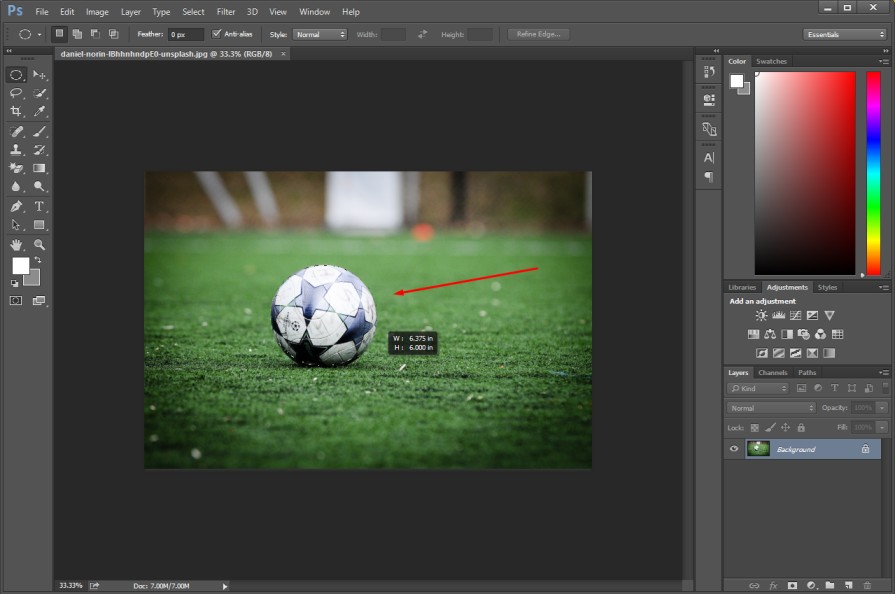
To move the selection, you need to hold the Spacebar. When you are okay with the selection, you can release the spacebar to fix the selection.

“M” is the shortcut key to enable the Marquee tool. To select an object with a specific shape, this tool is the suitable option to go for.
Single Row And Single Column Marquee Tool
Using the Single Row Marquee Tool, you can create a single row line on your image.
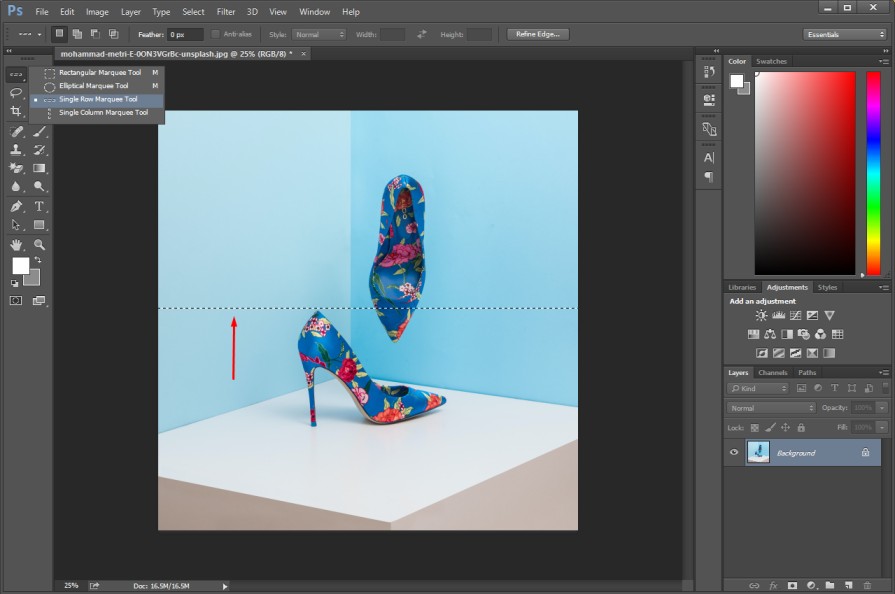
On the other side, the Single Column Marquee Tool is used for creating straight columns in the Photo. Usage of those two tools is not that common compared to previous tools.
However, you have learned to make selections based on the object’s shape. But how can you move the selection?
Here’s the move tool.
Related Articles: How to Add Drop Shadow in Photoshop? | How To Make A Reflection In Photoshop
Move Tool
Using that tool, you can move any selection or move the entire image within its frame.
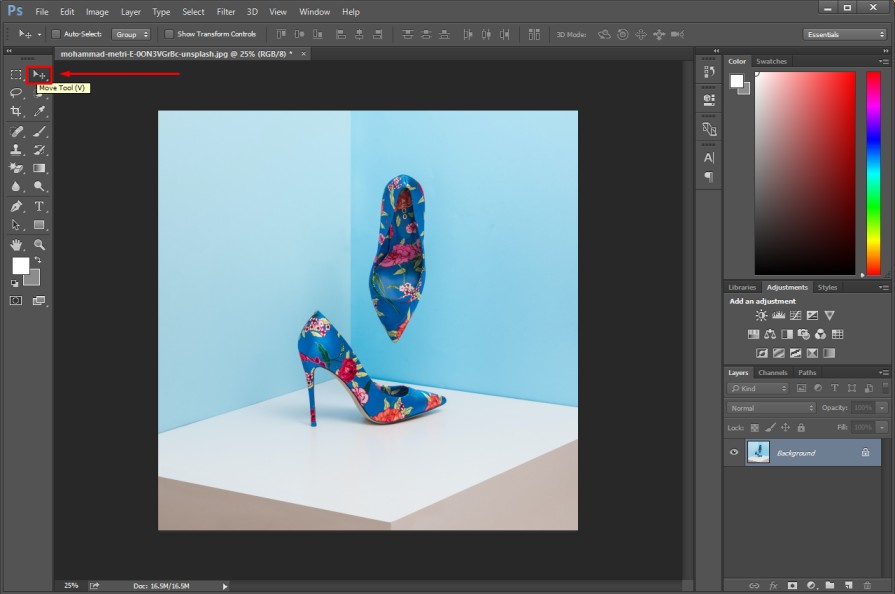
Let me clarify that with an example. Here we have made a selection using the marquee tool.
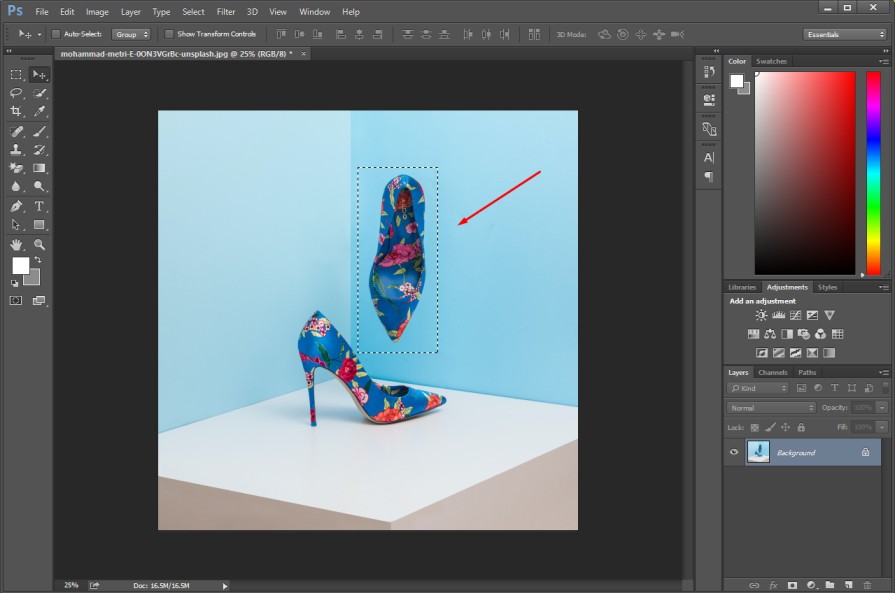
When you enable the move tool and move the portion using the left mouse key, it will move the selected portion.
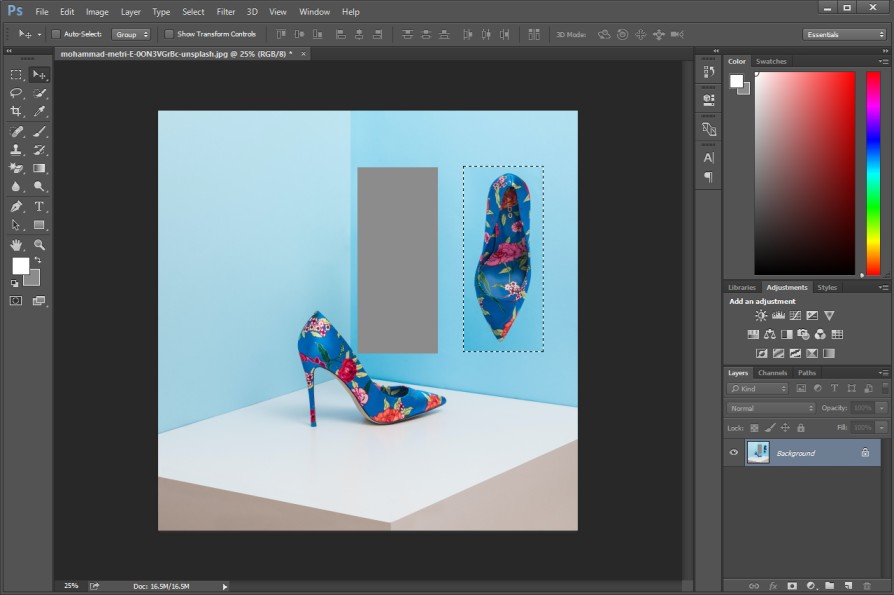
“V” is the shortcut key to enable the move tool. Now, we are going to move to a selection tool that is not limited to any specific shape.
Lasso Tool
Would you like to select an object freely? You can use the lasso tool for that.

Three types of lasso tools are available within the lasso tool. Using the first option, you can select an object freely.
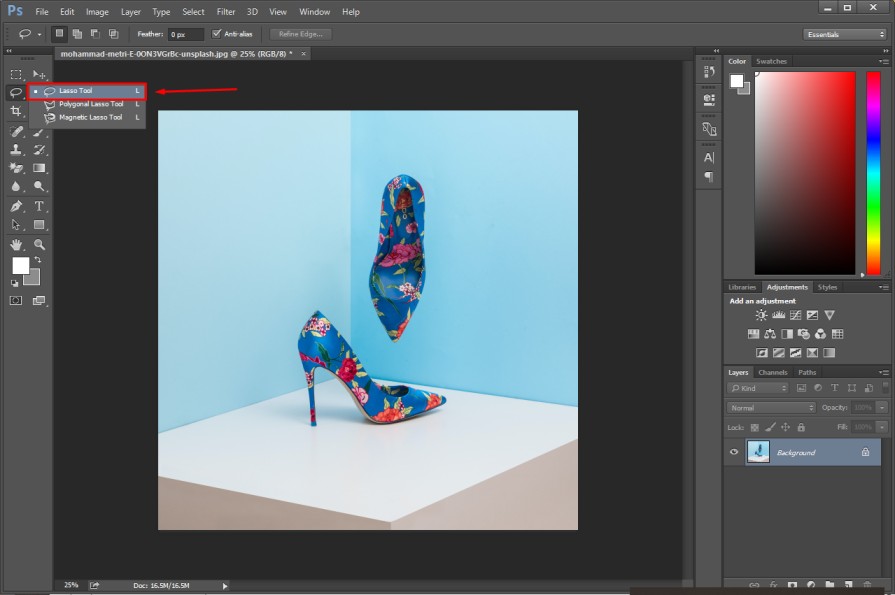
You just need to click on the mouse left key and drag it over the area that you want to select.
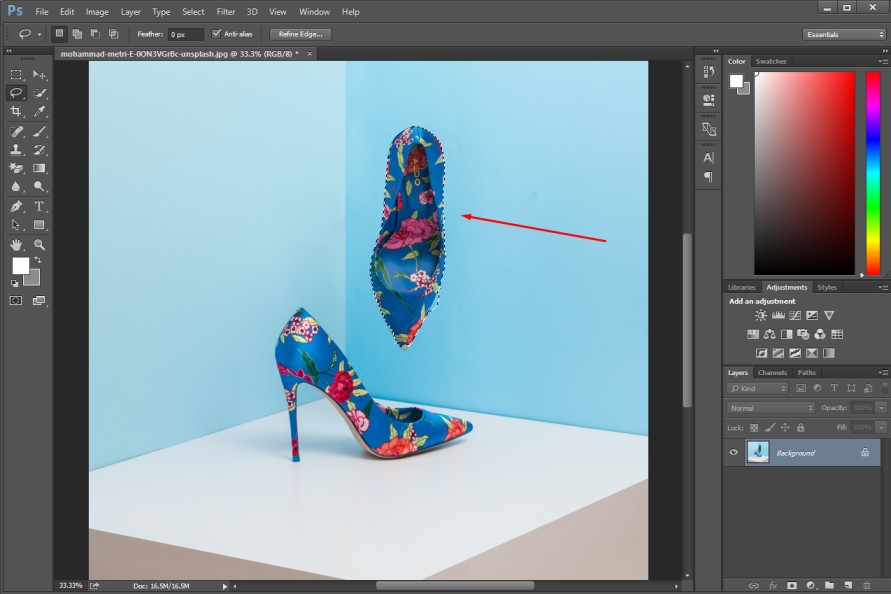
Polygonal Lasso Tool
If you want to select objects with polygonal shapes, this polygonal lasso tool will be a suitable option for you. You can use the tool for this type of selection.
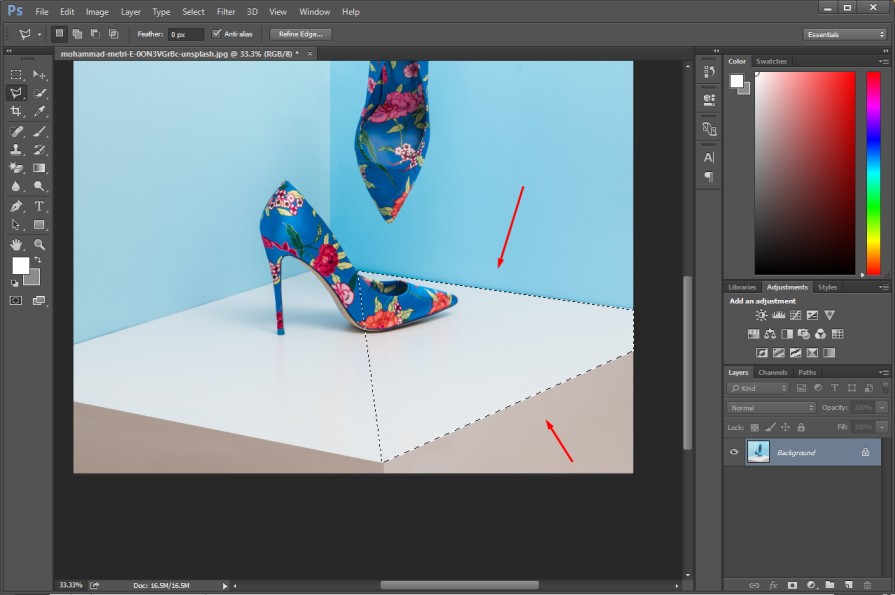
The next option is a magnetic lasso tool.
Magnetic Lasso Tool
This tool is like the automated version of the lasso tool. To use the tool, you just need to move the mouse near the object

It will create an outline around the object with anchor points. This tool is preferable when you are working with a simple object. “L” is the shortcut key to enable the lasso tool.
Quick Selection Tool
This is a comprehensive selection tool that is capable of making selections for any type of object. You can get the tool from this section.
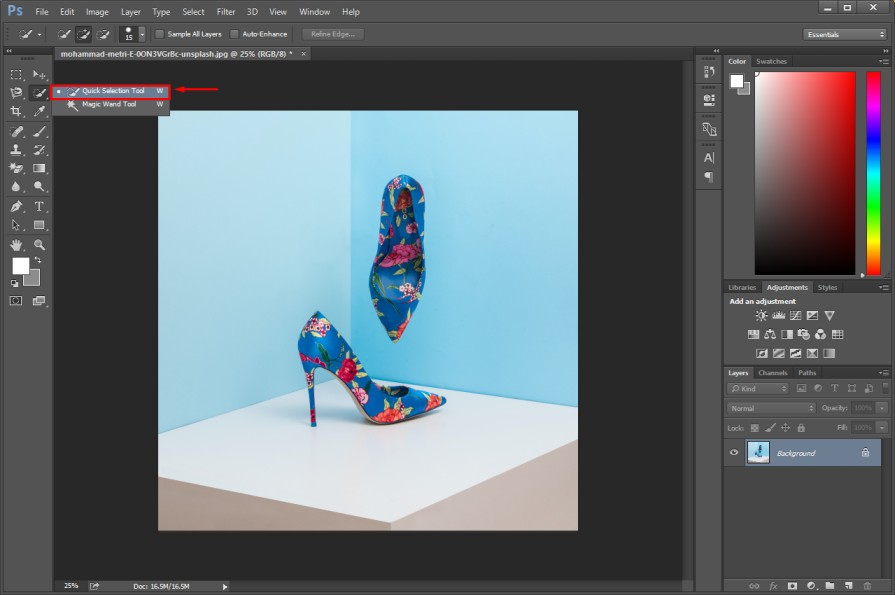
You need to zoom in on the image and hold the left mouse key while moving the mouse. It will make the selection based on the pixels.
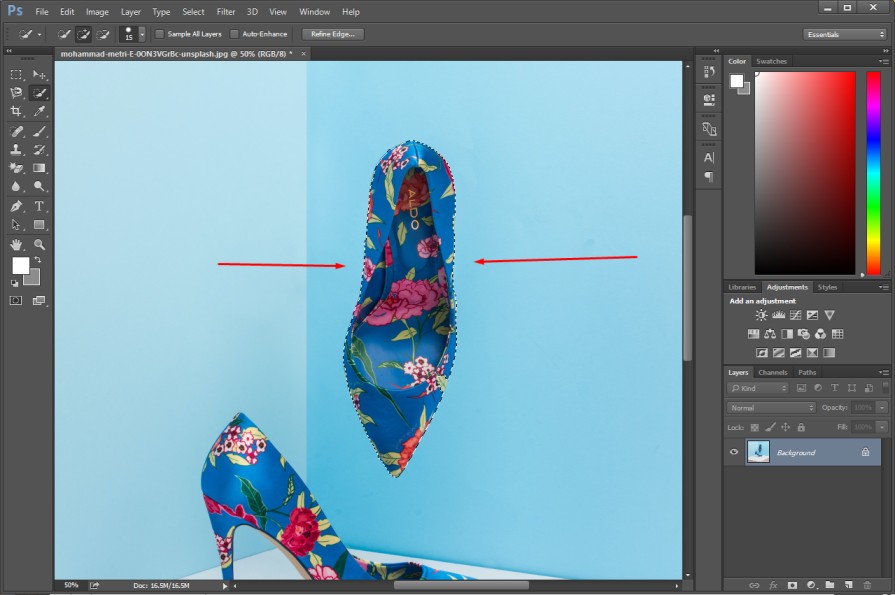
“W’’ is the shortcut key to enable the Quick Selection Tool. Another selection tool is available within this tool. Permit me to introduce you to that tool.
Magic Wand Tool
Would you like to make a one-click selection in Photoshop? The Magic Wand Tool is a fully automated selection tool.
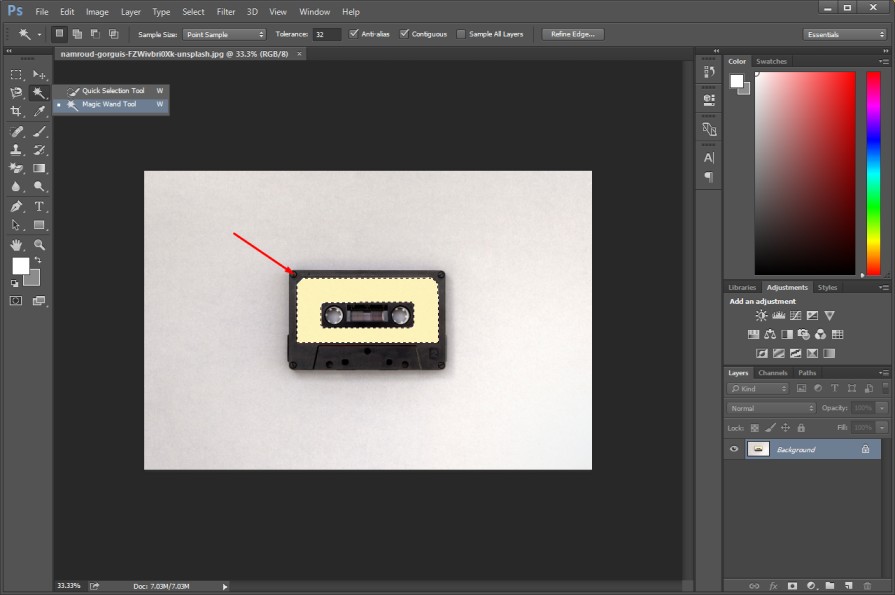
As the tool makes automated selection, it can’t provide accurate results for complex object selection. You should use the tool only when you are going to select something with a solid color.
Crop Tool
As the name suggests, the crop tool is used for cropping images. You can resize images by using this tool.
Here’s the crop tool.
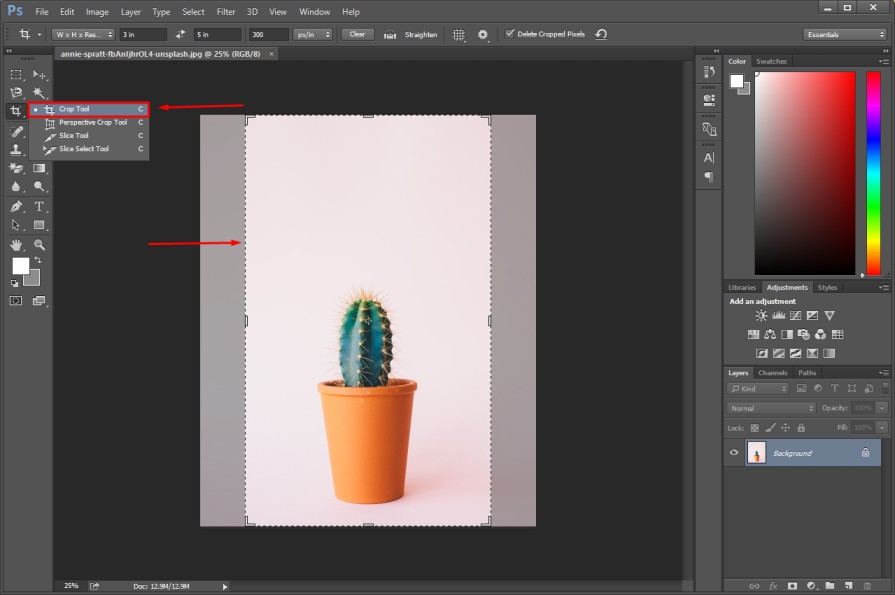
You can eliminate unnecessary portions from the background with this tool. You can reduce the height and width of an image. “C” is the shortcut key to enable the crop tool in Adobe Photoshop cc.
Perspective Crop Tool
This is another version of the cropping tool. Along with the cropping, it allows you to change the perspective of an image.
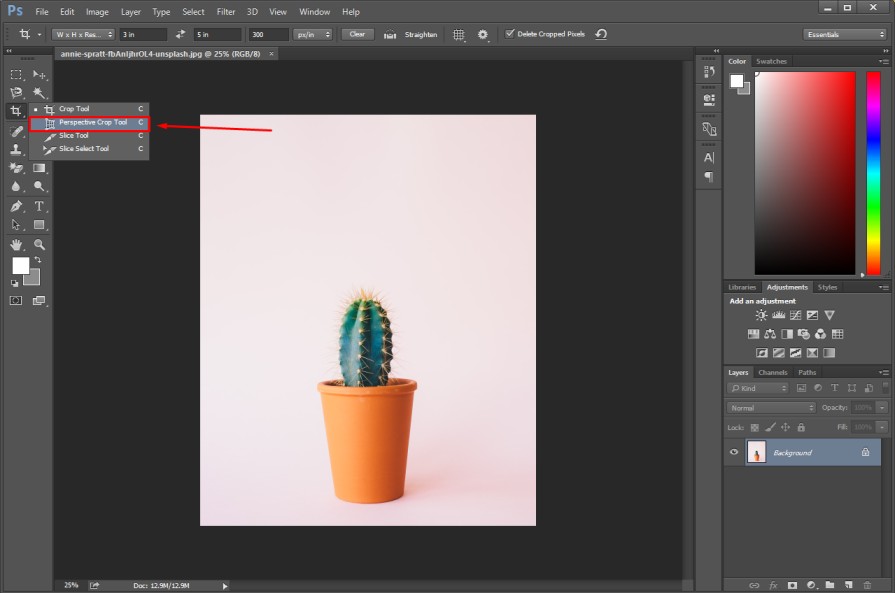
If you have captured an image from a bend angle, you can fix the perspective of the image. You need to adjust the height and width of the perspective view.
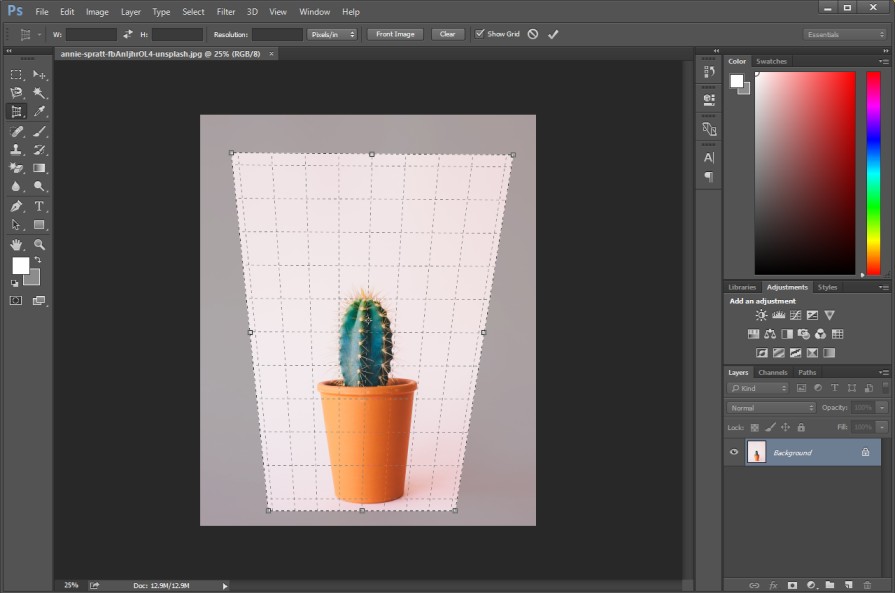
This tool is applicable to fix the position of an object captured from the bent direction.
Slice Tool And Slice Select Tool
Those two tools are available within the crop tool. You can find them from here.
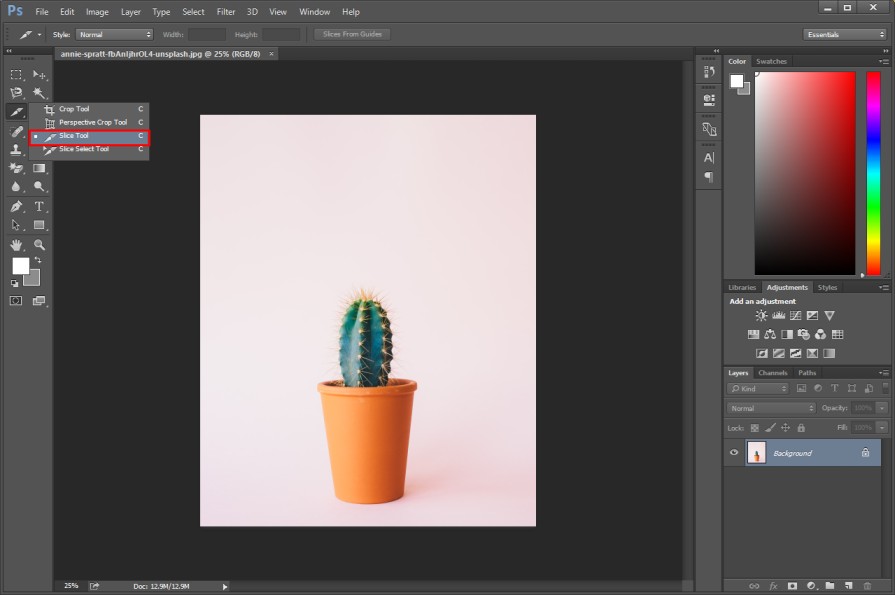
Those tools are helpful for graphic designers. If you want to slice your images into pieces, you can do that using the slice tool in Adobe Photoshop CC.
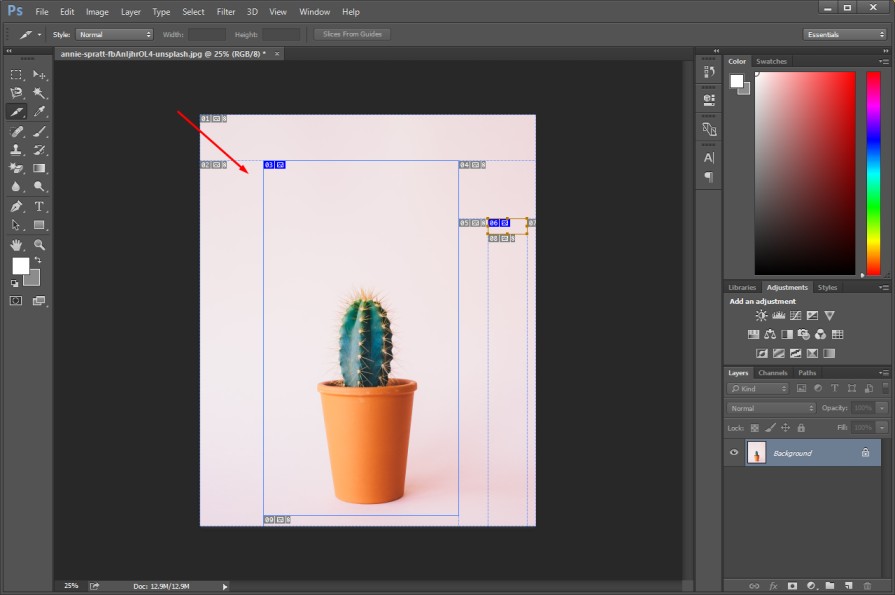
Using the Slice Select Tool, you can select those slices created with the slice tool. If you are not involved with graphics designing artwork, you may not have the necessity to use that slice tool. However, the next tool is essential for all sorts of Photo Editors.
Eyedropper Tool
You can access the Eyedropper tool from here.
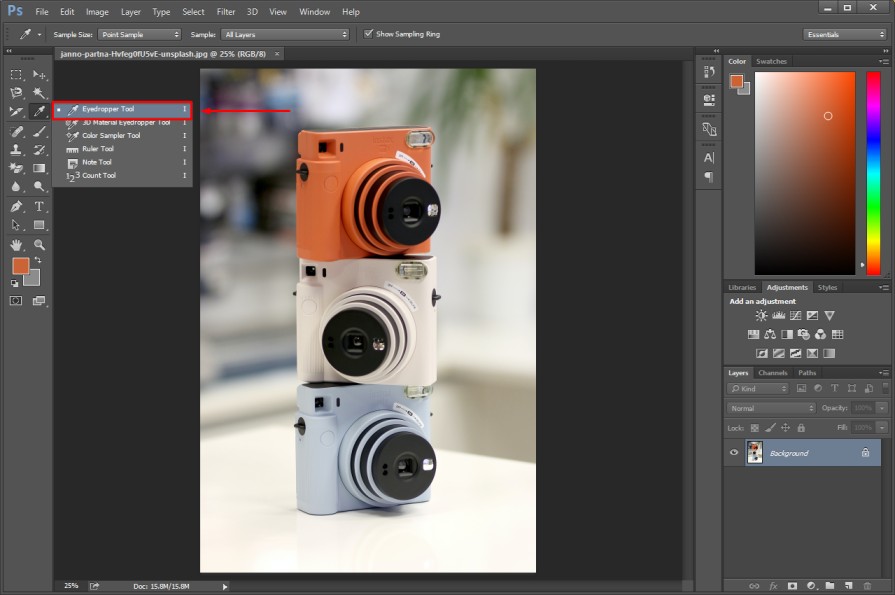
This tool is useful for picking specific colors from an image. If you want to pick a color based on a sample color, you won’t be able to pick the exact color in manual color picking. After selecting that tool, you just need to click on the color that you want to pick.
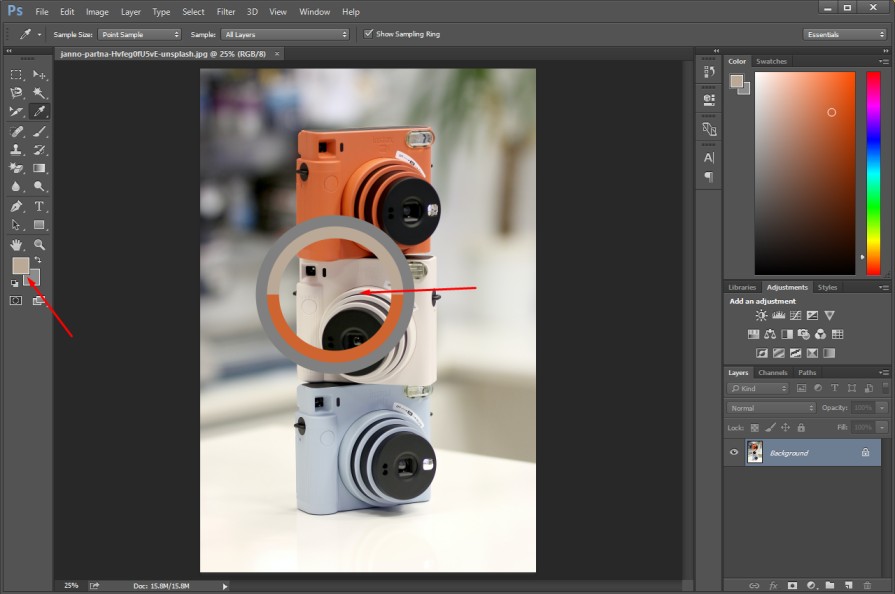
The color will be picked as the foreground color. There are several other color-picking tools available within this tool. “I” is the shortcut key to access this tool.
Here is the next one.
Color Sampler Tool
Using the Color Sampler Tool, you can get the RGB code of a specific color. You can use this information to get the exact color while working on different images.
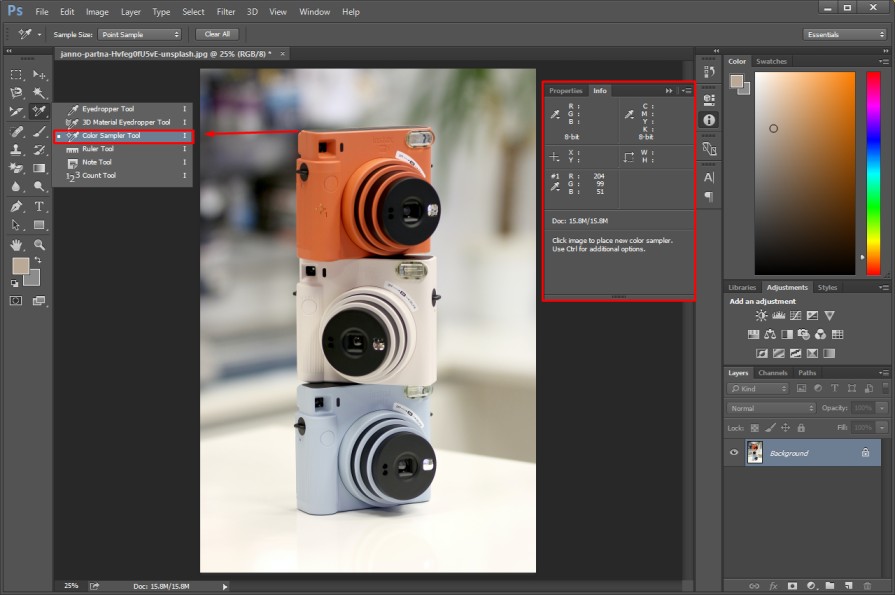
As you can see in the upper image, all the information about the selected color is visible on the right side box. You can press the CTRL key to get additional options.
Do you want to get the RGB information of a different color? Well, you just need to click on that color.
Ruler Tool
If you want to measure the width and height of a particular portion within your image, the ruler tool is used for that.
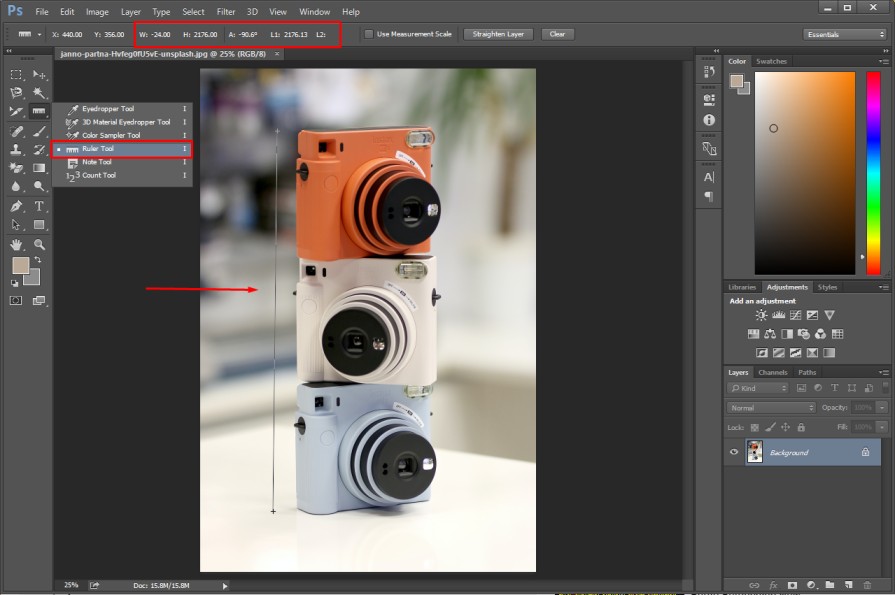
The width, height, and angle information are visible at the top. To get a measurement scale, you have to enable the “Use Measurement Scale” option from the top.
Note Tool
Do you have any important instructions that you want to note? The note tool is available in Adobe Photoshop CC to fulfill that requirement.
You can access the note tool from here.
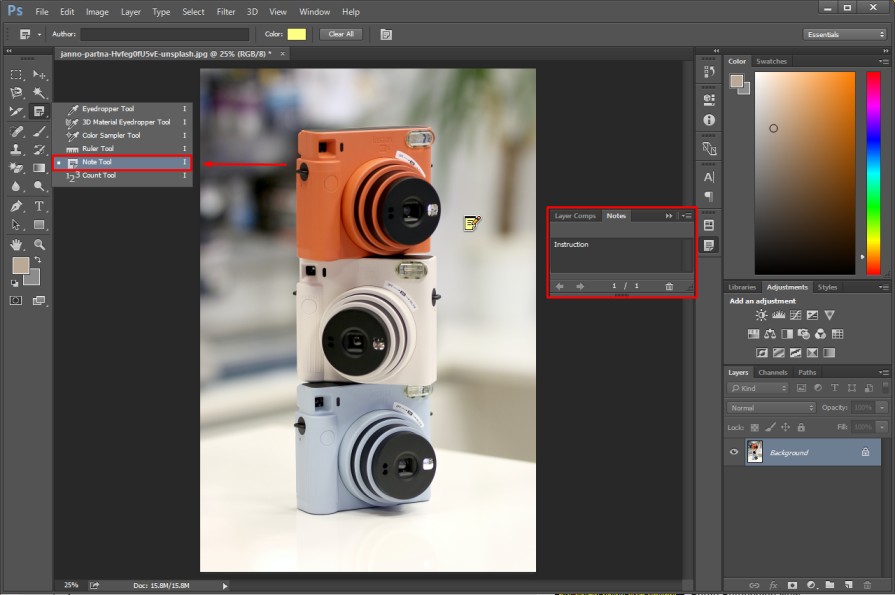
To add notes within your photos, you just need to click on the “Note Tool”. It will make the “notes” option visible on the right side of your image. You can type your notes in that box.
Count Tool
While editing an image in Adobe Photoshop CC, you may have to use numbers for alignment. On that note, you can use the Count Tool to add numbers within your image.

It’s super easy to use the tool. Simply, enable the tool from the left side and click on your image to add a number on that point.
Spot Healing Brush Tool
This tool is useful for portrait and product photos in Outsourcing Photo Editing. When you want to erase unwanted spots from your image, you can use this tool to fix your imagery.
You need to enable the tool from this section.
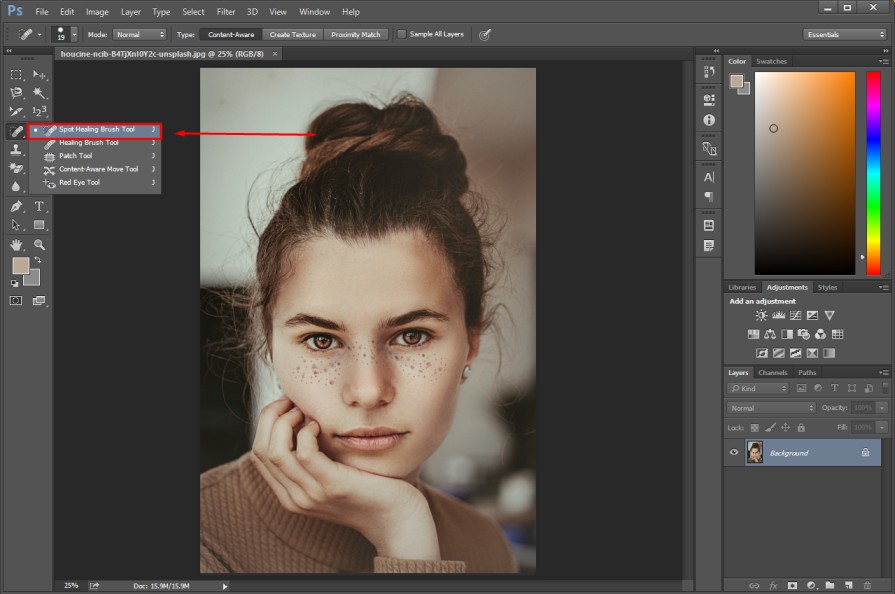
To fix unwanted spots, you just need to click on the spots. You can zoom in on the portion to make the process convenient.
After that, click on the image with the left mouse key. Here’s the result after making some adjustments with the spot healing brush tool.
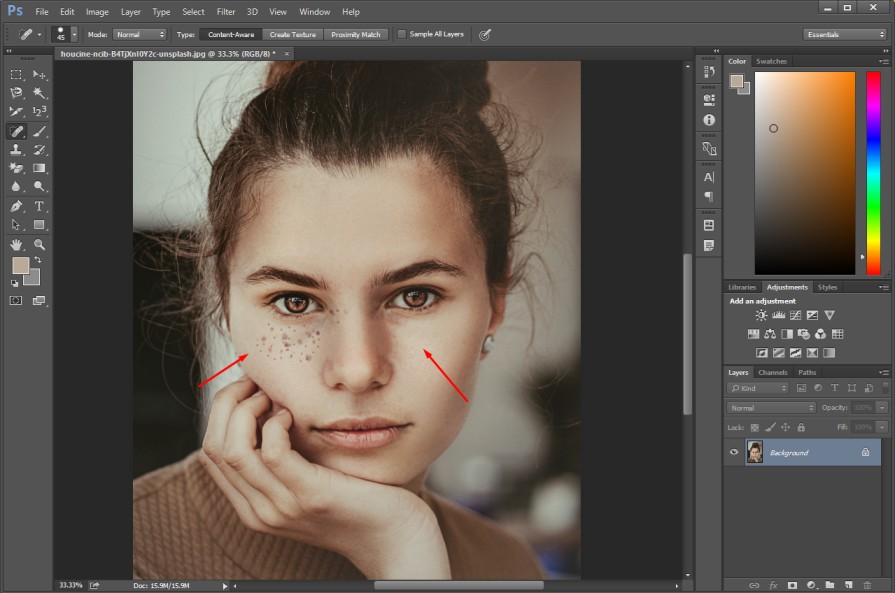
“J” is the shortcut key to enable the spot healing brush tool. Still, spots are available on the left side of the face. We are going to fix it using the healing brush tool.
Healing Brush Tool
The feature of the healing brush tool is pretty similar to the spot healing brush tool. The main difference is you have to pick sample areas for the healing brush tool.

You have to press the ALT key to pick a sample area. Let me share with you tricks to do that properly. You should zoom in on your image and choose a perfect portion for the sample.
Then click on the spot several times. If you don’t get the perfect result, you have to repeat the process once again.
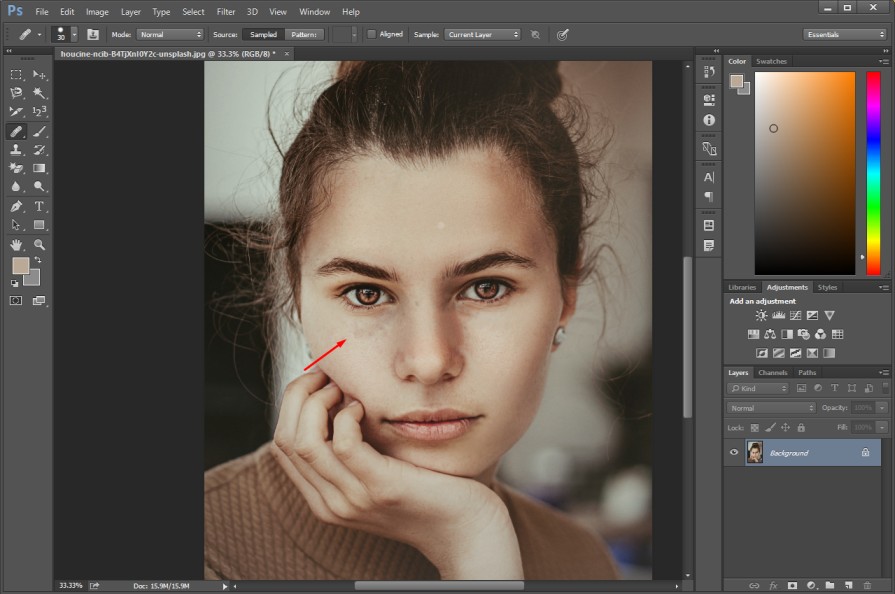
See, we have removed the spots from both sides. Along with the portrait photos, you can also use this tool to fix unwanted photos of product photography.
Also, you can apply it in the background. Would you like to make any further corrections? We are going to do that using the patch tool.
Patch Tool
The patch tool is also used for fixing dust, spots, wrinkles, and unwanted marks. You can get the Patch Tool from this section of the toolbar.
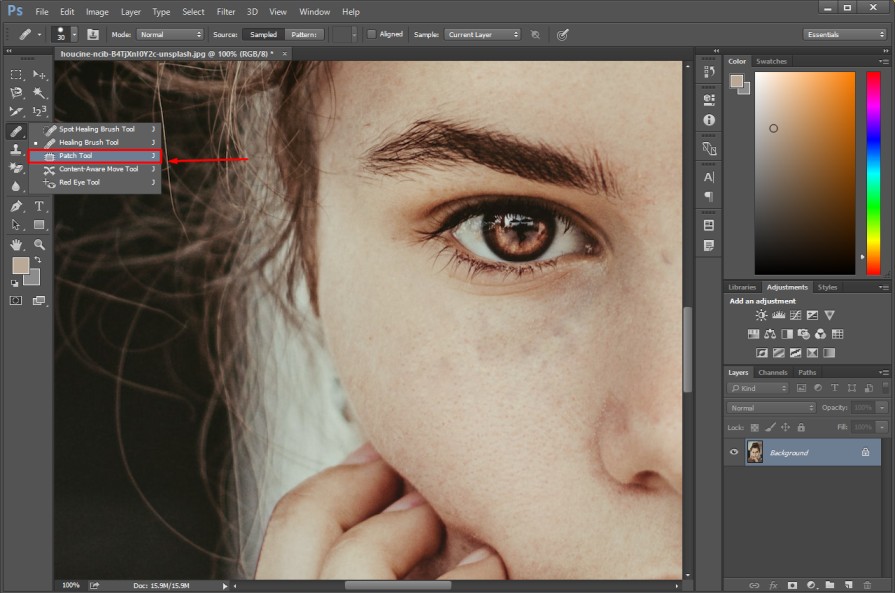
You have to make a selection of the portion that you want to fix. After that, you need to release the portion to a perfect area. Adobe Photoshop CC picks the released area as a sample to replace it with the selected portion.
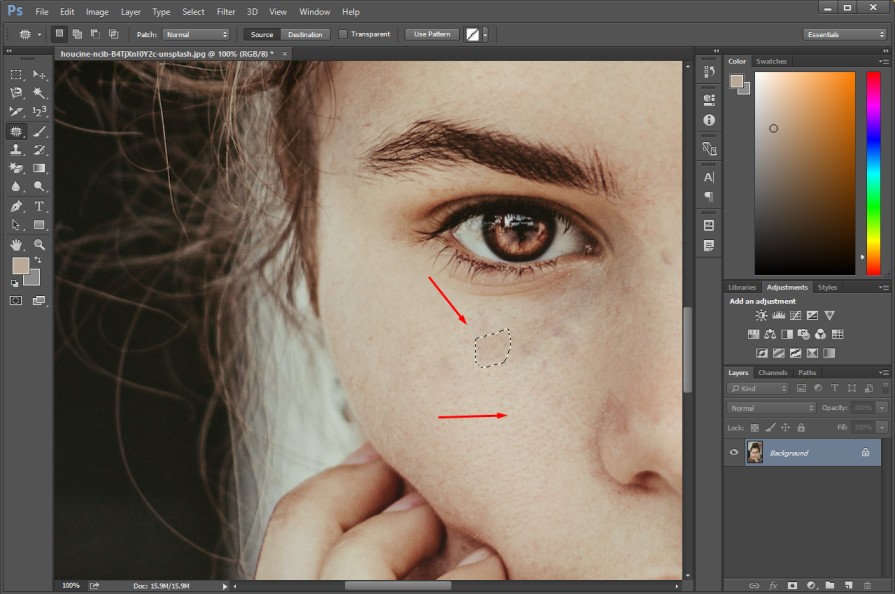
To replace a portion, you just need to move selected areas using the left Mouse key. Now, let’s move to the next tool.
Content-Aware Move Tool
The Content-Aware Move Tool functions almost similarly to the patch tool. Enable the tool from this section.
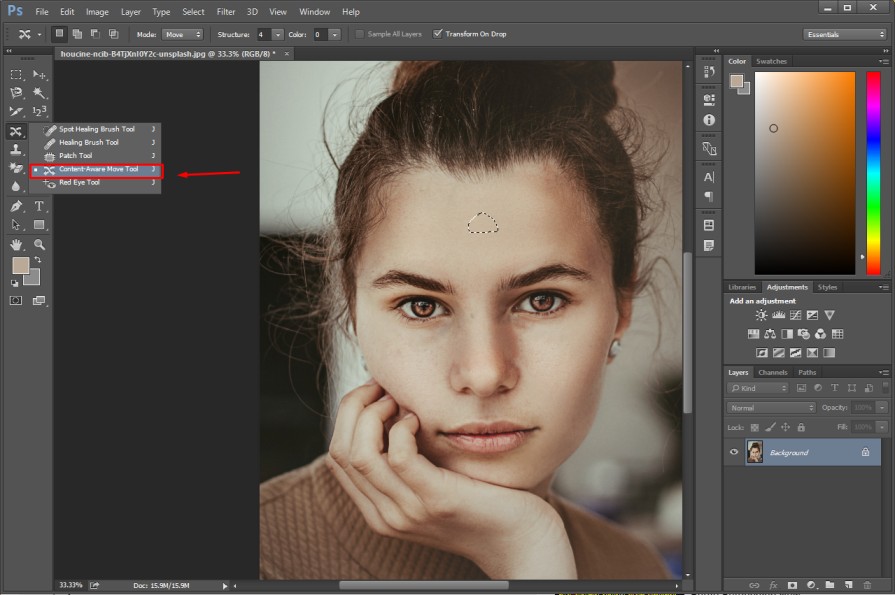
After that, you need to mark a perfect area to replace it with an imperfect area. Hold the left mouse key to select an area while using this tool.
Red-Eye Tool
This tool is applicable only for portrait photography. You can use this tool to fix the red-eye problem in Photography.
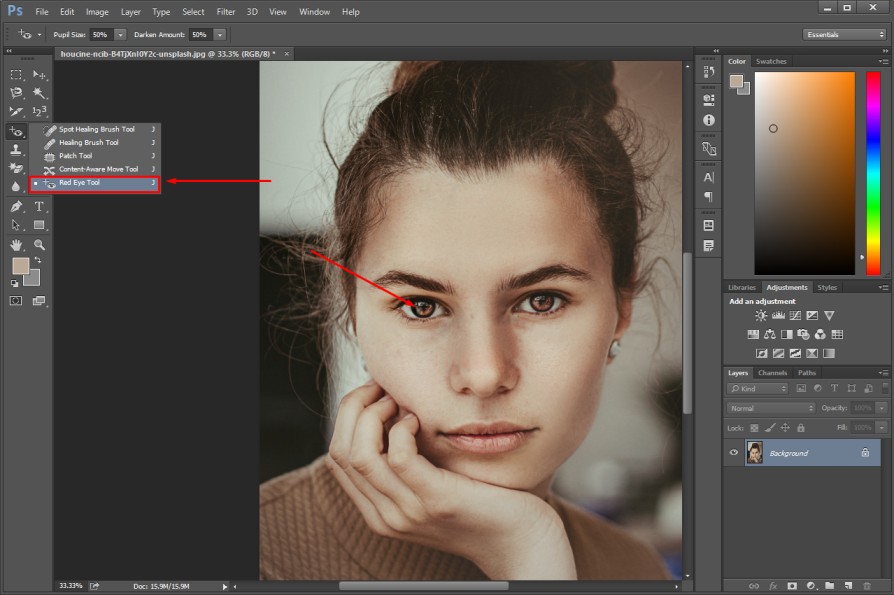
After picking the tool, you have to zoom in on the eye. Then, click on the eye to remove unwanted red marks.
Brush Tool
This is an important tool of Adobe Photoshop CC. Using the brush tool, you can paint your image. You can change the object color using this tool. Also, you can change and remove the background color using the brush tool in Photoshop.
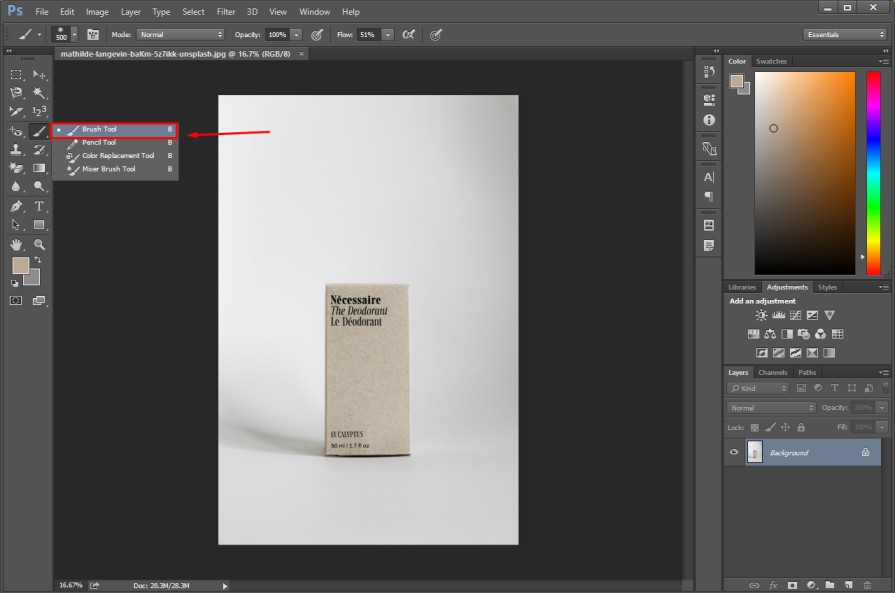
From the top bar, you can change the size, hardness, and shape of brushes. If you want to paint with a soft color you should change the brush hardness to zero. To make the paint look solid, you can increase the hardness.
Here’s a sample for you.
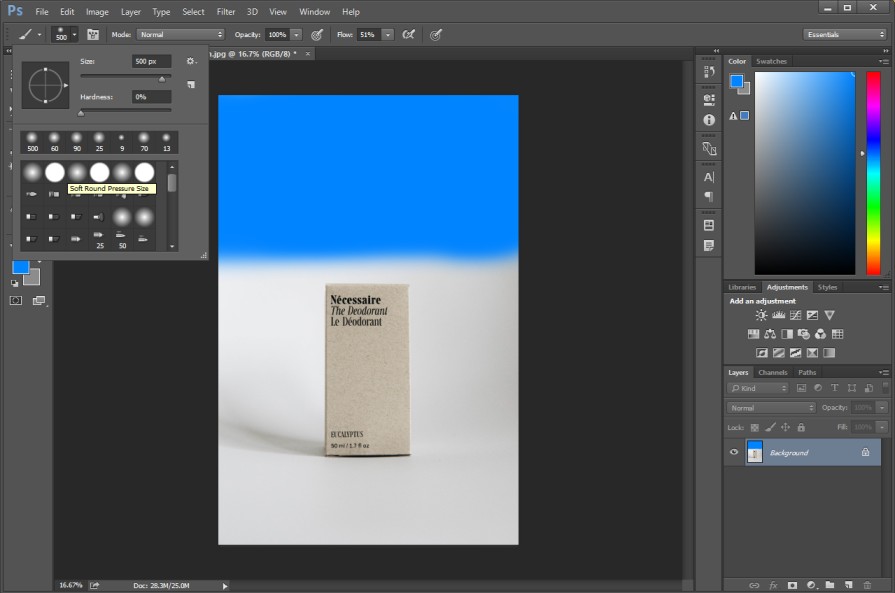
“B” is the shortcut key to enable the brush tool in Photoshop. Within the brush tool, you are going to get several other options. Allow me to share how to use those tools in Photoshop.
Pencil Tool
Using the Pencil Tool, you can draw on your image like a pencil. This tool is used in graphic designing to draw hard-edged lines.

Also, you can use the pencil tool to draw your signature on the image after editing. If you would like to paint with a softer line, you can use the pencil tool.
Color Replacement Tool & Mixer Brush Tool
The color replacement tool is used for replacing color between two or several objects. You just need to click on a sample color and then you have to select the color that you want to replace.
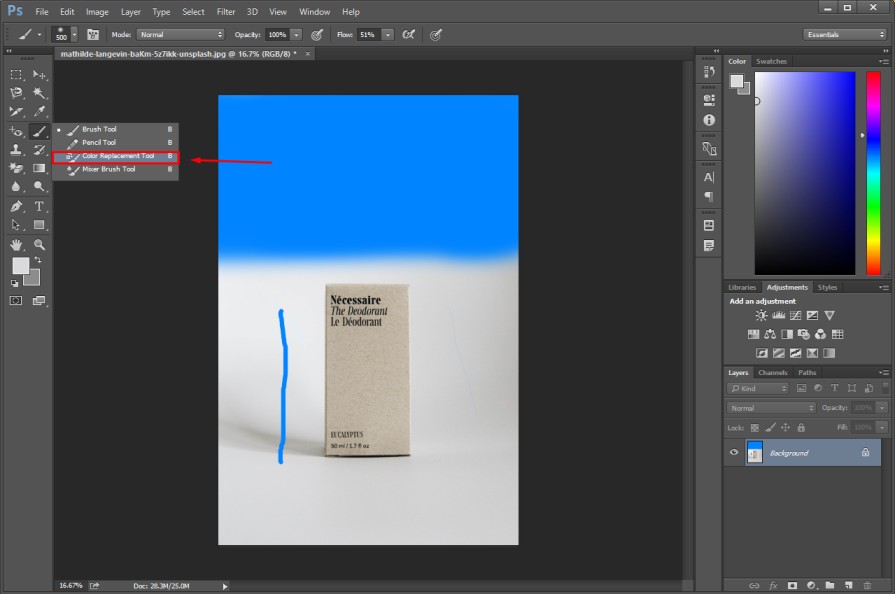
To replace the painted color, you have to set a specific color as the foreground color. After that, you have to start painting the light blue color. You can change the mode and limits from the top.
The Mixer Brush tool is available next to the color replacement tool. This tool works as a blender brush tool. Let me explain.
When you select the mixer brush tool, it combines the brush color and the background color to paint on that specific area. In professional photo editing, the brush tool is mostly used to perform the painting.
Clone Stamps Tool
The primary task of the clone stamp tool is to copy one area and replace it with another area. You can use the tool to fix any imperfection from a certain portion.
The clone stamp tool is located here.
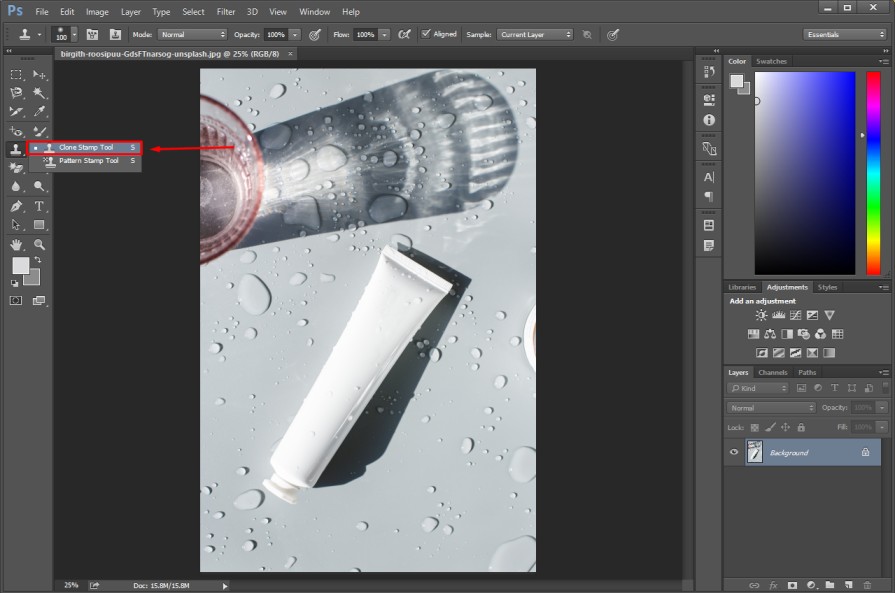
To use the tool, you have to zoom in on the area that you want to copy. Press the “Alt” key to copy the area as a sample. Next to that, you need to click on that area to replace.
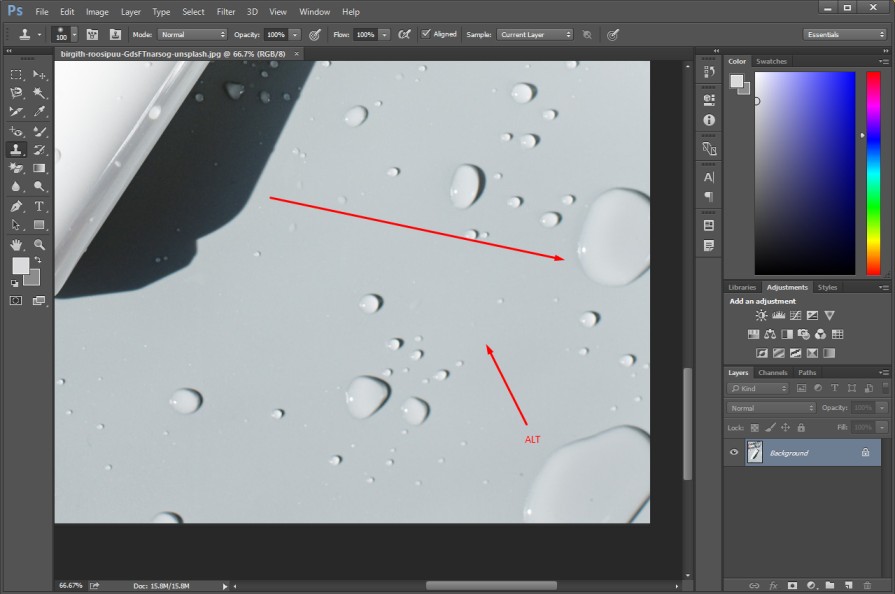
In that method, you can fix the error in the background, and delete unwanted elements, marks, or spots. Here’s the result after applying the clone stamp tool
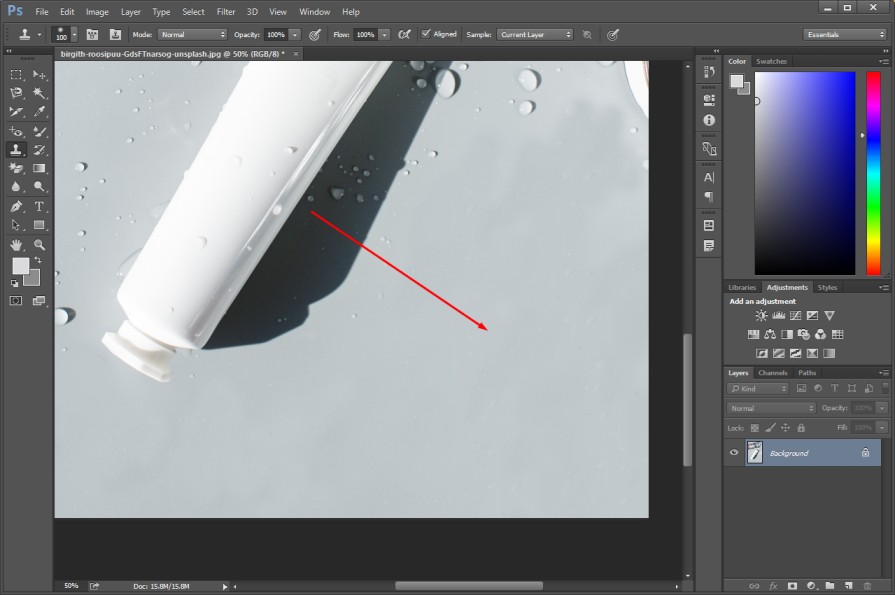
“S” is the shortcut key to activate the clone stamp tool. There is another tool located within the clone stamp tool named “Pattern Stamp Tool”.
You can use this tool to draw with a specific pattern. You can also paint with patterns from one image to another.
History Brush Tool
This tool is essential for all types of photo editing techniques. If you want to bring back the previous version of your image that you have edited, you can paint with the history brush tool in that section. Get the tool from this section.
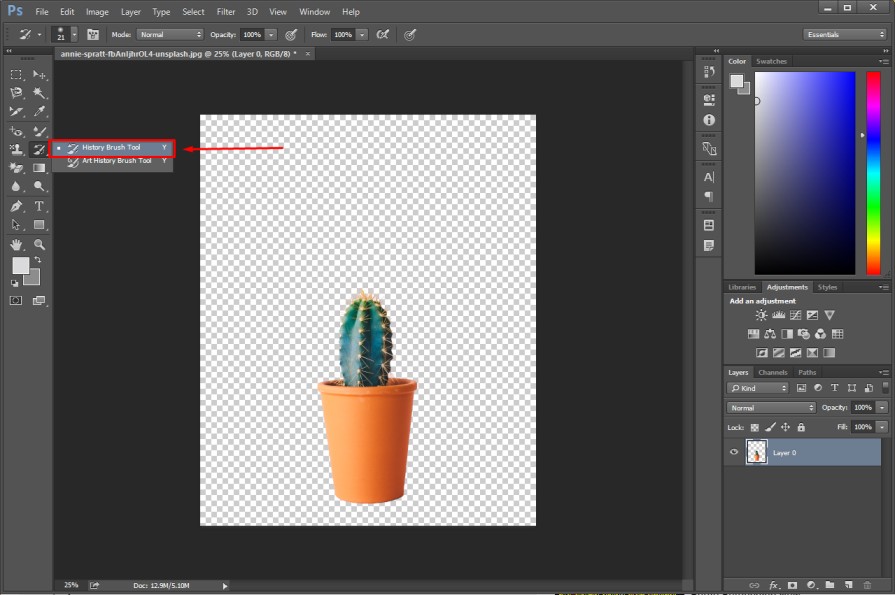
I have removed the background from this picture in Adobe Photoshop CC. If you paint on the background using the history brush tool, it will restore the deleted background. Here you can see the result.
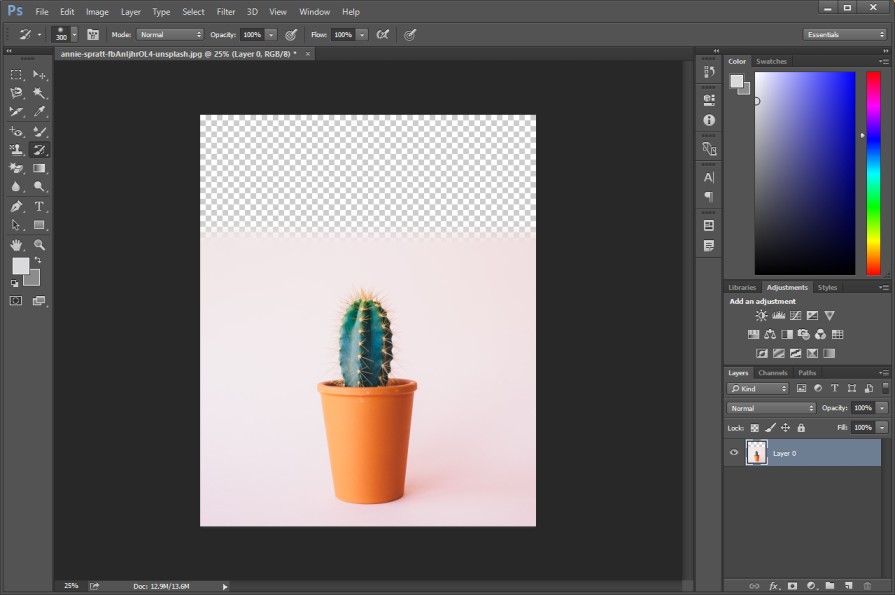
In the same method, you can restore any editing changes that you have made to your image.
If the editing doesn’t produce the result that you were expecting, you can go back to the previous version without using UNDO multiple times. To apply a paint-like effect to your photo, you can use the Art History Brush tool.
Eraser Tool
As the name suggests, “Eraser Tool” works like an eraser to delete any portion of the image. You can enable the tool from this section of the Photoshop toolbar.
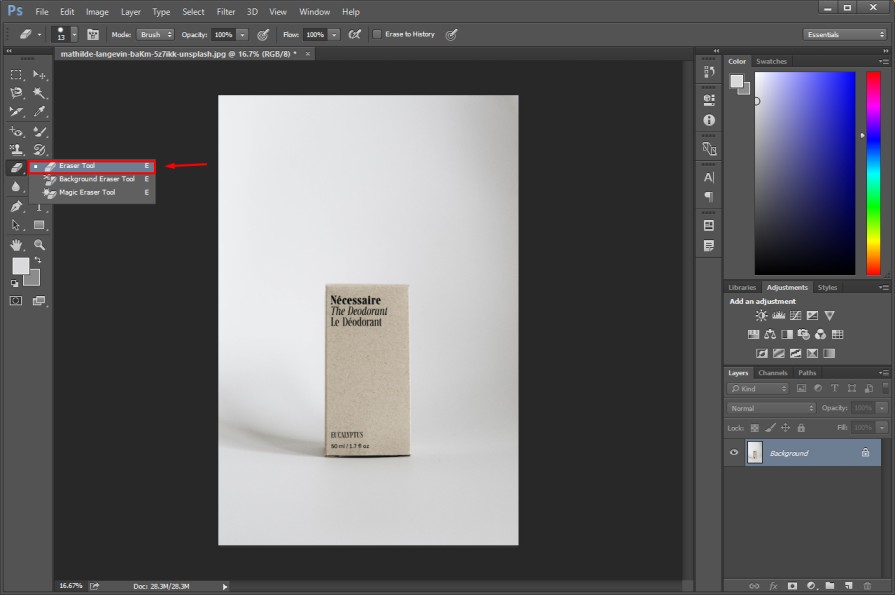
If you apply it to the background, it will make the background transparent.
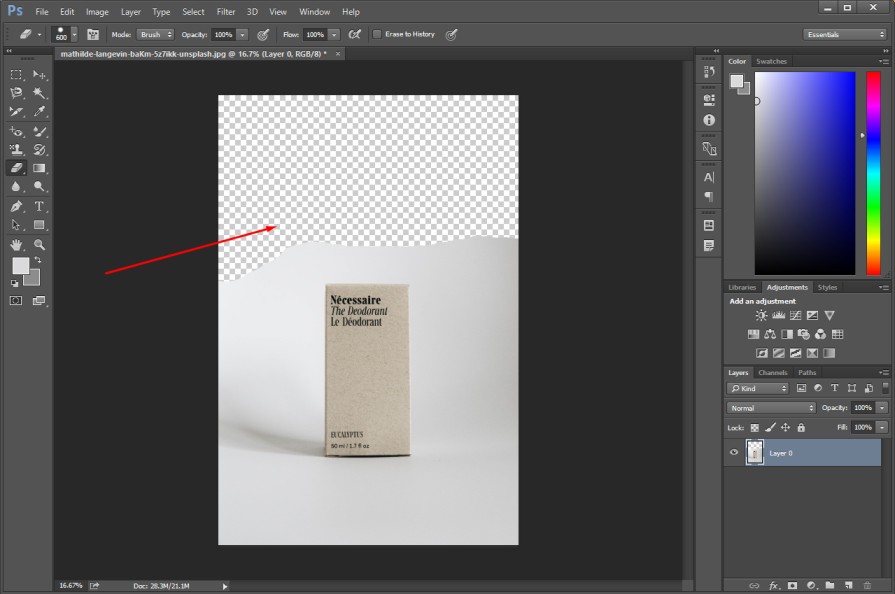
On that note, you have to unlock the layer before applying the erase tool. Otherwise, you won’t get a transparent background. The next tool is the Background Eraser Tool.
This tool is a dedicated background remover tool. If you are working on a solid color background, you can use this tool to remove the background without causing any damage to the object.
Magic Eraser Tool
This is another form of eraser tool. It removes the background in Photoshop based on pixels. You can remove the entire background with just a single click. Here is the result after applying the magic eraser tool in the background.
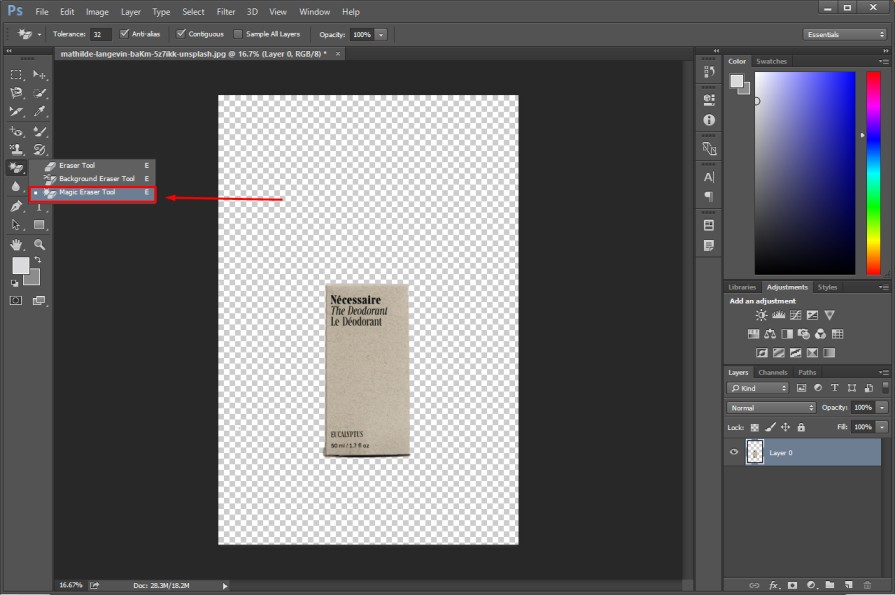
“E” is the shortcut key to enable the Eraser tool. If you want to bring back any removed portion, you can press CTRL + Z to undo your previous command.
Gradient Tool
Do you want to bring gradual changes of color to your photos? You can use the Gradient tool to blend specific portions of your image. To access the tool, you have to select it from here.
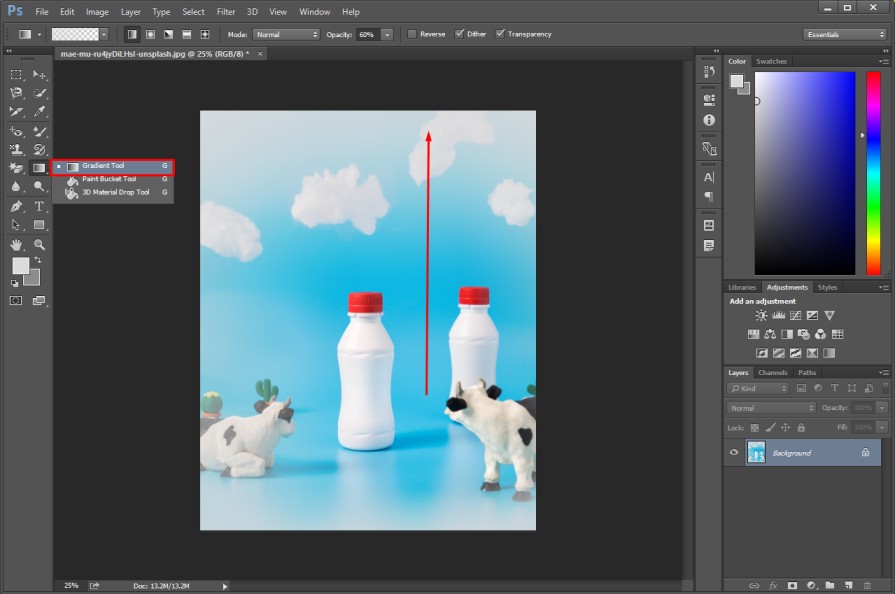
After picking the tool, you can choose different types of Gradient effects from the top. You just need to drag the mouse from one direction to another vertically.
It will bring changes in the color and light of your images. You can see the sample in the above image. “G” is the shortcut key to enable the gradient tool.
Paint Bucket Tool
If you want to paint something with a specific color, the paint bucket tool will be the preferable option for you. You can apply the tool from here.
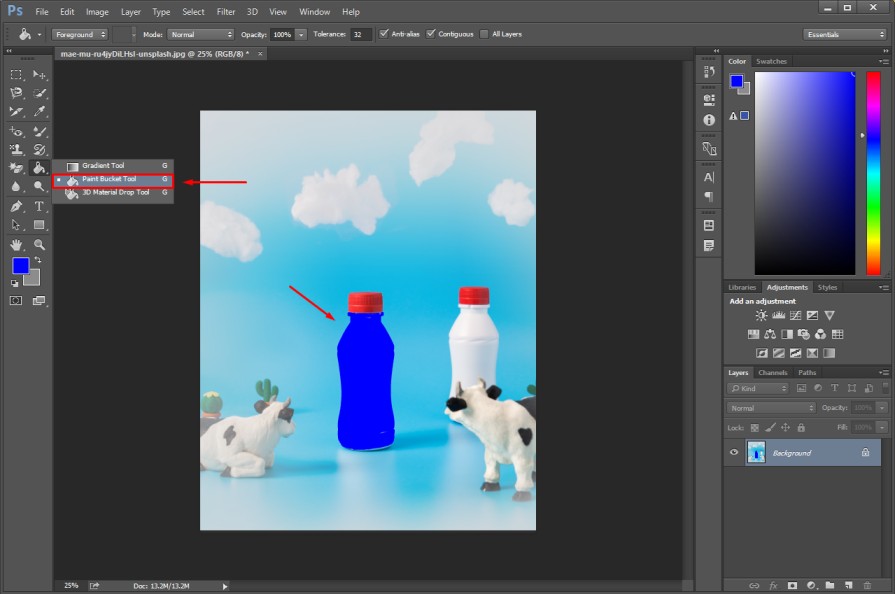
After choosing the tool, you have to pick the color that you want to paint. After that, click on the object that you want to fill with the selected color. It will do the task.
This tool provides an accurate result when you apply it to a solid color object. If there is a mixture of different colors, it won’t provide accurate results.
The 3D Material drop tool is used when you’re working on a 3D model to fill a specific portion.
Blur Tool
Do you want to make any object blurry in Photoshop? You can do it easily using the blur tool. You just need to choose the tool from the toolbar and click on the object that you want to blur.
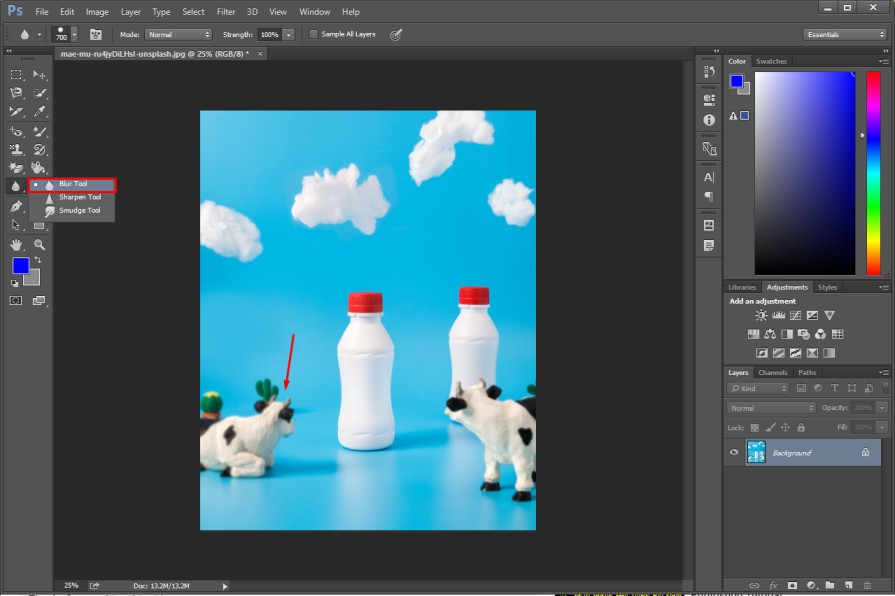
See, it has blurred the cow on the left side. From the top, you can change the blur settings, brush size, and blur strengths. The next tool is the sharpening tool.
Sharpen Tool
The sharpen tool works opposite to the blur tool. By applying that tool to a specific portion, you can make the area look sharp. Here you can see we have blurred the cow on the left side.
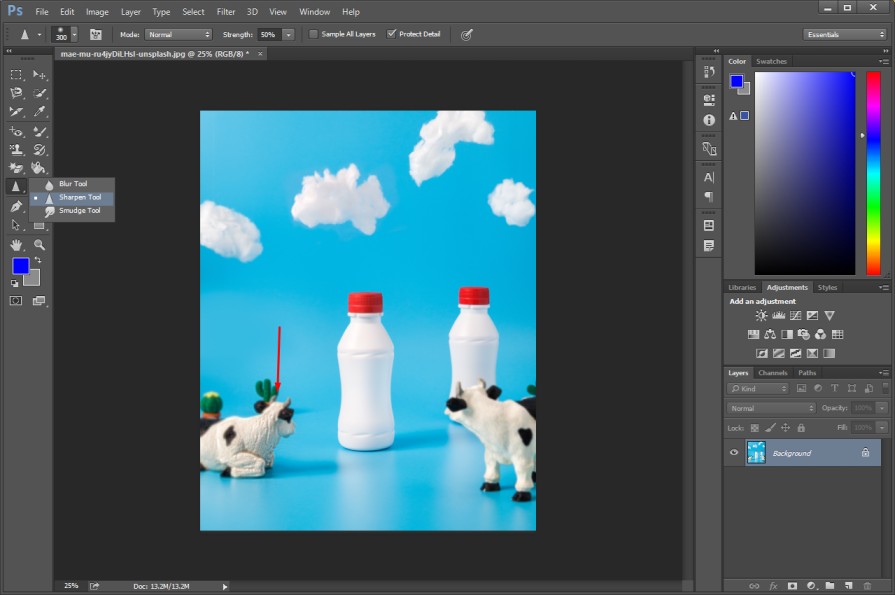
In the same method, you can also add sharpness to your image. Now, we are going to introduce you to the smudge tool.
Smudge Tool
The smudge tool is used for compressing and stretching an object within an image. The smudge tool is located within the blur tool section in Adobe Photoshop CC 2023 or any other recent version.
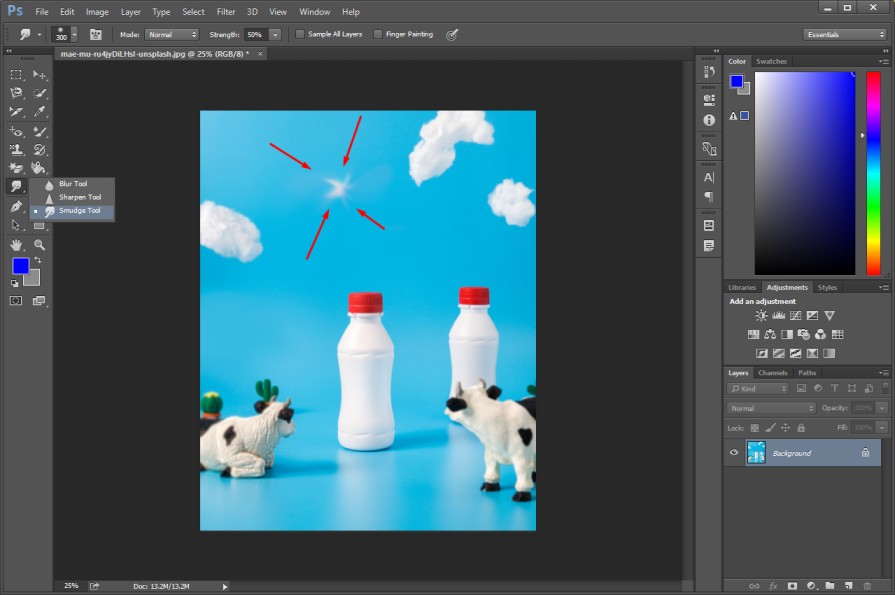
We have compressed the cloud by applying the smudge tool. Using that tool, you can make an object smaller and bigger.
Dodge Tool
The Dodge tool is basically used in portrait photography to lighten dark areas. Particularly, you can apply the dodge tool on the body or body to make them look brighter.
You can select this tool from here.
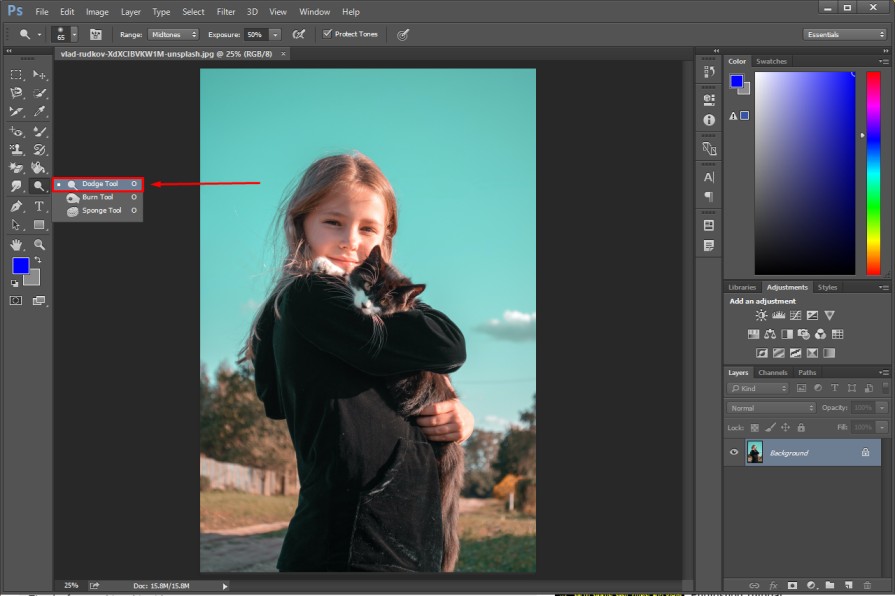
Next to that, you have to zoom in on the face where you want to apply the tool.
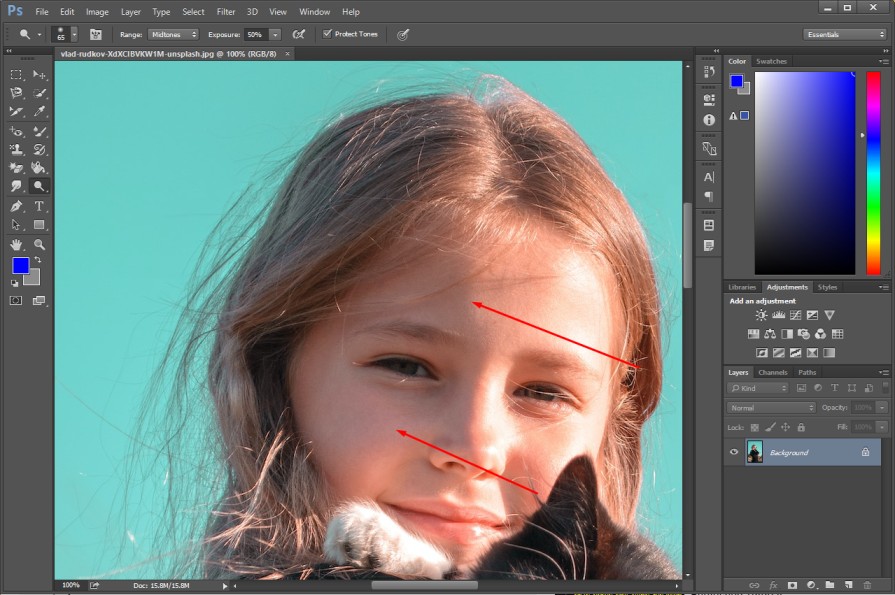
As you can see, there are some shadows in the face. We can fix those shadows and make the area brighter using the dodge tool.
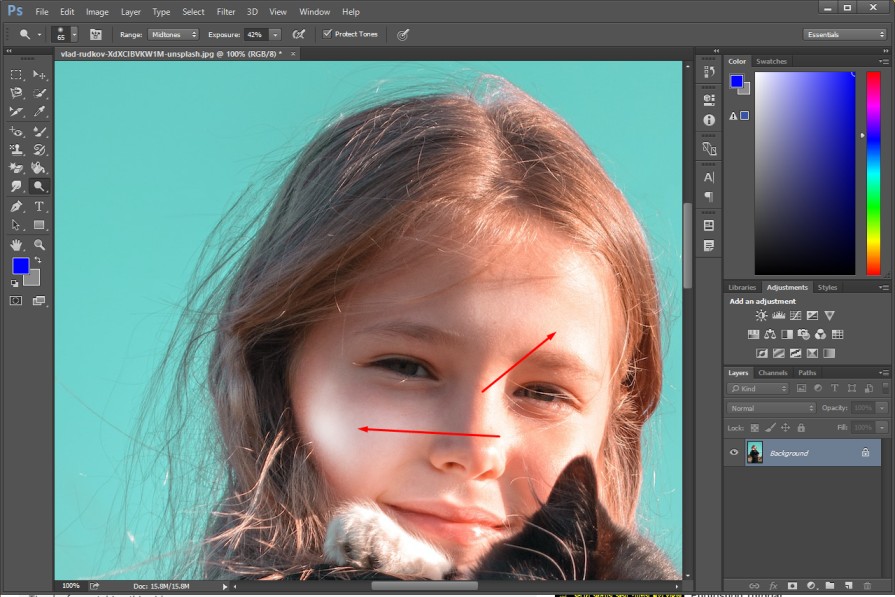
Click on the area with the left mouse key to make them brighter. If you feel that the area is looking much brighter than needed, you can reduce the exposure from the top according to the requirements.
Hopefully, you have understood the basic principle of the dodge tool.
“O” is the shortcut key to enable the Dodge tool in Photoshop.
Burn Tool
The burn tool does the opposite job of the dodge tool. Using that tool, you can darken a specific portion of an image. In portrait photography, photo editors use this tool to make the hair look darker. You need to pick the tool from here.
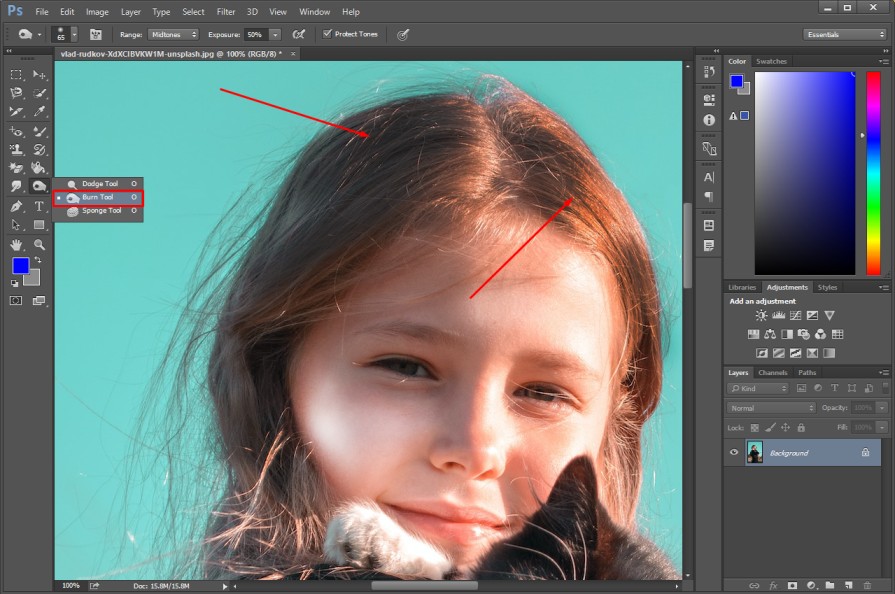
Hole the left mouse key and move the mouse over the hair to apply this tool. It will make the hair darker. You can adjust the exposure from the top to control the density of darkness.
Sponge Tool
The sponge tool is used for changing the color saturation of an area. Here’s a sample for you.

If you click several times after picking this tool, it will make the color look saturated. You can control the flow from the top.
To make it look more saturated, you have to increase the flow. To make it less saturated, you have to decrease the flow.
At this stage, we are going to move to the most important selection tool in Photoshop.
Here you go.
Pen Tool
If you want to make a precise selection, this is the most important selection tool in Photoshop. Using the pen tool, you can create multi paths around the object to select the object accurately.
The tool is located here.
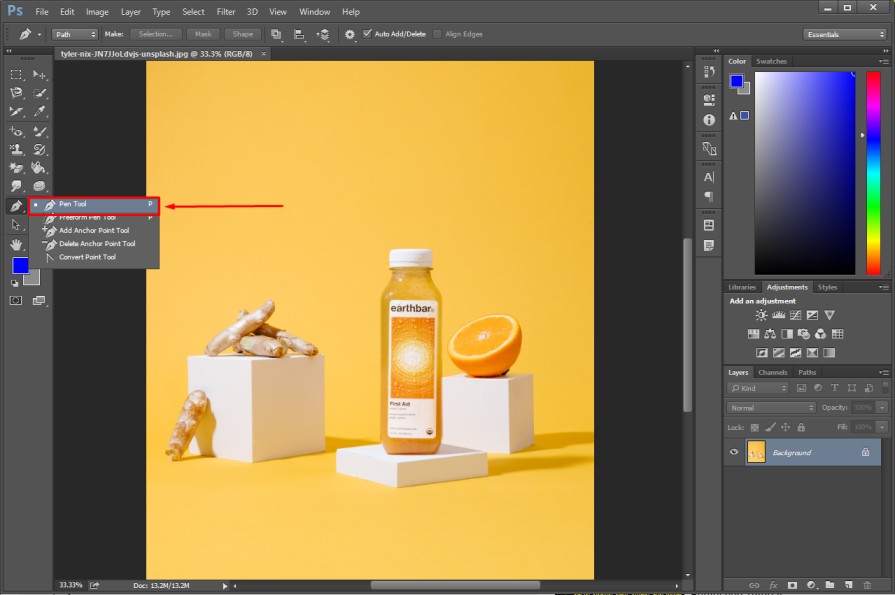
You can create anchor points to make a precise selection using this tool.
Here’s a sample for you.
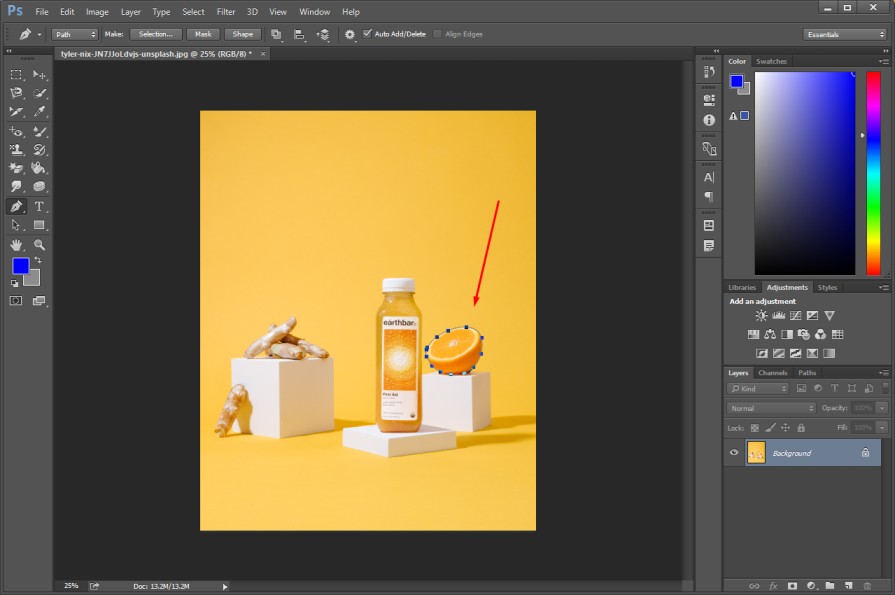
There are some other options available within this tool. Let me explain those variations of this tool.
Add Anchor Point Tool & Delete Anchor Point Tool
Basically, you can notice four types of tools along with the pen tool. Those tools are the Freedom Pen Tool, Add Anchor Point Tool, Delete Anchor Point Tool, and Convert Point Tool.
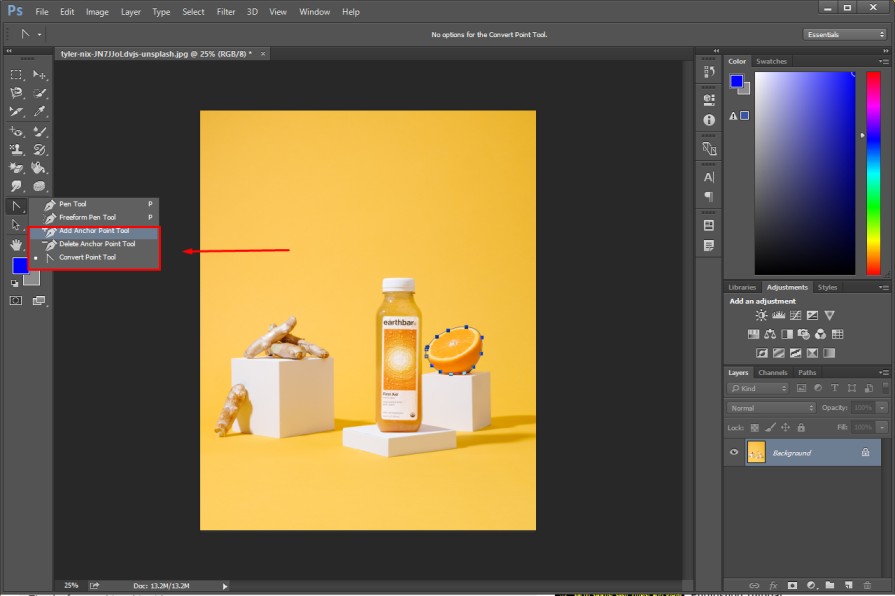
Using the Freedom Anchor point tool you can create vector paths freely like the lasso tool. Add Anchor Point & Delete Anchor Point Tools are used to customize existing paths.
You can add new points and remove existing points using those tools. You can make all anchor points visible using the Convert Point Tool.
Type Tool
Would you like to add some text to your Photos? You can use the Horizontal Type Tool and Vertical Type Tool to add text within Photos in Adobe Photoshop CC.
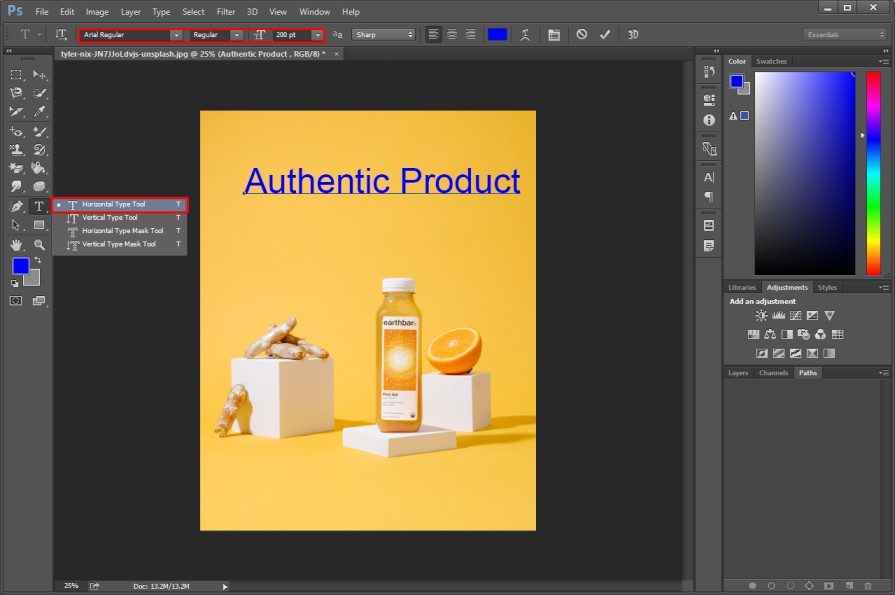
You can change the text style, size, and appearance from the top bar. Also, you can change the text color and make the text look 3D. You can add text both horizontally and vertically. “T” is the shortcut key to enable the type tool in Adobe Photoshop CC.
Path Selection Tool
This tool is also related to the Clipping Path. Using the path selection tool, you can select the create path from image.
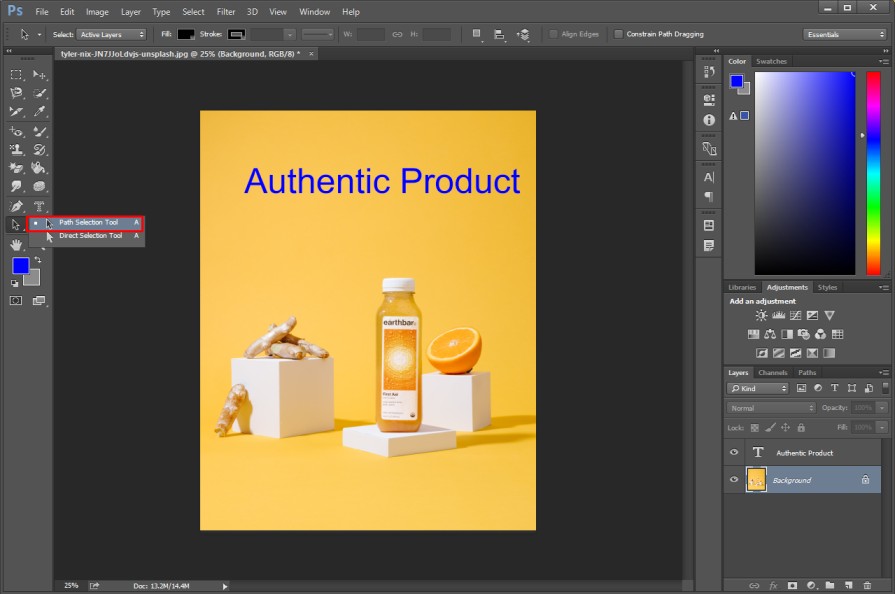
If you haven’t created any path yet, this tool won’t be effective for the image. So, you can use the tool only when you are working on an image that has paths in it.
Rectangle Tool & Ellipse Tool
Within the Rectangle tool, six types of different shapes are available. You can get Rectangle Tool, Rounded Rectangle Tool, Ellipse Tool, Polygon Tool, Line Tool, and Custom Shape Tool.
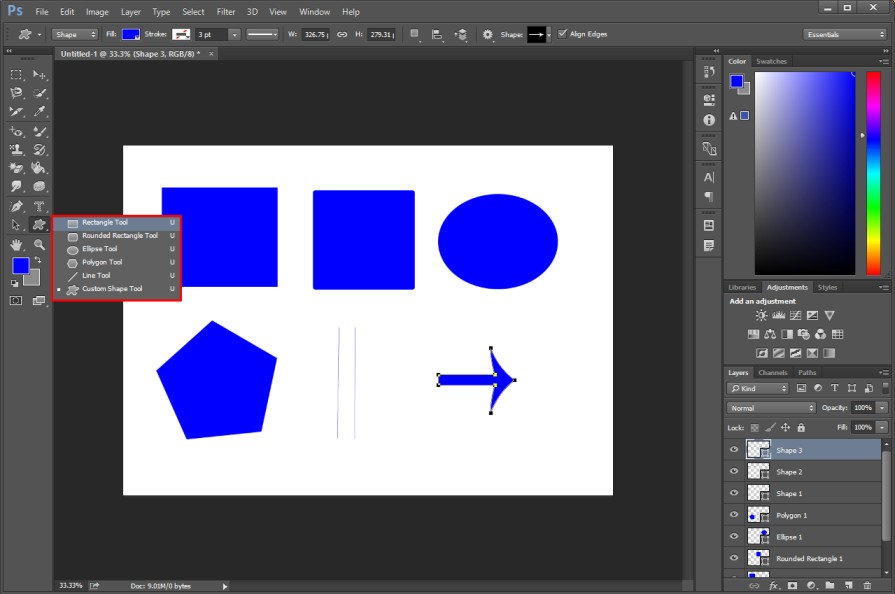
To use those shape tools, you just need to choose the shape that you want to create. After that, you have to click on the image to get that shape.
You can adjust the color, size, and opacity of the shape. “U” is the shortcut key to enable the shape tool in Adobe Photoshop CC.
Hand Tool
Using the hand tool, you can move an image freely to have a look at it from different portions. You can enable the tool from this section of the toolbar in Photoshop.
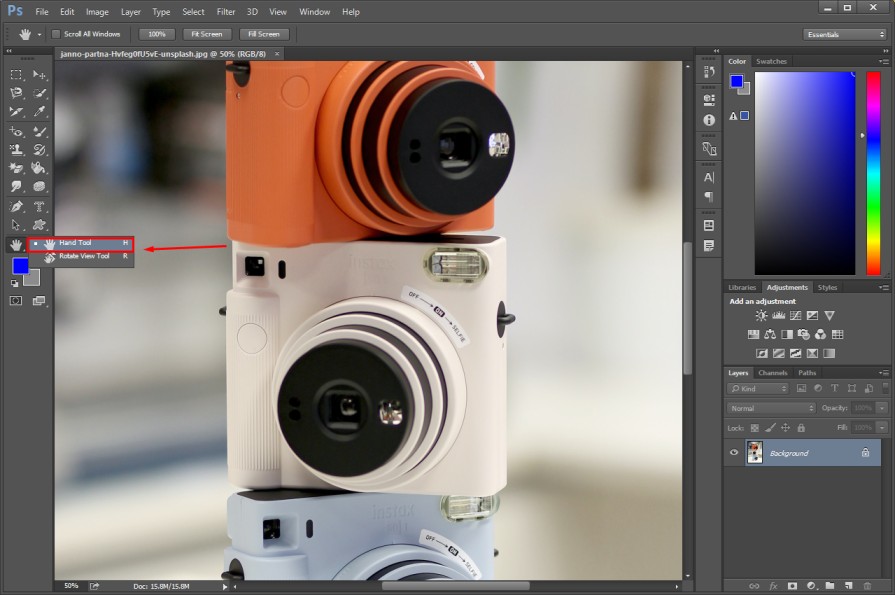
Particularly, you may find this tool helpful after zooming in on an image. Also, you can use the spacebar to move your image while zooming on it. “H” is the shortcut key to enable the hand tool.
Rotate View Tool
After picking this tool, you can view your image from different camera angles. The Rotate View Tool is located at the bottom of the Hand tool.
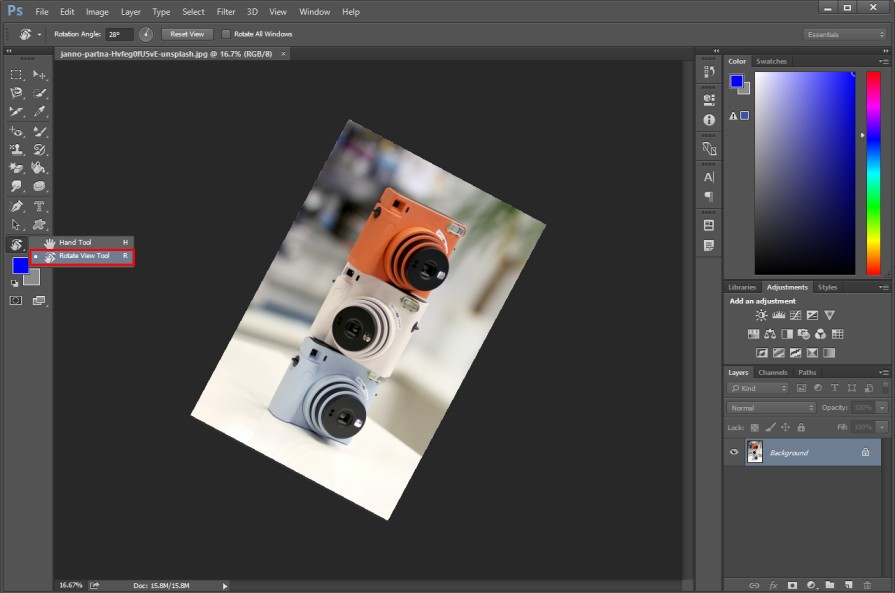
“R” is the shortcut key to enable the Rotate View Tool in Photoshop.
Zoom Tool
The Zoom tool is used for zooming in on an image. You can get the Zoom tool from this section.
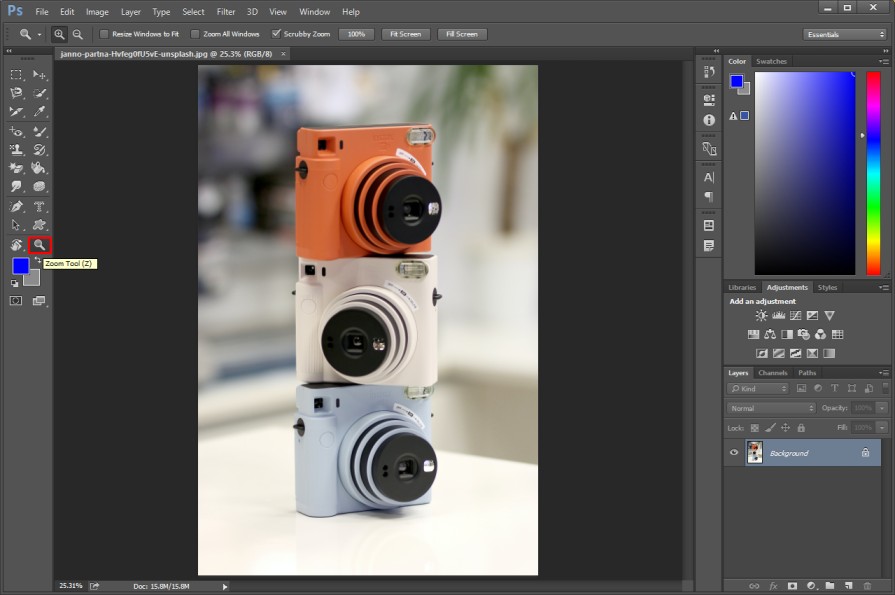
“Z” is the shortcut key to enable the Zoom tool. To zoom out an image, you can press “CTRL -”.
Foreground Color And Background Color
At the bottom of the toolbar, you can notice the Foreground color and background color picker options. Those options are used for picking colors while working with the brush tool or any other tool related to colors.
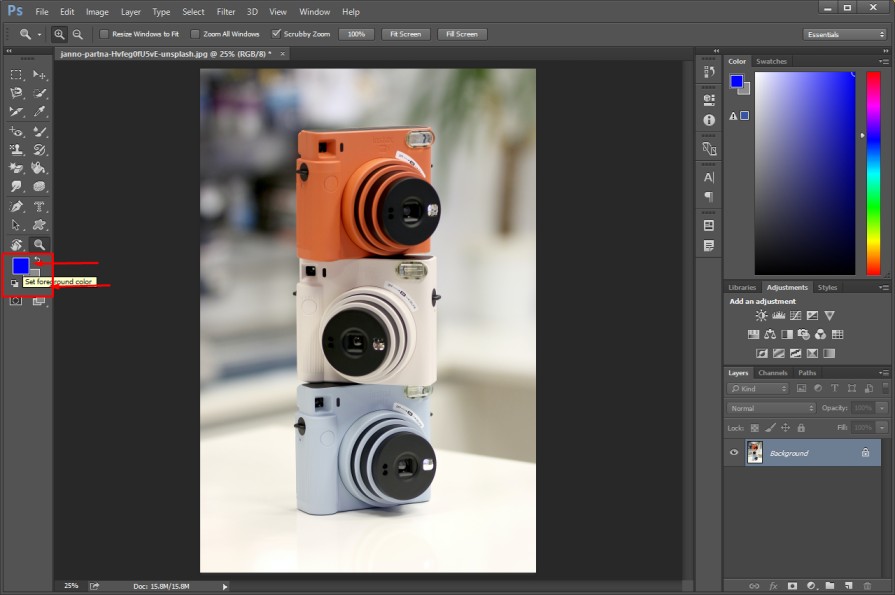
If you want to paint an object using the brush tool, you can choose the color by clicking on “Set Foreground Color”.
That’s the end of Photoshop’s tool list. We have shared the usage of all available tools in Photoshop CC. At this stage, you have learned how to use all
Adobe Photoshop tools. Now, you can utilize those tools while editing your photos to fulfill your specific image post-processing requirements like a pro editor.
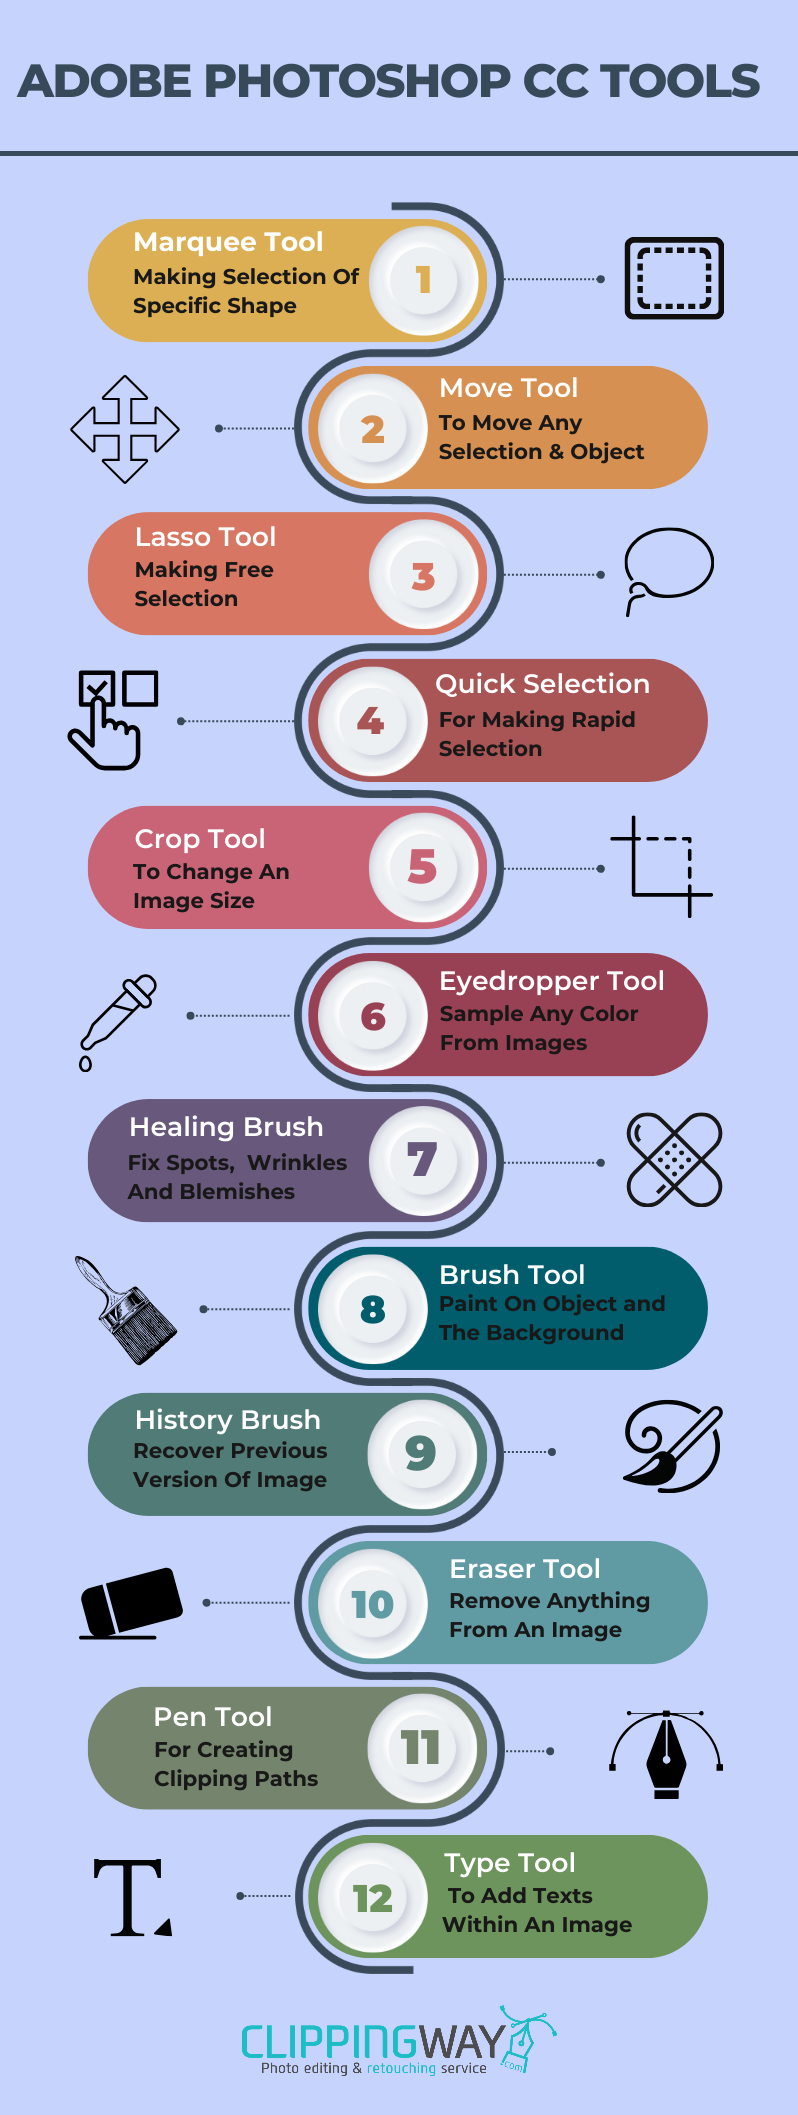
7 Golden Photoshop Tips To Compact Your Image Editing Process
- When you want to stretch the background use the “Content Aware Scale” from the “Edit” option to keep the object unchanged
- To draw straight lines with the brush tool, hold down the “Shift” key while painting with the brush tool on images.
- To erase something in straight lines, hold down the “Shift” key while applying the eraser tool to your pictures.
- To pick any color from outside Photoshop, select the “Eyedropper” tool and minimize Photoshop to click on that color.
- Hold down the “Shift” while using the rectangular marquee tool to create a perfect square by freely moving the mouse.
- While working on several layers, choose the “Auto Select” option from the “Move Tool” to move the layer’s element automatically.
- To move a specific portion in another layer choose “Convert to Smart Object’ to prevent the portion from losing resolution.
7 Common Photoshop Mistakes To Avoid While Image Post-Processing
- Don’t be afraid to add layers according to the requirements. Adding multiple layers will make the process easier
- Don’t apply the adjustment directly on the layer. You should try to use an adjustment layer or convert to a smart object
- Lack of proper layer organization is a common mistake. You should rename layers and create groups when required.
- Don’t rush the process while making a precise selection. In most cases, you are going to make mistakes in that way.
- Don’t forget to try to make your image post-processing method non-destructive. UNDO is not the best solution.
- Don’t apply any specific editing techniques for all types of objects and photographs. You need to be versatile with editing.
- Don’t stick to a specific selection tool for making all types of selection. You should change the selection tool according to the shape.
Conclusion
Hopefully, you have got a comprehensive knowledge of Adobe Photoshop CC. We have shared the process of using all Photoshop tools along with the example.
Alongside this, you get to know about 7 golden tips to compact your image editing process in Photoshop. You should not forget to stay away from the common mistakes that we have mentioned.
Do you have any requirements for Photoshop Image Editing Services? Don’t hesitate to contact us. We have a dedicated team of highly qualified designers to fulfill your image editing requirements. You can get started now with a free trial with Clipping Way.
FAQ’s
Any recent version of Adobe Photoshop CC is sufficient enough to fulfill any type of image editing requirements.
No, you have to pay a monthly or annual subscription fee to use the official Adobe Photoshop CC.
You can use the “Spot Healing Brush” to perfectly remove blemishes in imagery. Alongside this, you can use the “Clone Stamp” tool to fix imperfections.
Around two months is sufficient enough to fully learn all Photoshop tools. However, it needs more time to become an expert in using Photoshop.
By following our above-mentioned guidelines, you can learn Photoshop in a week. But it takes around two months to practice the techniques for perfect execution.

