The magic wand is the easiest tool in Photoshop to make a selection. Using that tool, designers can select objects automatically. If you are working on an image having hard edges, the magic wand tool comes in handy to select the object easily.
To extract the best result, you need to know the proper use of this tool. Through this article, you are going to learn how to use Magic wand tool in Photoshop.
After reading this article, even beginners will be able to make a selection. You can also use this tool for image Background Removal.
Here’s an in-depth explanation of the magic wand.
What is Photoshop Magic Wand Tool?
The magic wand is one of the selection tools in Photoshop. You can make a selection with a single click using that tool. Basically, this tool selects pixels considering the color.
If you click on an object, it will select a similar color automatically. When you are working with a plain color object or solid color background, you can precisely make a selection using that tool.
As you will get the selection automatically, you won’t get an accurate selection all the time. In that case, you have to adjust the selection and edit the selection in mask mode to make the selection precise.
In the later section, you will learn about that. However, you can find the tool within the quick selection tool. Now, let me show you how you can use this tool to make a selection.
Key Function of Magic Wand Tool
Before we jump on the tutorial of using the magic wand tool, you have to know about some of its features of the magic wand tool. That will make the selection process easy and accurate for you.
Tolerance
At the top of the screen, you will get the tolerance setting. To make an accurate selection using the magic wand, you have to know the use of this feature.
When you increase the tolerance, your selection gets broader. If you set the tolerance to a higher value, Photoshop will select additional pixels that are closer to the sample pixels.
When you reduce the tolerance, your selection becomes more specific. For lower tolerance values, Photoshop will select exact pixels that match the sample pixels. So, the tolerance setting is directly connected with the selection. You can utilize this feature to make your selection based on the colors.
Contiguous
Besides the tolerance setting, you will get the contiguous option. When you enable this option, Photoshop will exclude any pixels that match the tolerance range of your sample pixels from different areas.
If you disable this feature, every pixel that matches the tolerance range of your sample pixels from different areas will be included as a selection.
Anti-Alias
Anti-alias makes the edges smooth while making a selection. Therefore, it’s recommended by experts to keep it enabled while making selections. Otherwise, you may get unnecessary edges that will ruin your selection. Now, you are ready to start using the tool.
How to Use Magic Wand Tool in Photoshop?
When you do a clipping path in Photoshop, you have to create paths and convert them into a selection. Unlike the pen tool, the magic wand tool makes the selection automatically. You can select both individual objects and multiple objects. Here’s the process.
Open any of your images in Photoshop and select the magic wand tool from the editing tool panel. Here is the sample.
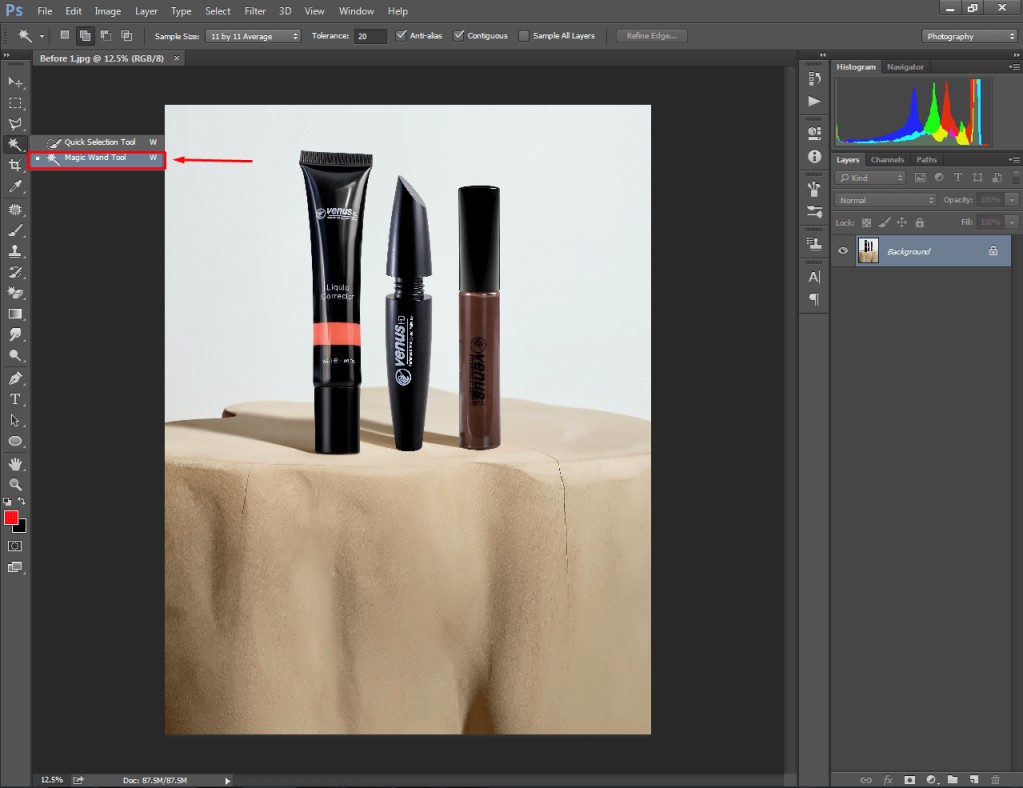
You can also select the magic wand tool by pressing the “W” key. Now, let’s have a look at the below image.

A single selection feature is enabled from the top. In this selection mode, you can select only one object.
I clicked on the background of that picture and the magic wand tool selected the background automatically. Do you want to select multiple objects? You have to click on the “Add to selection” option from the top. Here’s the option.
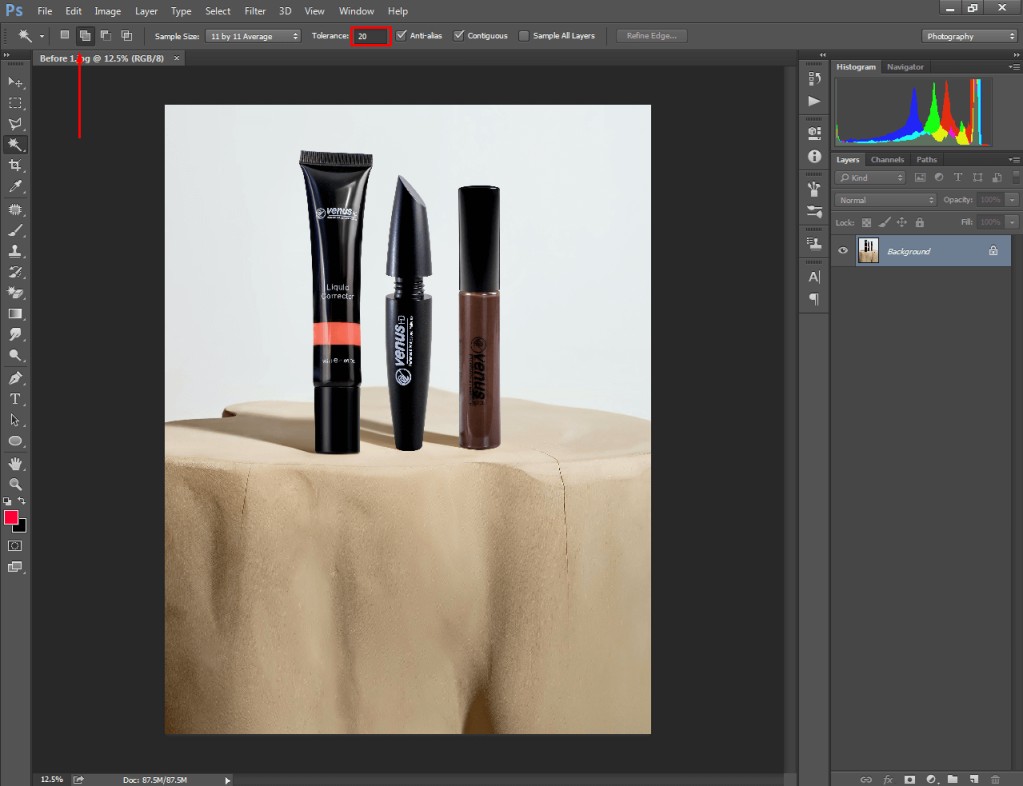
You will see selection lines after clicking on the object. You may find your selected object in this form.
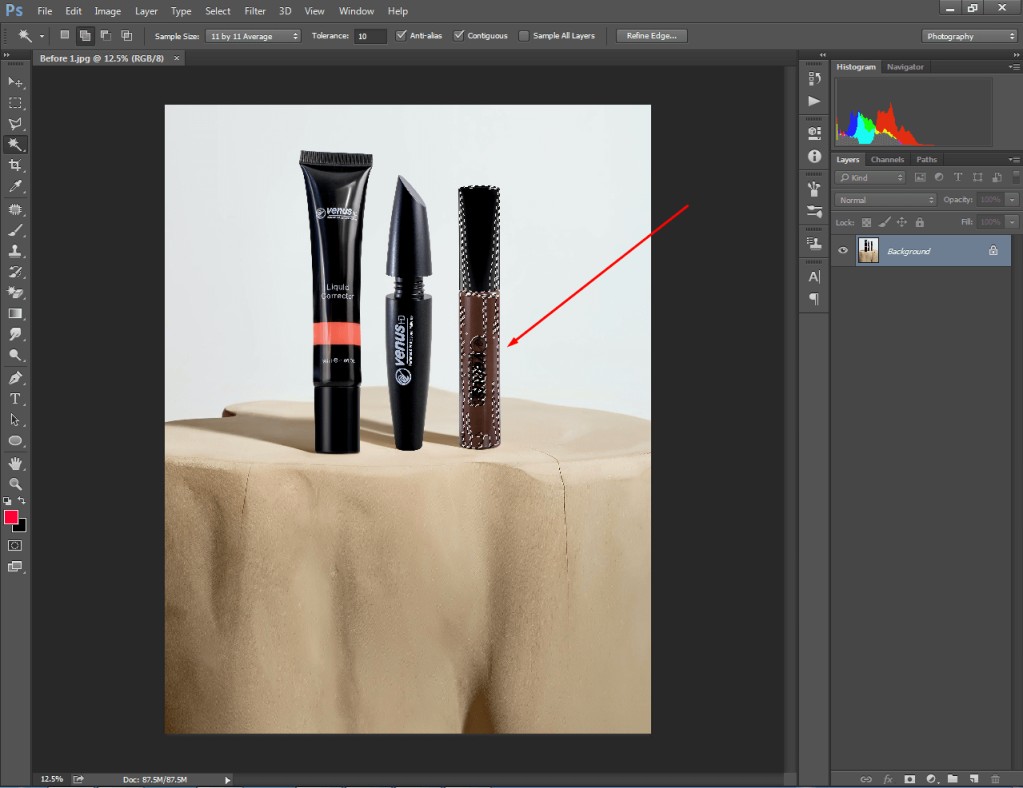
You have to click within the object several times and make those extra selection lines disappear. Then, you need to make your selection in this form.
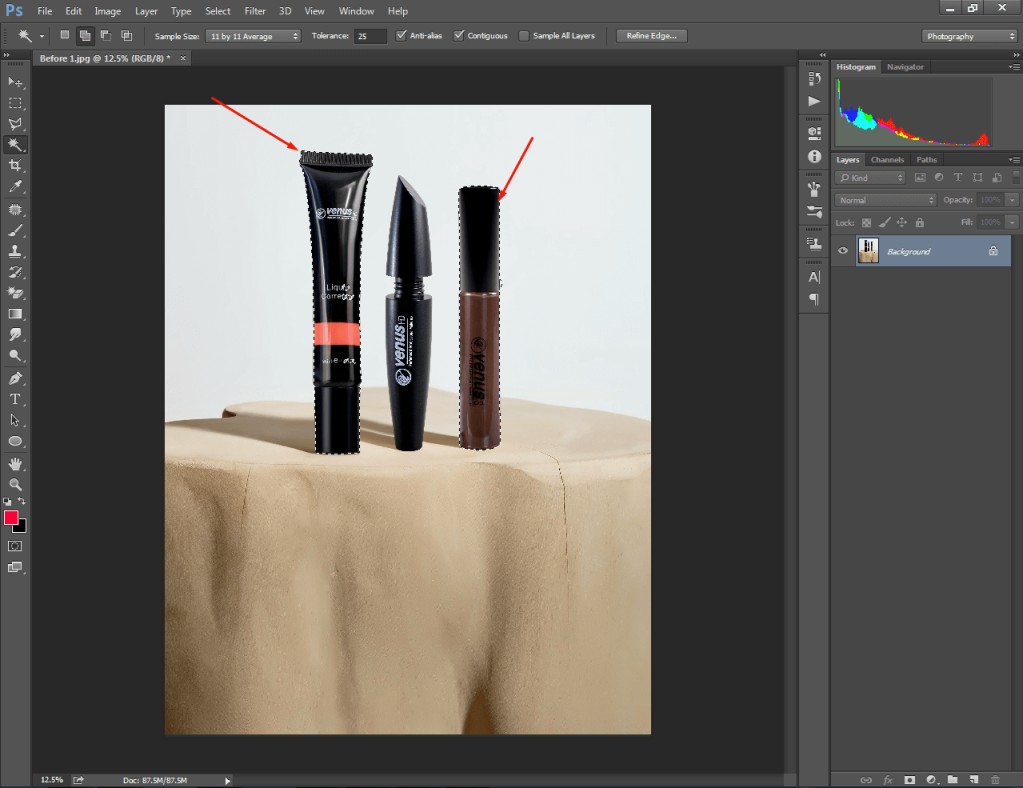
In this method, you can use the magic wand tool to select multiple objects at a time. Now, it’s time for background removal.
Let’s do that.
Know More: Remove White Background Photoshop
How to Remove Background in Photoshop Using Magic Wand?
After making a selection, you can remove the background and add a mask to your selection. Here’s the Photoshop magic wand remove background technique.
Step 1: Pick Magic Wand Tool
First of all, open your sample image in Photoshop and enable the magic wand tool.
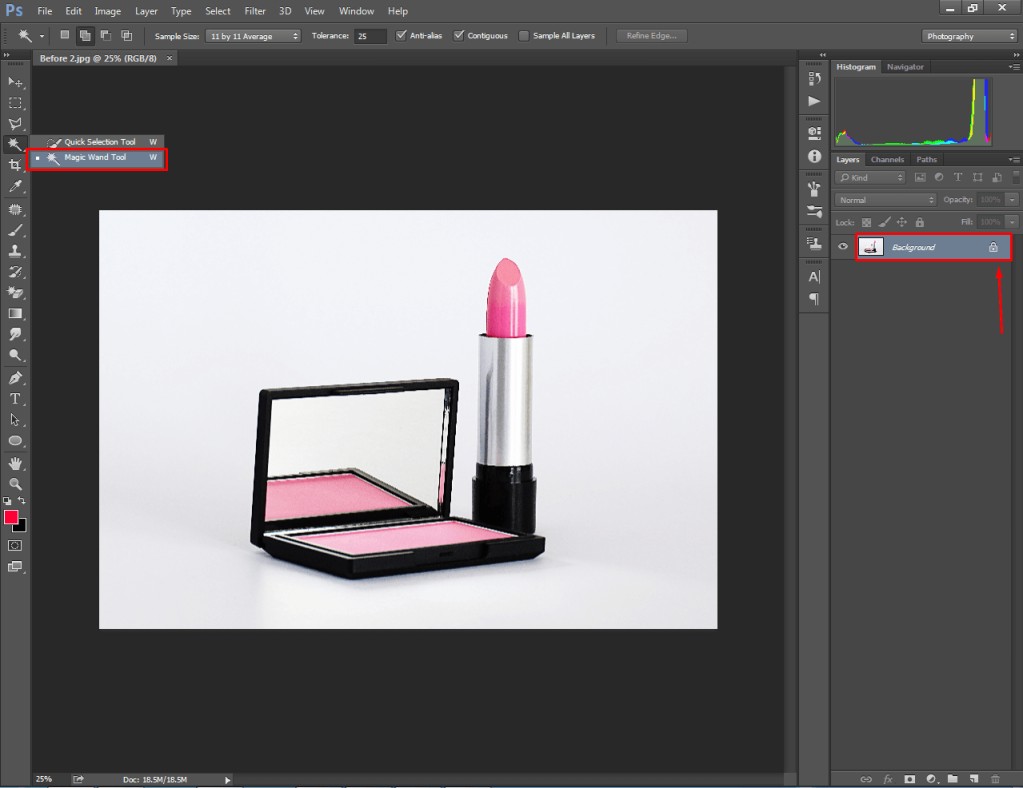
You will get the background layer in locked form. Simply click on the lock icon to unlock the layer.
Step 2: Click on the background
Now, we have to select the background. For doing that, do a single click on the background. If you don’t get an accurate selection, adjust the tolerance option.
When the selection goes inside the object, reduce the tolerance option. Also, you can increase the tolerance to get an accurate selection. Press CTRL + D to hide the existing selection. You have to bring your selection for this look.
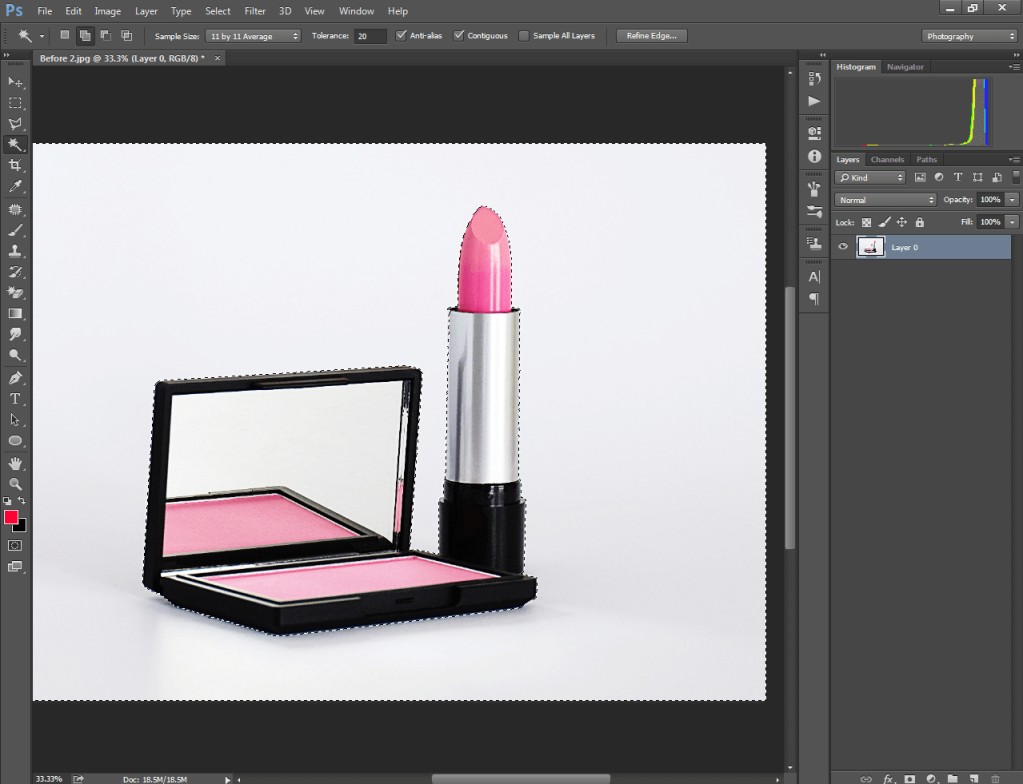
We have selected the background and excluded the object from the selection. Then, you need to press “CTRL + SHIFT + I” to make an inverse selection.
Step 3: Add mask to the selection
From the layer panel, you need to click on the mask icon. Here’s it.
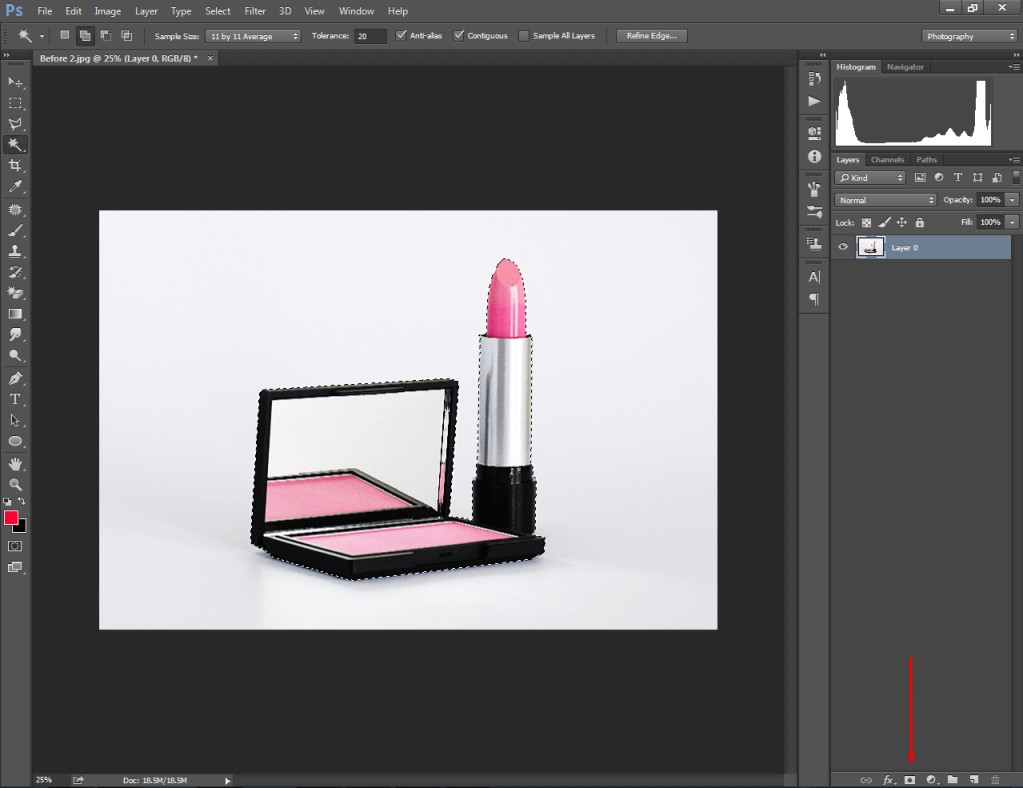
Next to that, you will find the image in masking mode. Double-click on the mask icon on the layer to get adjustable options.
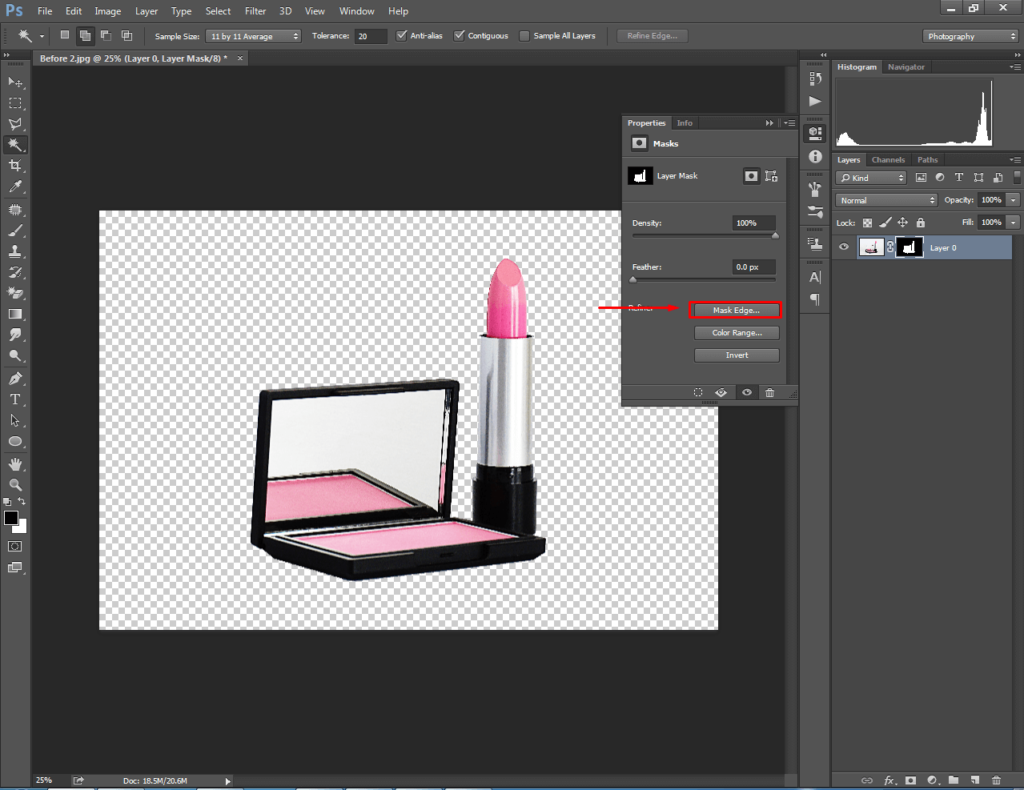
Now, click on the mask edge option to make further corrections.
Step 4: Refine Mask
From the refine mask option you can fix visible edges. You just need to customize “feather” and “shift edge” to hide the edges.
Set the feature value to 1 or 2 px depending on the edges. After that, reduce the shift edge value to -100%.
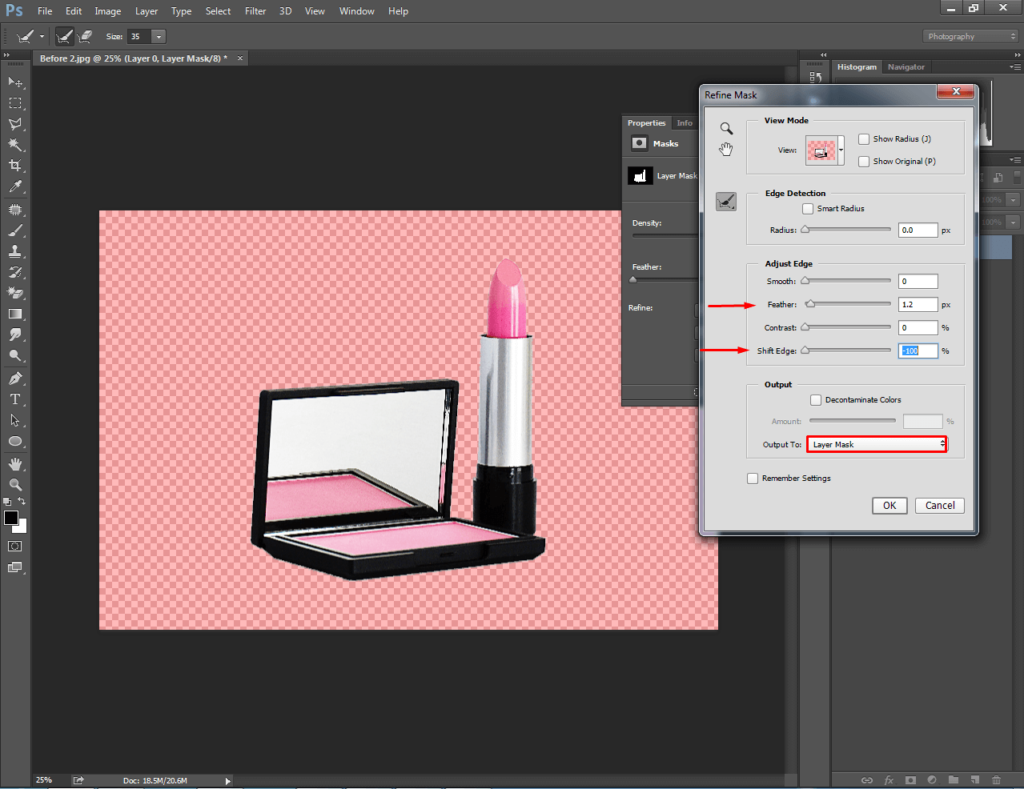
Those values are not universal for all types of images. You have to apply different values for a specific selection.
Know More: How to Add Fonts in Photoshop CC | How to make something look Gold in Photoshop
When you get the accurate result, set the output to “Layer mask” and press ok. That’s it. You will get your object with a transparent background.
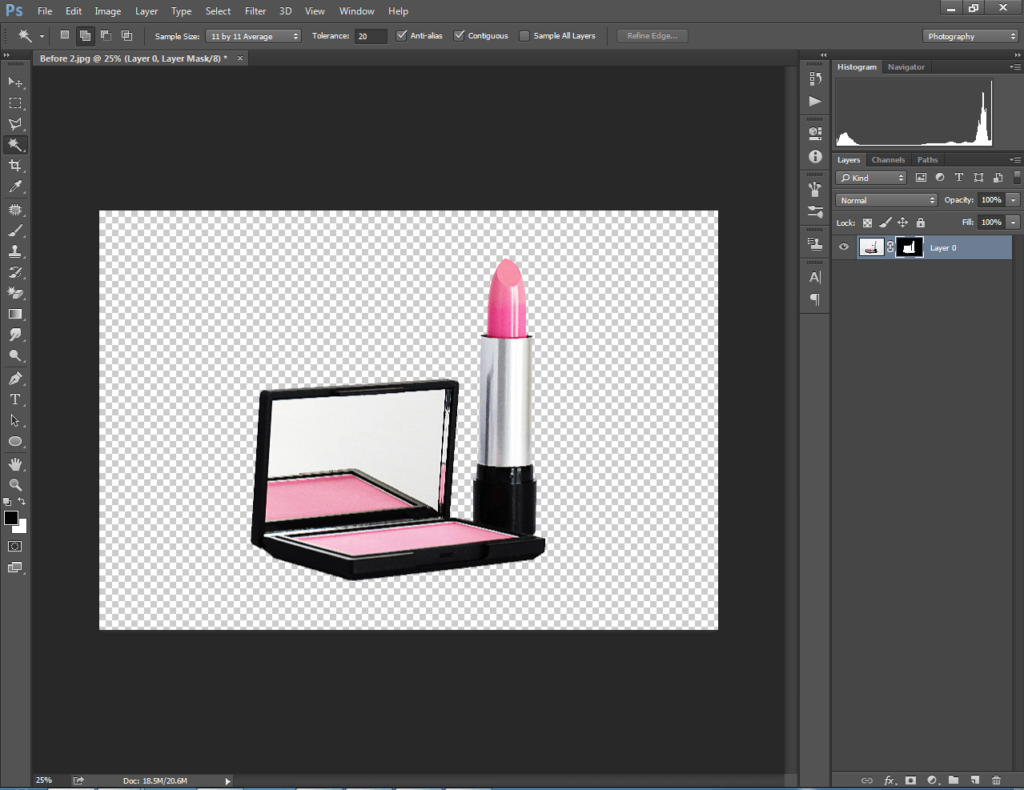
That’s the easy process to remove the background with a magic wand tool. You can use this method in your product photo editing.
When To Use
- Working on a plain background.
- Working on solid color background.
- Selecting specific Shapes.
- Make a selection of hard Edges.
- Background removal.
- To get a transparent background.
- To replace a background.
When Not To Use
- To select hair and fur.
- To select smoke, glass, and transparent Object.
- Working on soft edges.
- To create a clipping path.
Final Thoughts
At this point, you have learned everything about how to use a magic wand. Now, you can utilize the tool to enhance your graphic design skill. Do you need assistance from professional and highly experienced designers?
Feel free to contact Clipping Way. We are available 24/7 to assist photographers, E-commerce owners, print media, studio people, and product advertisers with professional Photo Editing Services.
FAQ’s
How does the Magic Wand tool work?
The magic wand tool makes an automatic selection based on shades, pixels, and colors.
What is the shortcut key to activate the magic wand in Photoshop?
“W’ is the shortcut key to activate the magic wand tool. However, it may bring the quick selection tool sometimes as both are in the same groups. You can switch between those tools with “SHIFT + W”
Can i make the magic wand tool more accurate?
Enable the Anti-Alias feature and adjust tolerance settings to make the magic wand tool more precise.
How can i select multiple areas with a Magic Wand?
You need to enable the “Add to selection” feature from the top of the screen.


