Different sizes of images are required for different platforms. It’s not always possible to capture the same image in different sizes. In that case, image resizing is the best option to make the image usable for different platforms.
Most people prefer to use Photoshop to resize an image. But you can also do it using Adobe Lightroom. In this article, we are going to show you how to resize image in Lightroom.
By following our method, you can both increase and decrease the size of your image.
Why Image Resizing is Essential for Photographers and Online Sellers?
When you are dealing with eCommerce Product Photo Editing, you have to maintain specific image sizes according to the eCommerce platforms. By resizing your images, you ensure that your product image will be suitable for the platform.
Otherwise, your product image won’t be approved for the product listings. It’s also important for individual eCommerce owners as maintaining specific sizes is essential for better compatibility for online buyers.
It’s also essential for photographers. For example, who maintain personal websites for photography portfolios, image resizing holds the key to a seamless browsing experience.
Large image files can bog down your website’s loading speed. By resizing your images, you can maintain quality while reducing file size.
Also, your clients may have different size requirements for a specific image. Image resizing gives you the option to maintain different image sizes without capturing the image several times.
4 Simple Steps To Resize Image in Lightroom
Step 1: Import the image into Lightroom library
First of all, you have to start by opening your image in the Lightroom library. You have to click on the import option and choose the image from your device.
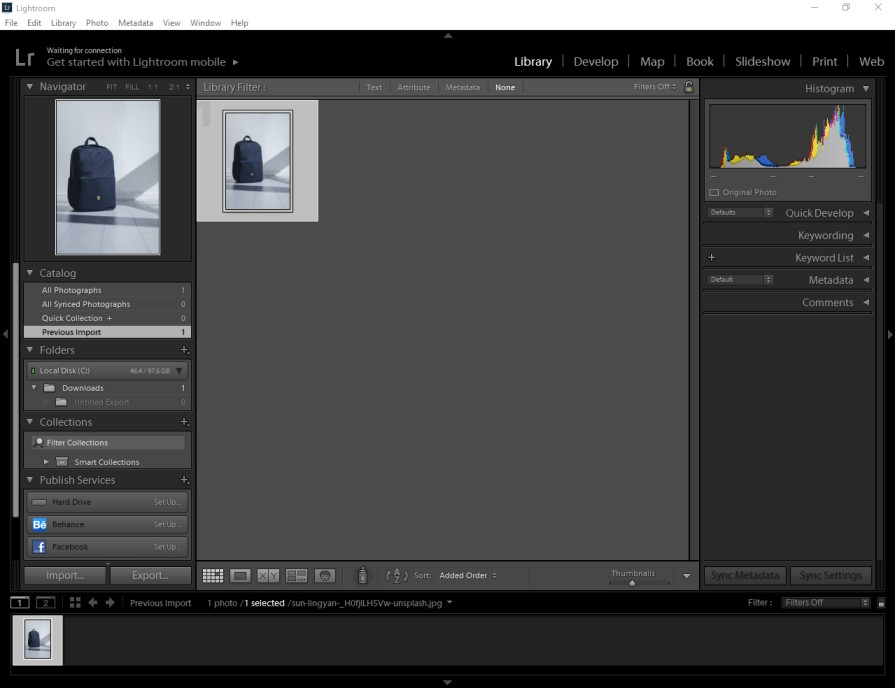
After that, You have to go to the “develop” option to resize the image in Lightroom.
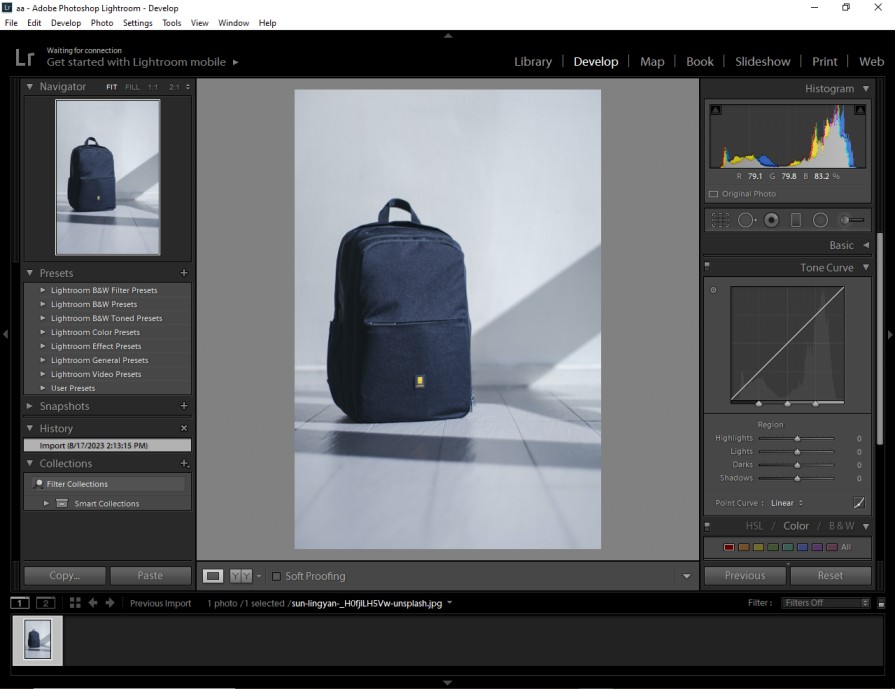
Basically, we are going to use the Export option for the resizing task.
Step 2: Go to the export option
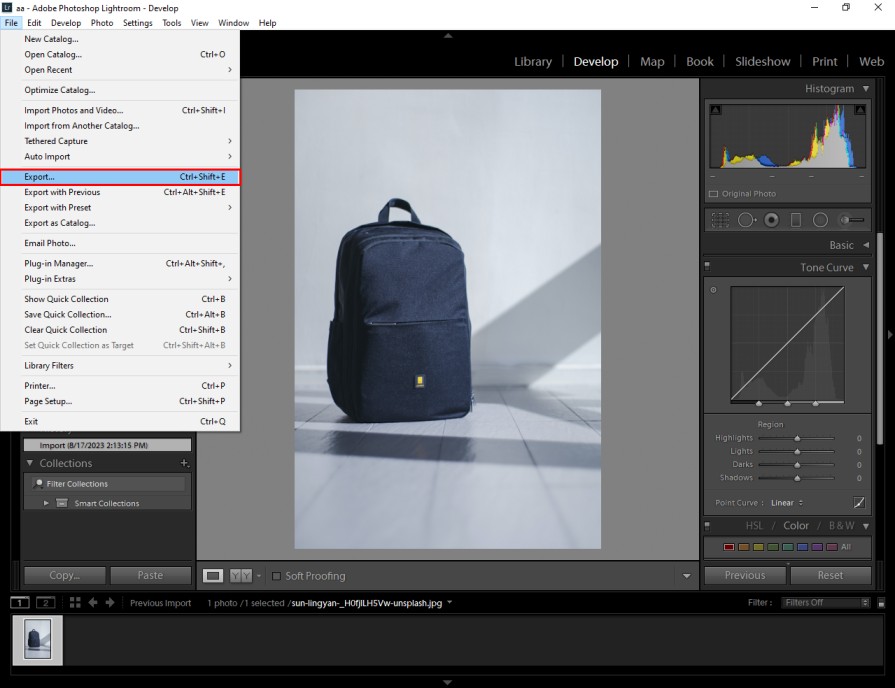
In this step, you need to click on the “File” option from the top and choose “Export” from the list. Here you can see that.
Now, you have to click on the “image sizing” option. Here, you can see this option.
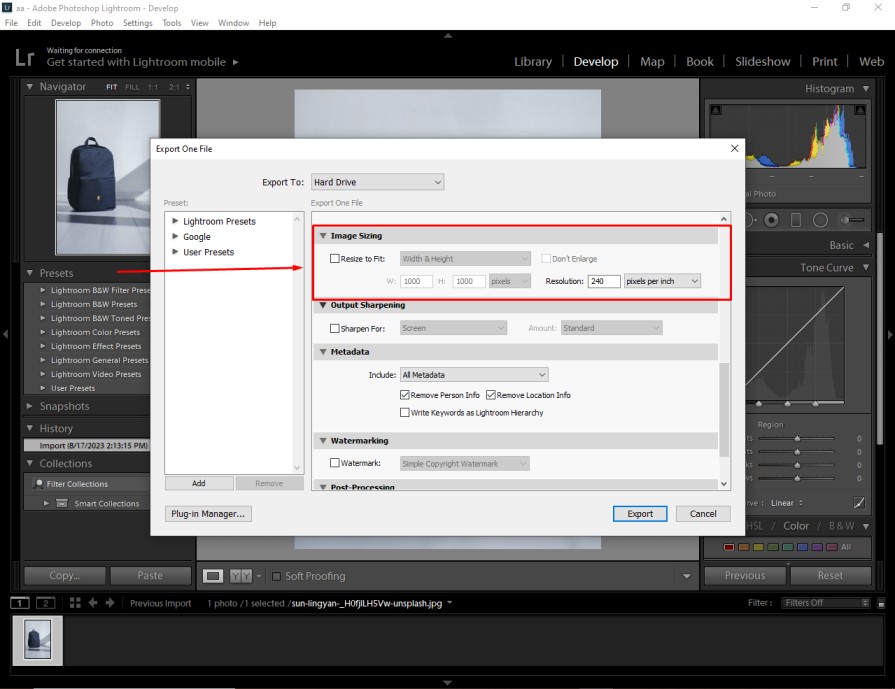
Now, we are going to proceed to how to resize images in Lightroom.
Step 3: Choose width and Height
In Lightroom, there are several options to change the picture’s size. We are going to use the width and height option for this method. We have to click on the “Resize to fit” option to unlock the resize access.
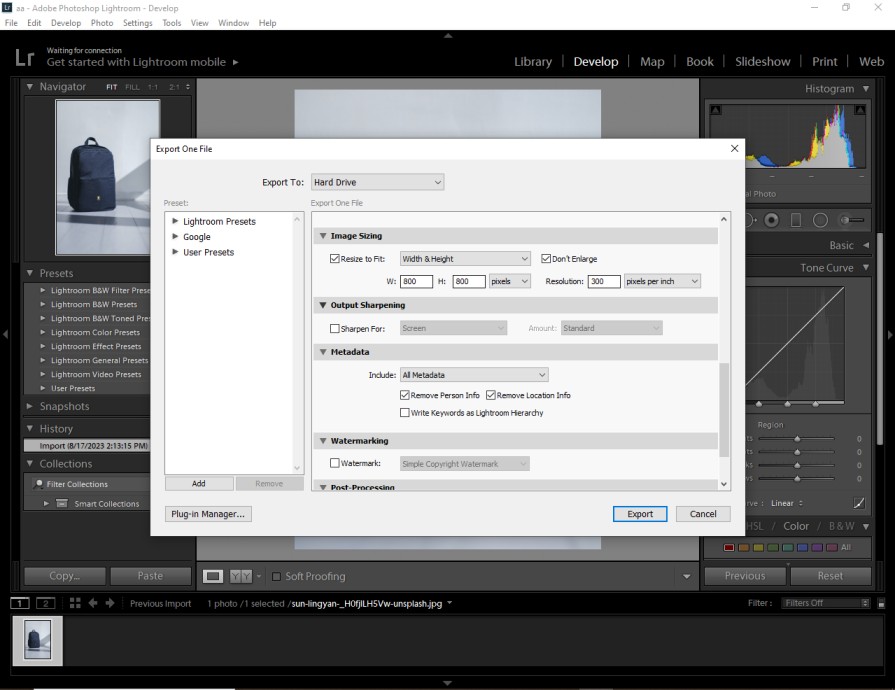
It will allow you to choose the height and width of the image individually. Also, you have to select “Don’t Enlarge”. It will protect the image quality after resizing.
When you try to enlarge the image, it will damage the resolution of the final output. For this image, I am going to set the preferred size to “800 Pixels into 800 pixels”. You need to set the image size according to your preference.
Step 4: Export the resized image
In Adobe Lightroom, you can’t preview the resized image directly. You have to export the image so that you can save it to your device. Simply, you just need to click on this option.
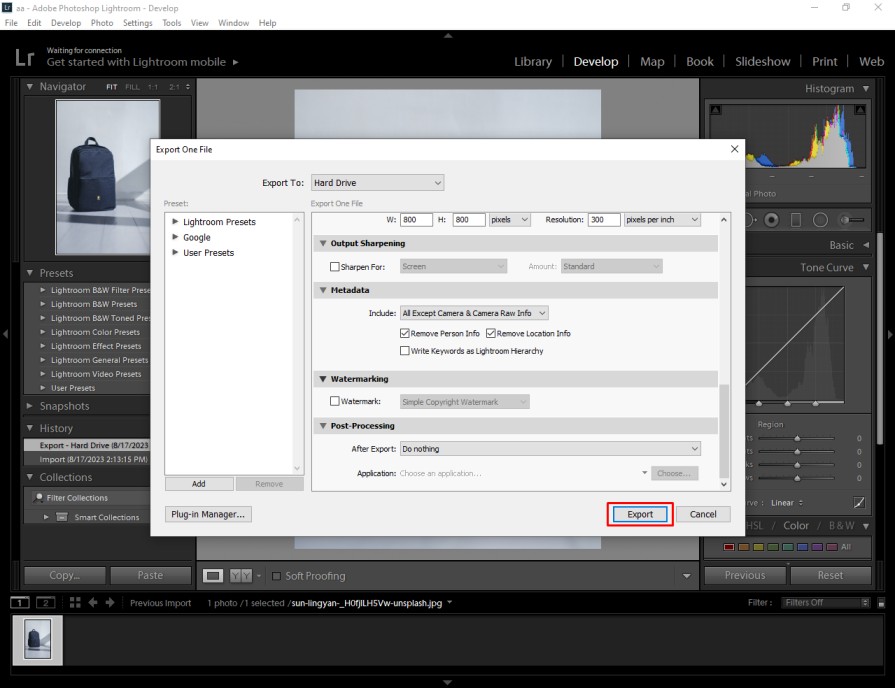
It will save the new resized image to the saved storage. That’s the most convenient option of how to resize an image in Lightroom.
As we have mentioned earlier, there are some other options available as well to resize the image in Lightroom. Would you like to know about those methods too? Well, it will be highly beneficial for you to resize Ecommerce images.
How to Resize Images in Lightroom with Dimensions?
Step 1: Choose dimension from exports
The primary method is similar to the previous one. You have to go to the export option in your Lightroom after opening the image. Then you have to choose the Dimensions option.
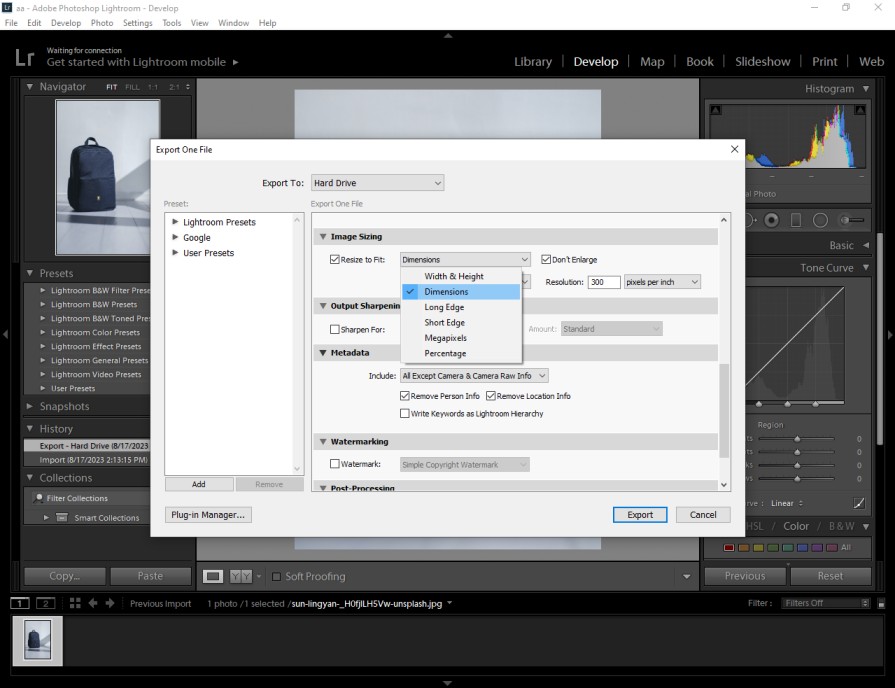
Step 2: Set dimensions
If you are going to resize the image for Amazon, you need to select the dimensions at least 1000 pixels for both sides. This is the minimum image size requirement. Also, you should images with higher resolution.
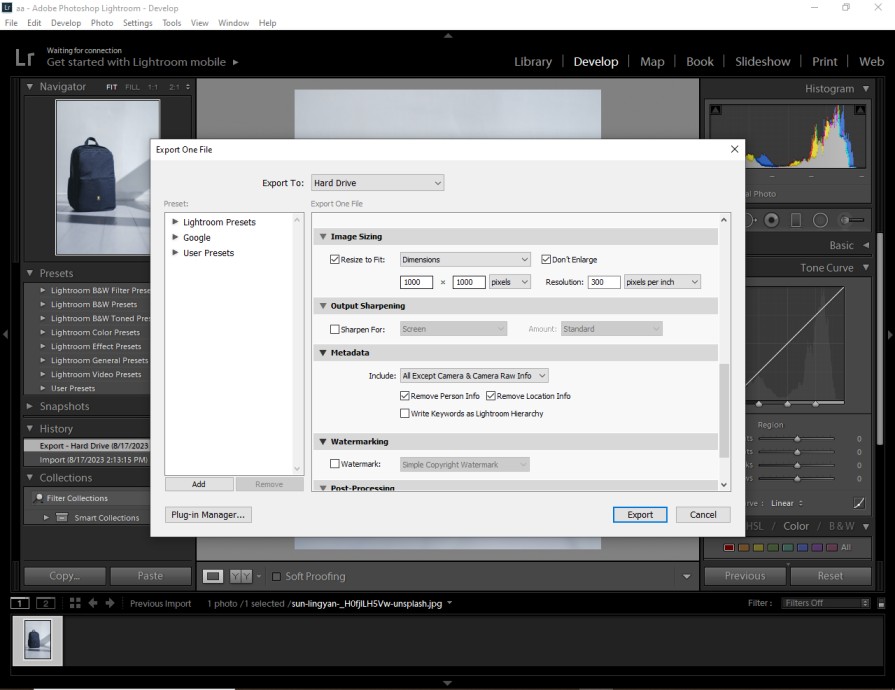
This size is recommended for product photography. By following the above method you can resize your image in Lightroom without putting too much effort into it.
Apart from this, we can also assist you with another useful method. Particularly, when you are going to increase the image size, this method is suitable for that. Let me show you the process.
How to Resize Images in Lightroom with Long Edge and Short Edge?
Step 1: Choose long edge from export
Once again, you have to go to the Export option after you have opened your image in Lightroom. That will show you the long-edge and short-edge options.
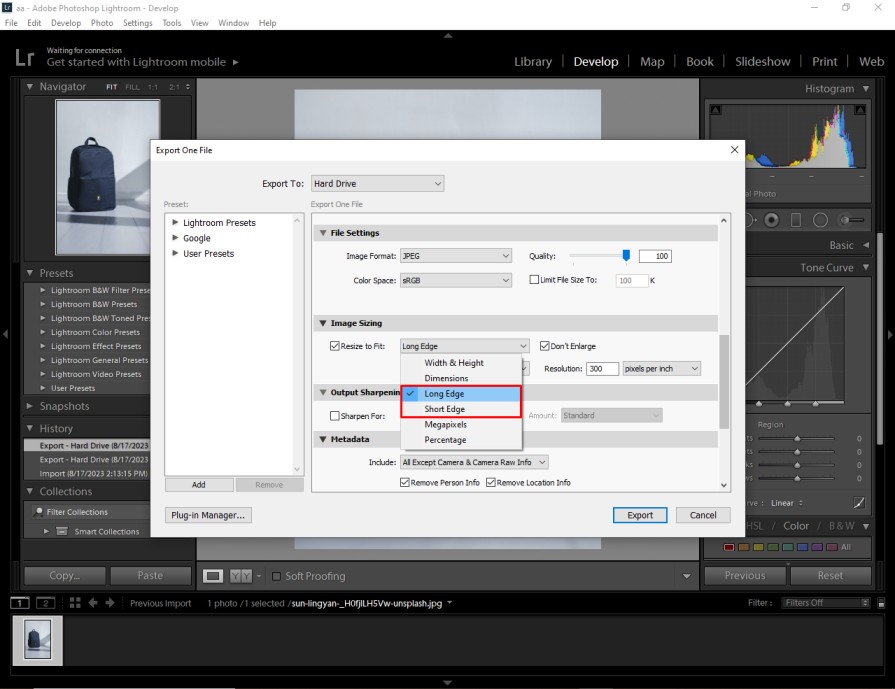
You have to choose those options one by one. For example, you have to start with a long edge. Then, you can also resize the same image using the short edge.
Step 2: Set pixels for long edge
After that, you have to click on the long edge pixels option and put the required pixel number for your image.
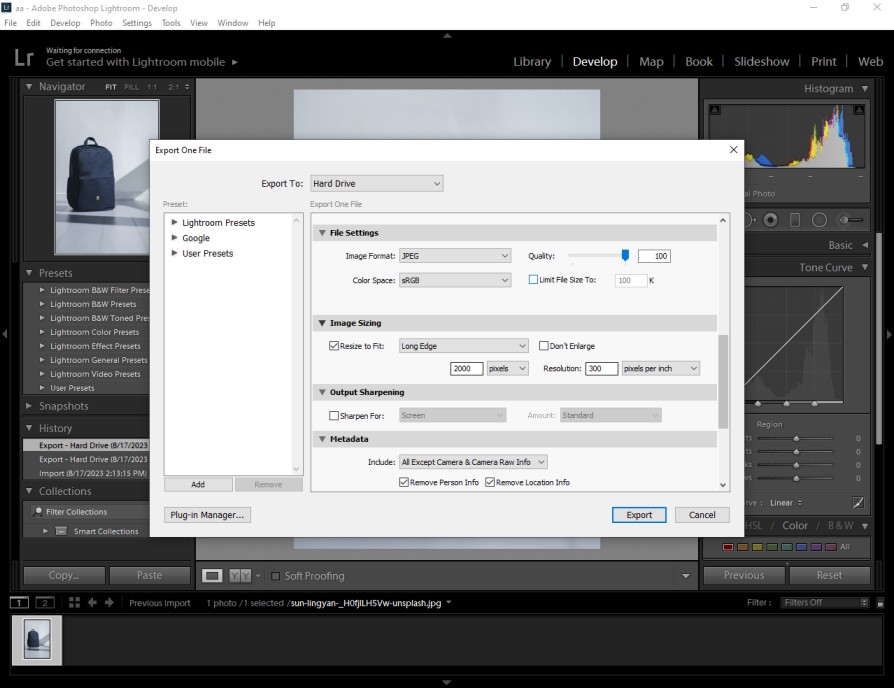
For this method, you don’t have to select the “Don’t Enlarge” option as you are going to increase the image size. When you are working with a simple background, this method works perfectly to increase the image size without reducing the image quality in Lightroom.
How to Choose the Perfect Image Size and Resolution?
Website images
When it comes to websites, loading speed is crucial. Large images can slow down your website’s loading time. That will affect the user experience. For regular website images, a resolution of 72 PPI and a width of 1200 pixels will be perfect. If it’s a full-width image, you should aim for around 2000-2500 pixels in width.
Social media
Each social media platform has its preferred image sizes. For example, Instagram favours square images with a resolution of 1080 x 1080 pixels. Facebook cover photos should ideally be 820 x 312 pixels. If you are going to use the images in social media, you should follow their image guidelines to get the best result.
Printing
If you’re working on a print project like flyers or posters, you’ll need higher-resolution images. A resolution of 300 DPI is the standard for good print quality. You can measure the space you want to fill with the image and choose dimensions accordingly. It will ensure the image’s DPI matches the print requirements.
Maintain aspect ratio
When resizing an image, you always have to maintain its aspect ratio. The aspect ratio is the relationship between the width and height. If you don’t preserve it, your image will appear squished. In Lightroom, you can lock the aspect ratio while resizing images.
Bonus Tips
- Enable the ‘Don’t Enlarge” option so that the output image doesn’t get enlarged than the original dimension.
- Increase the image resolution also to get a better-quality image after the resizing.
- Use the long and short edge options to increase the image and use dimension to decrease image size.
Common Mistakes
- Don’t exceeds the size of the original image size it may reduce the image quality.
- Don’t select the “Don’t enlarge” option when you are going to increase the image size.
- Don’t forget to select “Resize to fit” to make the final results look natural and sharp.
Wrap Up
At this point, you have learned how to resize images in Lightroom. You can use the dimension, height, width, long edge and short edge options to resize your image according to your requirements.
From now on, you should not have any problem with the image size requirements. Do you need any professional assistance with the image post-processing?
FAQ’s
How do i open an image in Lightroom for resizing?
You have to import your image into Lightroom. Then, you have to select it in the Library module and switch to the export option.
What’s the simplest way to resize an image in Lightroom?
In the Develop module, go to the “Crop & Straighten” tool, and choose a preset like “1×1” or “16×9” to resize the image easily.
Can i maintain an image’s aspect ratio while resizing?
You have to hold down the “Shift” key while dragging the cropping box to retain the original aspect ratio.
What about the image resolution when resizing for print?
In the Export dialog, you should set the resolution to 300 DPI in the “Image Sizing” section for high-quality prints.
Can i save different resized versions of an image?
Yes, you have to export it with a new filename to keep all different resized versions.
Does resizing affect image quality?
When you reduce the image size, it doesn’t affect the image quality. While increasing the image size, it will affect the image quality.


