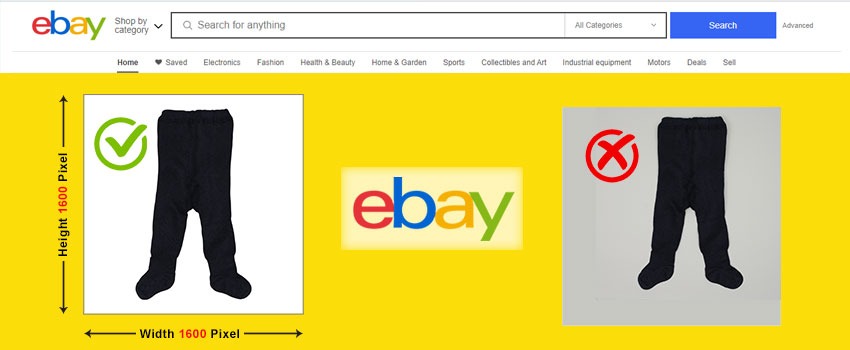
Whenever we want to buy something online, Amazon comes to our mind as the primary option. Amazon, the largest E-commerce platform in the world has more than 300 million active users.
In 2022, it generated $125.6 billion in revenue. Undoubtedly, competition is also increasing among Amazon sellers. Are you connected with Amazon sellers central? This article is going to bring lots of value to you.
To beat your competitors on Amazon and generate more sales, your product images need to be at the best level. Through this article, I am going to inform you how to resize images for Amazon and 7 effective tips to optimize Amazon Product Images.
After that, you will have a better idea of Ecommerce Image Editing. Can’t wait anymore to know about these valuable tips? Without any further delay, let’s start.
Resizing Product Images for Amazon
Amazon has set some rules about Product Images for the sellers. For obeying Amazon Image Requirements, we have to resize Product Photos before uploading them on Amazon. Actually, this requirement makes the product image more acceptable to potential customers.
So to get approval for your product images, you should follow the Amazon product image requirements. You might be thinking about which file format to use and how to resize image for Amazon? We are going to do that using Photoshop. Let me show you step-by-step guidelines.
Before jumping on the step-by-step guidelines, I would like to inform you about Image Cropping and Resizing.
What is Cropping?
When we cut off any portion of a photo for a better view and framing, it’s called image cropping. You can change the pixels and aspect ratio of the image with the help of cropping.
So, it can be beneficial when you want to remove an element from your image. Also, changing the framing of an image helps the viewers to keep their attention on the primary subject.
Know more: Product Photography Pricing Guide For Better Budget Optimization
What is Resizing?
Some people consider resizing as similar to cropping. But there is a big difference between these two image manipulation techniques. Resizing indicates changing the file size without removing any elements from the picture.
This technique is essential for keeping an image fit to a specific size. In a while, we will learn how to resize images for Amazon using Photoshop.
How to Resize Image for Amazon in Photoshop?
Step 1: Finalize the image
First of all, you ought to know about Amazon’s image guidelines for dimensions. You can keep the dimensions to 3000 pixels maximum in height and width.
If your image is smaller, then you have to increase its size. Otherwise, it won’t look clear after uploading which can be distracting for viewers.
Step 2: Amazon image requirements
As I have mentioned earlier, Amazon has some specific requirements for its images. According to those requirements, the minimum size of an image for Amazon is one thousand pixels both in height and width.
So, you can’t use images that have a lower dimension than 1000 pixels and a higher dimension than 3000 pixels. But how to inspect the dimension of product images, what to do? Let’s find the solutions in the 3rd step.
Step 3: Open it up in Photoshop & review the sizing
Open the product image in Photoshop and go to the “Image” option from the top. Then, you need to click on the “Image Size”.
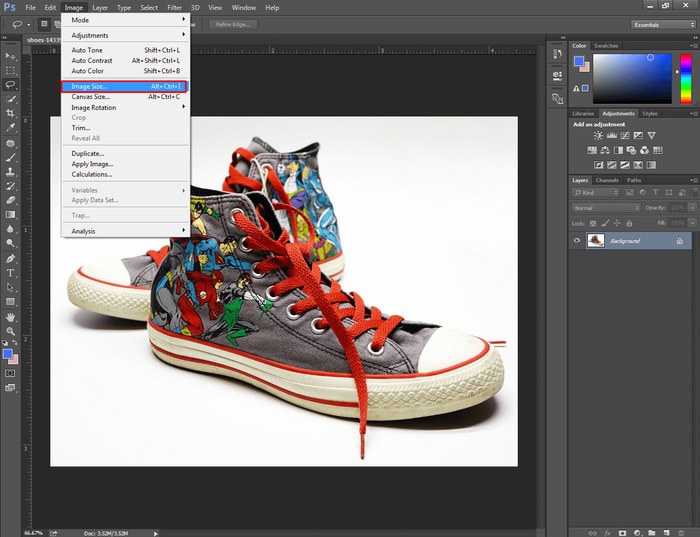
It will show you the dimension of the height and width of that image. Here you can see the sample.
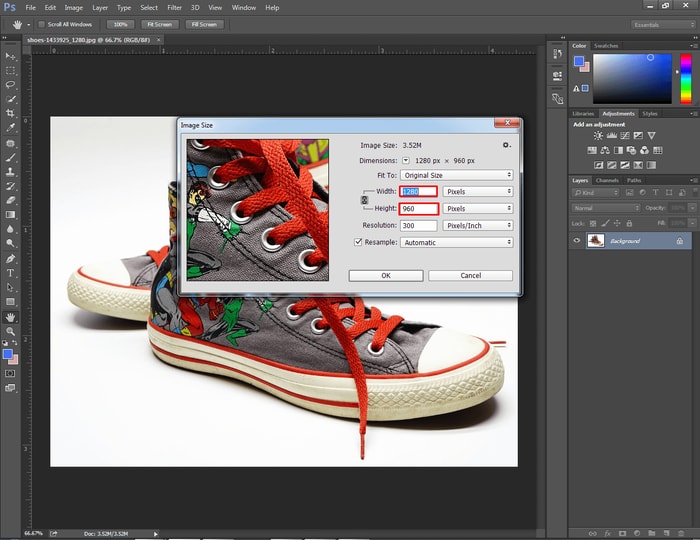
The dimension of the height of our sample picture is less than the recommended Amazon image size. So, we have to resize the picture. Let me show you how to do that.
Step 4: Resize & crop the image in Photoshop
After getting to know about the dimension, you have to press “Enter”. This will bring the image back to the normal mode. Now, press on the “C” from the Keyboard, and the cropping mode will be on.
At the top of the left corner, you can see a box for cropping ratio and resolutions.
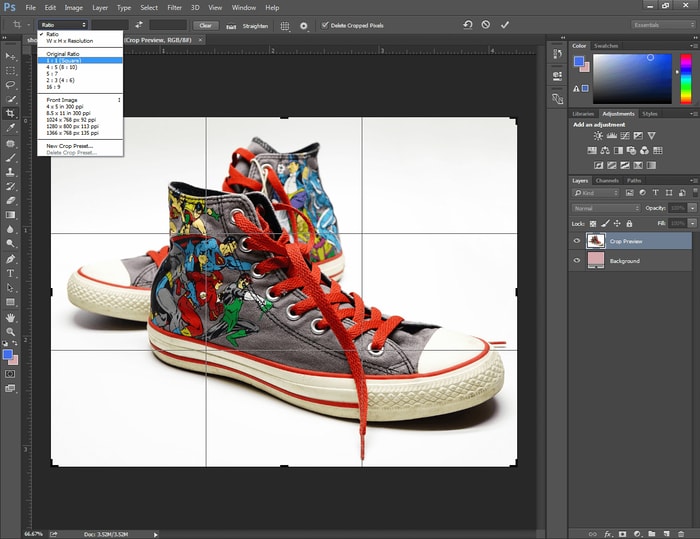
From that box, we are going to set our expected image dimension to resize images for Amazon in Photoshop. If you set the dimension to 1:1, it will crop the image in a rectangular shape.
As we are going to resize the image select “H × W × Resolution” so that we can set specific dimensions. I am going to set 1000 pixel’s dimensions both for height and width.
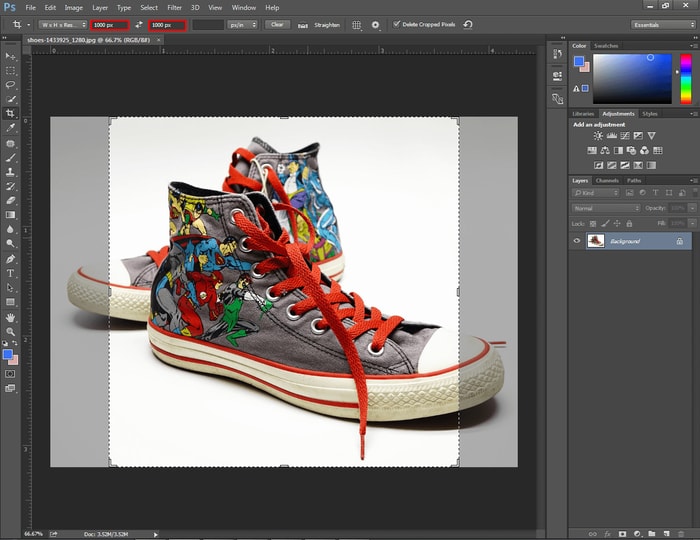
Here you can notice, our object is not visible properly inside the frame. Press and hold the left mouse and make the frame bigger by dragging it.
The objects should be properly positioned inside the frame. Want to have a look at the sample picture?
Here you go.
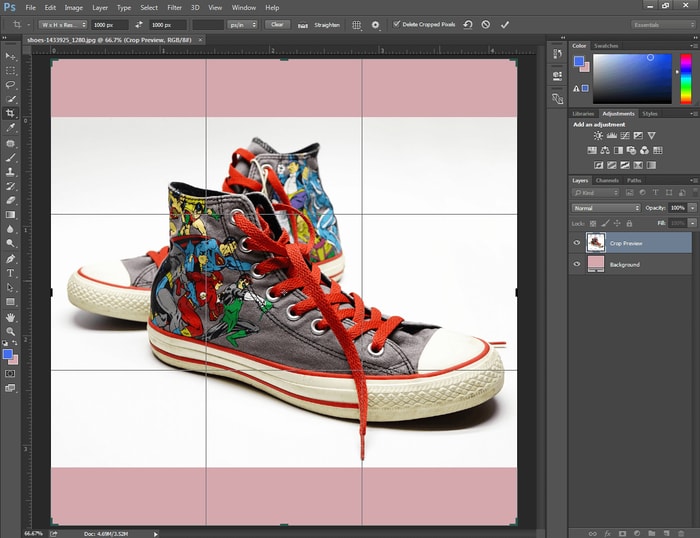
Now, the object is properly positioned but there are some additional colors available with the background.
We need to remove that color from the background. If you want to remove the background from your product images, you can try our Background Removal Services.
However, pick the brush to remove the external color from the background.
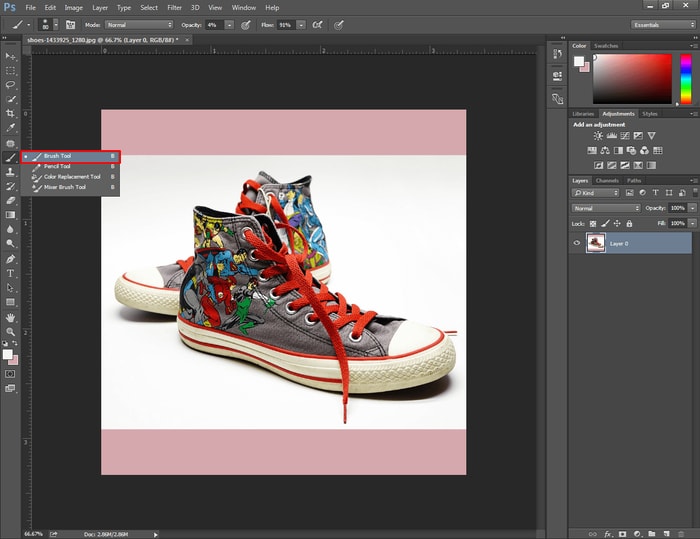
Then, you should click on the color selection below and set the background color of your image as the foreground color.
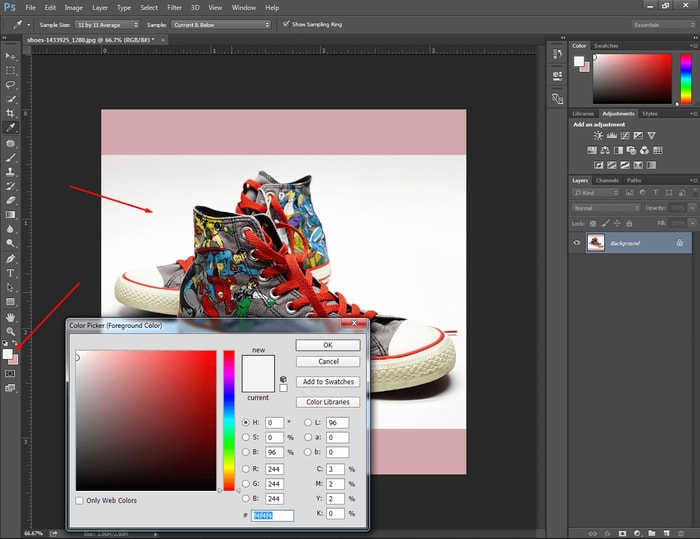
Before you start painting on the background, change the opacity and flow from the top. Set the opacity around 70% and the flow around 80%. This will keep the changes realistic.
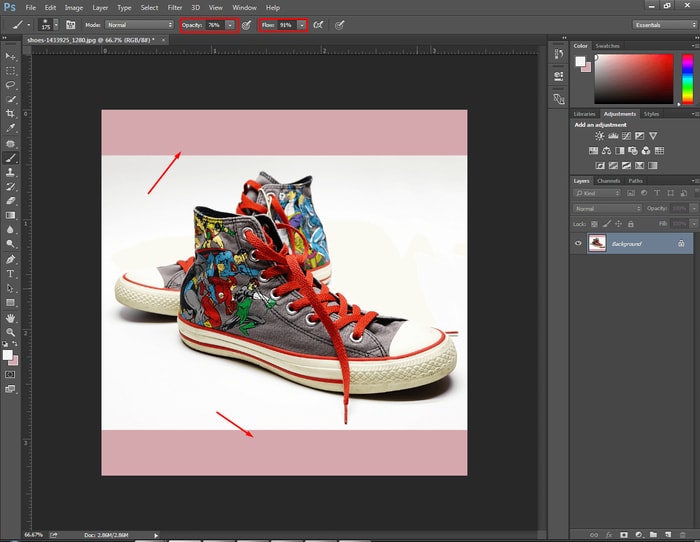
Start painting with the brush over the color and it will be turned into the background color just like this one.
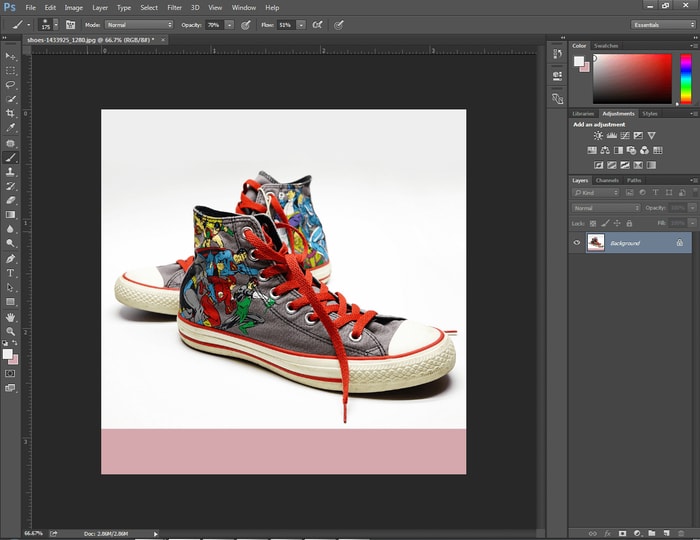
In a similar way, change the additional background color from the bottom. The whole background should contain only White color.
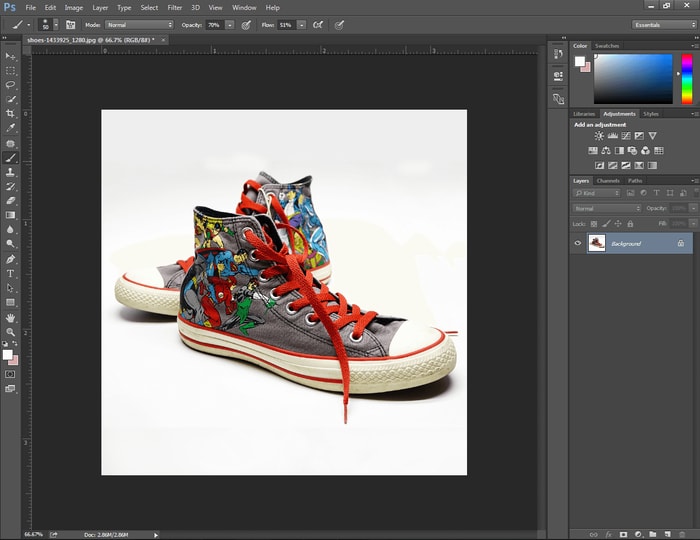
See, we have resized the picture and presented it on a plain white background. Following the same procedure, you can also resize images for Amazon in Photoshop.
Is that image compatible now according to the Amazon Image requirements? Let’s check it out.
Go to the image size and inspect its dimension.
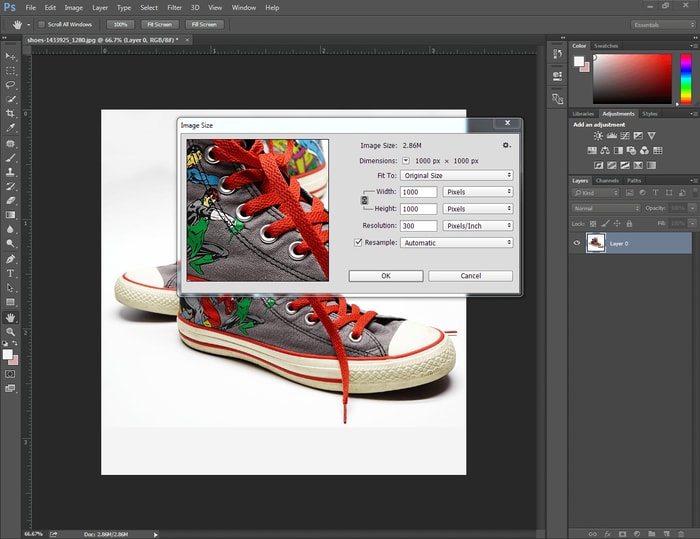
At this point, the dimension of the image is 1000 pixels both in Width and Height. So, we can use this image for Amazon. From now on, you can also do it. Now, it is time to save and upload the image.
Step 5: Save and upload
To save the image, you have to go to the file option and choose the “Save As’’ option.
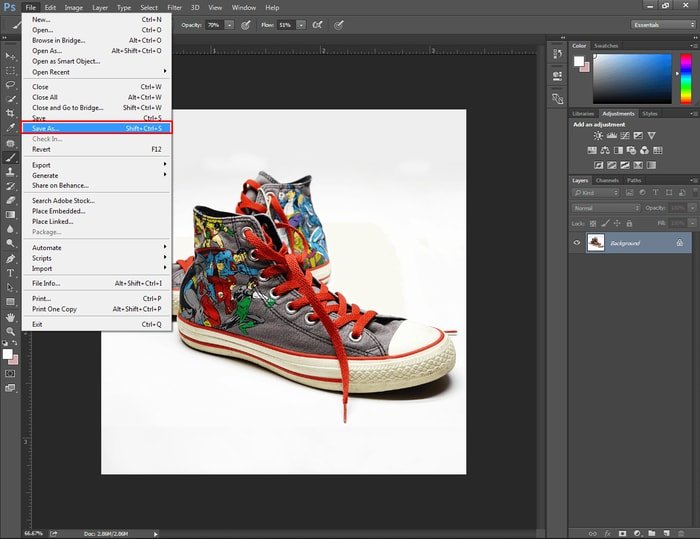
After that, you choose the file format and rename the file. You can save the image in JPEG or PNG format. Amazon accepts JPEG, TIFF, PNG, and GIF. You can use any of those formats.
Final Verdict on Resize Image for Amazon in Photoshop
For getting approval from Amazon, you must have to fulfill their image requirements. We know that resizing an image takes a bit of time. If you have a lot of images, it can be difficult for you to resize those images for a tight working schedule. In that case, you can take our Photo Cropping Service. We will take the responsibilities and make your product photos ready for uploading on Amazon.
Why do product images need to be cropped and resized?
Are you still feeling confused about why product images need to be cropped and resized? Let me clarify your thoughts. You might have noticed that Amazon’s product images are presented in square form.
To provide the visitors a consistent look of the product images, those need to be cropped and resized. Otherwise, your uploaded images won’t be accepted to Amazon. When you crop and resize your image, the audience gets the full view of the picture.
You can try our E-commerce image editing Service for bringing the best possible look to your product Photos.
Now, I am going to provide you 7 excellent tips that will help you in getting more revenue.
7 Tips to Optimize Amazon Product Images And Generate More Revenue
1. Follow The Technical Amazon Image Requirements
First of all, you should maintain Amazon’s technical requirements for images. If your product photo doesn’t meet the requirements it won’t get approval. I’ve informed you about the image dimension. Your products should occupy at least 85% of the frame.
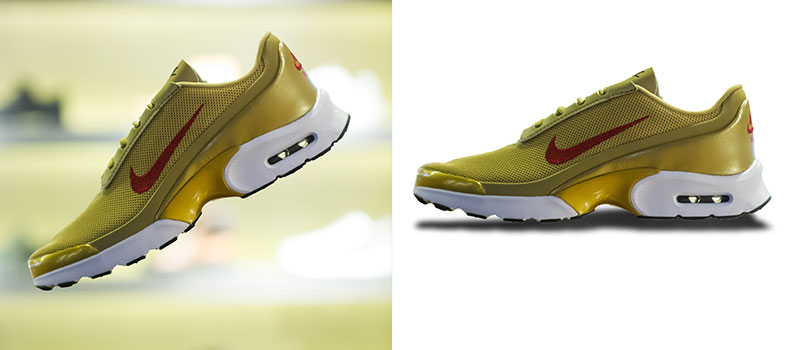
Also, you should keep the images on a plain white background. If your photos don’t have a white background, our Image Cutout Service can assist you in this case.
Before uploading the picture to Amazon, don’t forget to rename the image following Amazon’s guidelines.
2. Assign image priority on the product page
Assigning image priority on the product pages is an essential aspect of Amazon image optimization. You can use a maximum of seven images for a specific product. You can capture photos from a different angle in order to give viewers a clear idea about the looking of your product.
Keep the primary image clear and properly visible without missing any portion. Capture the photo from a decent distance and angle.
3. Adhere to Amazon’s standards for high-quality images
You should maintain Amazon’s standard of high-quality images. Your Amazon Product Photos should be captured professionally. Don’t use any vectors or drawings.
Also, there is no need to keep anything extra with the product photo that is not related to the product. This is not only important for Amazon’s approval but also these are important for making your photos attractive to potential customers.
4. Remember offer level images
For refurbished items, you are allowed to use “Offer Level”. When you use this term, that image will be displayed on Amazon’s offer listing page. It will assist the buyers to know about your offer.
5. Use a variety of product photos
Amazon has given you permission to use 7 Photos for a product. Don’t miss the opportunity of attracting a potential customer. Buyers want to get details about the product.
The more photos you will add, the product will be more reliable for them. Otherwise, buyers might lose concentration from your product for the lack of visibility.
You might question, which type of photos should I use? You can capture photos from separate directions. It will give a clear overview of your products from all dimensions.
If you don’t have the skill, you can hire a professional photographer for product photography. It may cost you some money but will be beneficial for you in the long run.
6. Mind the entire frame
Never capture the image from the angle that loses some portion of the subject. Also, you shouldn’t leave so much white space that the products look smaller than their actual size. The ideal proportion will be to use 85% to 90% of the entire frame. It will keep the overview simple, natural, and reliable.
7. Provide important information
If your product has some additional stuff, you can provide the information with Amazon product Photos. It will attract your potential customers. Also, potential buyers might give you priority over your competitors. You shouldn’t miss this opportunity.
FAQ’s – I’ve Got Some Questions
What is the best image size for Amazon?
Using 2560 px X 2560 px dimension is one of the best image sizes for Amazon.
How do i resize a photo to 16 X 9?
Open the picture in Photoshop and enable cropping mode. Set the dimension 16 × 9 and apply it to crop.
Why are my Amazon images so small?
Having too much space in the background can be the cause of small-looking pictures on Amazon.
How do i resize an image?
You can resize an image perfectly using Photoshop.
How do i resize a jpeg image?
Open the JPEG file in Photoshop and use the cropping tool.
What is the best program to resize photos?
According to experts, Adobe Photoshop is the best program to resize Photos.
Is there an app to resize photos?
Several apps are available to resize Photos, you can use Photoshop for the best result.
How can i resize a photo for free?
Using GIMP you can resize a photo for free.
How do i resize photos in bulk?
You can take our Photo Cropping Service. Discounts are available on bulk orders.
How do i resize a photo to 2 MB?
Upload your photo in Easy Resize and set the maximum file size to 2 MB.
How can i resize photos in bulk online?
You can use Bulk Resize Photo to resize bulk photos online.
