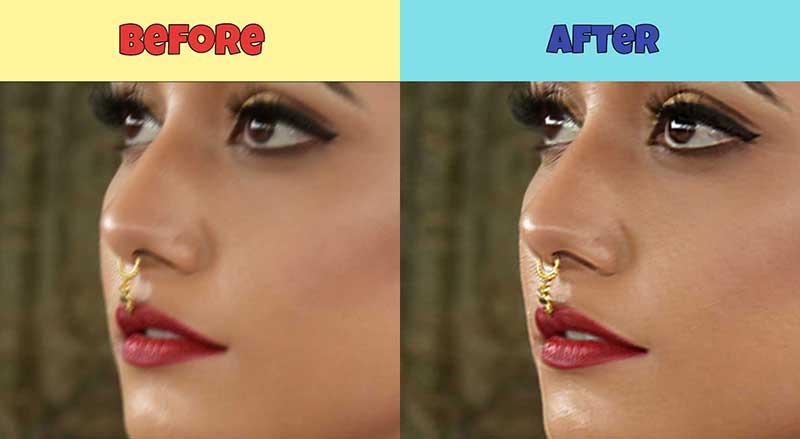
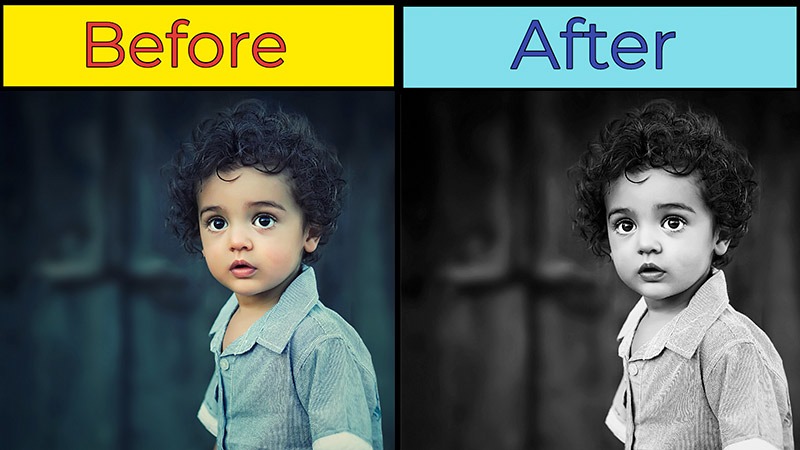
Photos become more noticeable after blending two images together. Using the image blending technique, you can present your targeted object or a product to attract more audience. Using Photoshop you can perfectly blend two images and make the final output way more attractive.
Within a while, you will learn how to blend two images in Photoshop. Also, you will get to know about Photo Retouching Service to make those images ready for uploading online.
I’m going to explain everything with easy step-by-step guidelines so that anyone can follow them. 5 bonus tips are also available.
How to Blend Two Images in Photoshop?
You can follow those three methods with any version of Photoshop such as Photoshop CS5, Photoshop CS6, Photoshop 2021, and so on.
Process 1: Blend Two Images in Photoshop with Layer Mask
For this image blending tutorial, we’re going to use the layer mask feature to merge two images together. Permit me to show you the procedure.
Step 1: Open two images in different tabs
First of all, we have to begin with opening two images with different tabs in Photoshop. To do that, select multiple pictures from your device and drag those photos into Photoshop.
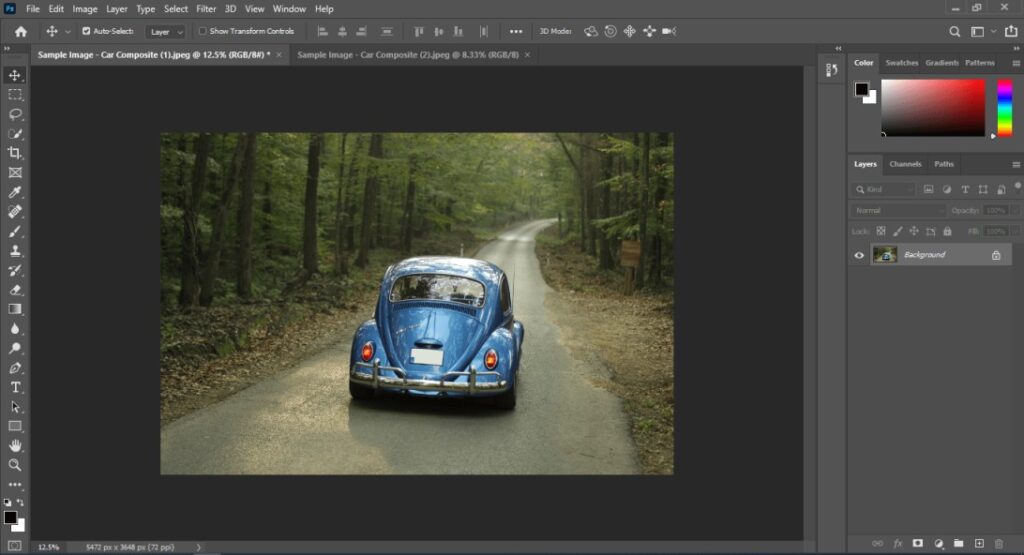
This car is going to be the object. We’ll blend this object with the secondary image. Here is the second image.

Now, let’s move to the next step.
Step 2: Select targeted object
As we have selected the car as our target object, we have to make the selection based on this car. Click on the background layer lock icon to unlock the layer. Next to that, you have to pick the quick selection tool from the left tool panel.
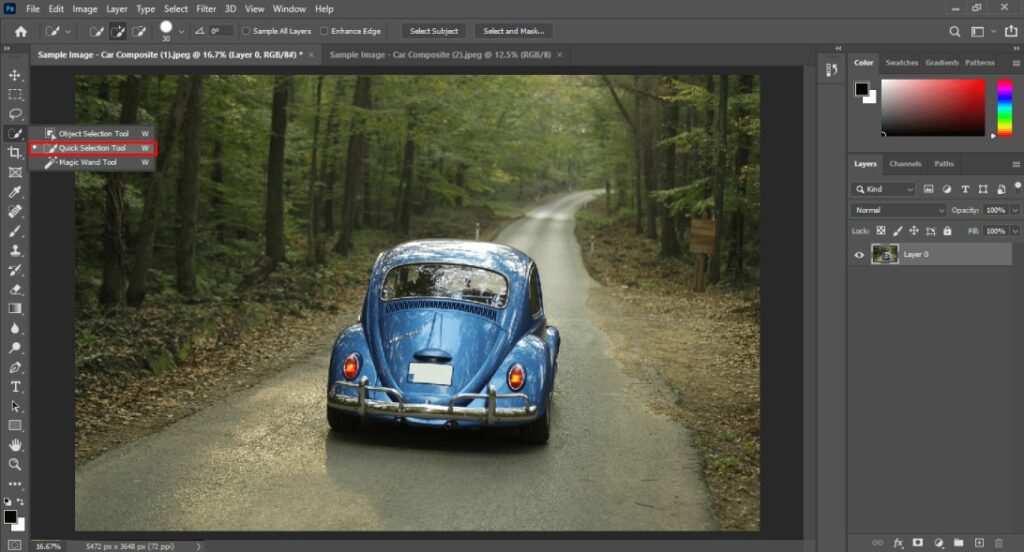
Making selection with the quick selection tool is an easy process. Simply press and hold the left mouse key and move the cursor over the object. After that, zoom on the primary image with the keyboard shortcut “CTRL +” and use “CTRL -” to zoom out.
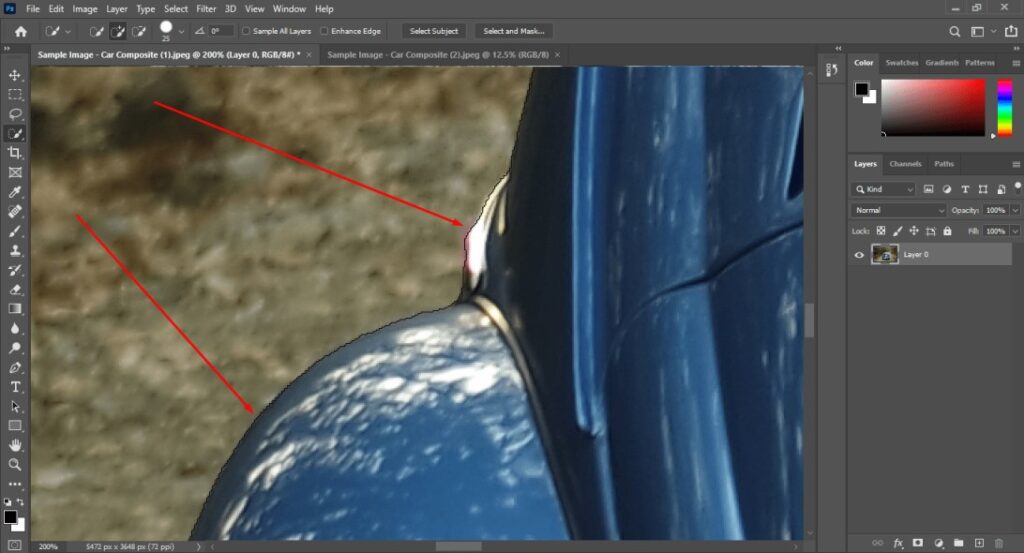
Do you want to exclude something from your selection? In that case, you have to press and hold the ALT key. After that, move the mouse over that area. That will minus that area from the selection. Here is the selection outcome.
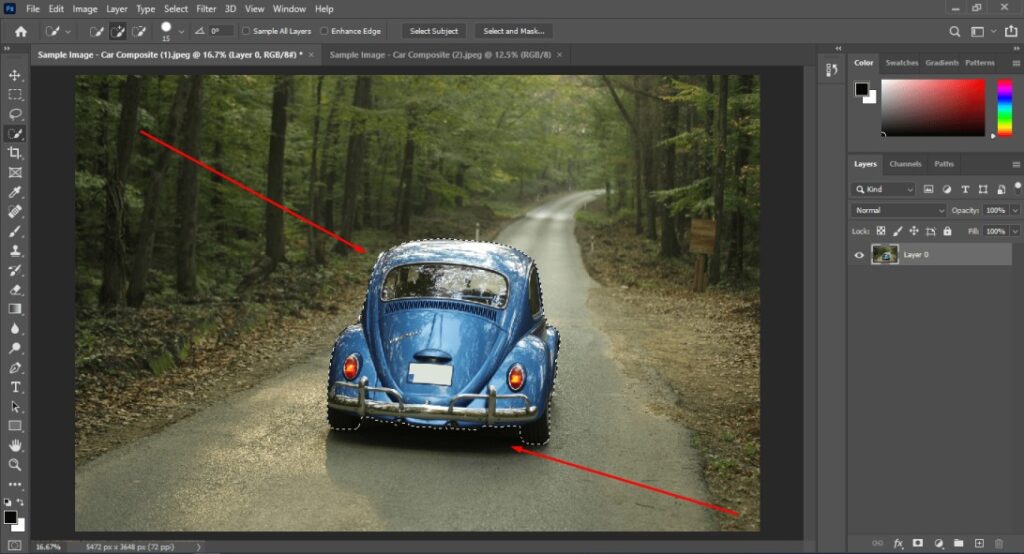
Now, the selection task is complete. Let’s move to the layer mask section.
Step 3: Add Layer Mask
In the 3rd step, you have to click on the “Add layer mask” from the below layer panel with keeping the selection enabled.
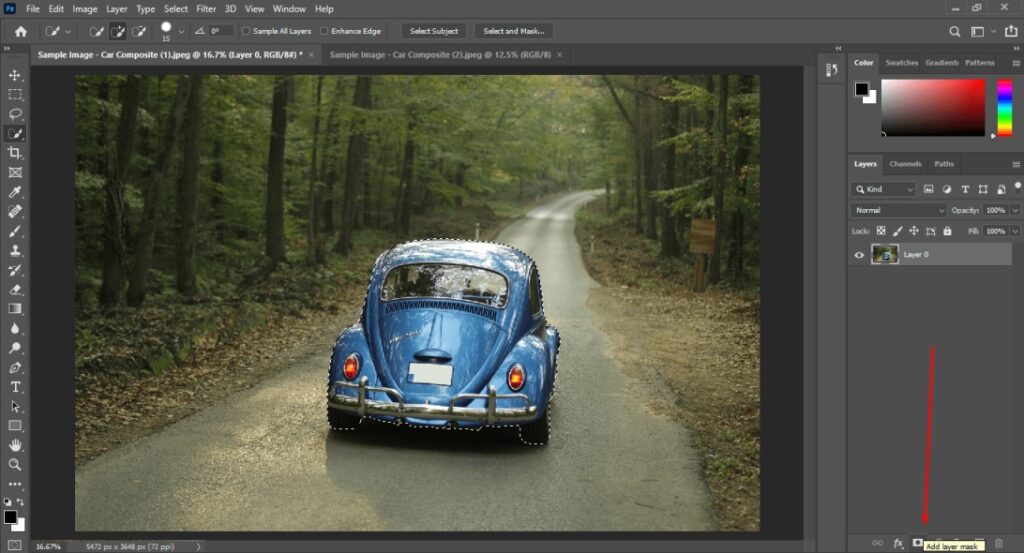
Alright, click on the layer and drag it to the secondary image of another tab. You have to release the layer inside the secondary image. That will blend two images in photoshop.
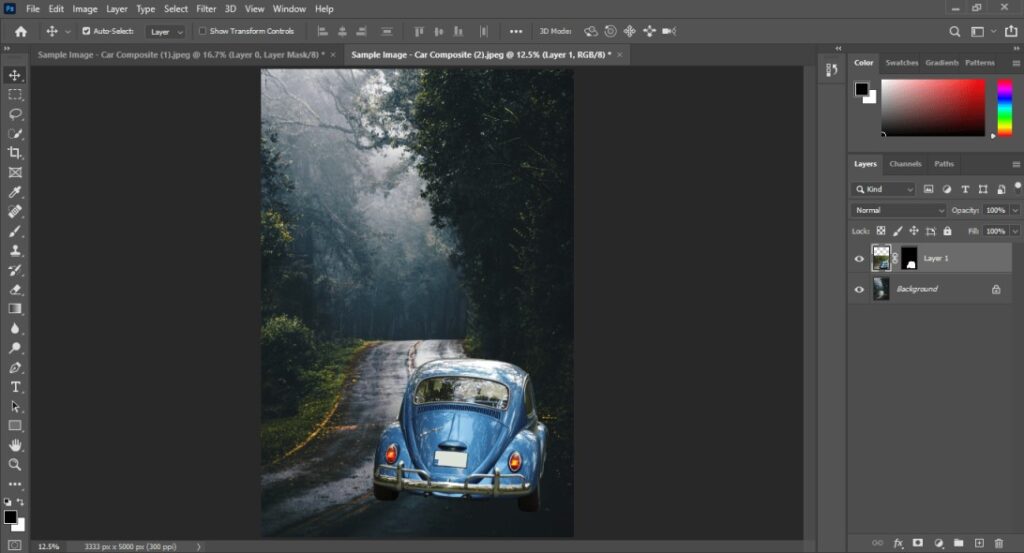
At this point, we have to resize the shape of the car to make it looks natural. Let me show you how to do that.
Read More: How to Get Rid of A Double Chin in Photoshop
Step 4: Apply Free Transform
You need to make sure that you have selected the first layer with the mask feature. Next to that, you have to press “CTRL + T” to apply the free transform feature. In free transform mode, the object will be visible within a rectangular shape.
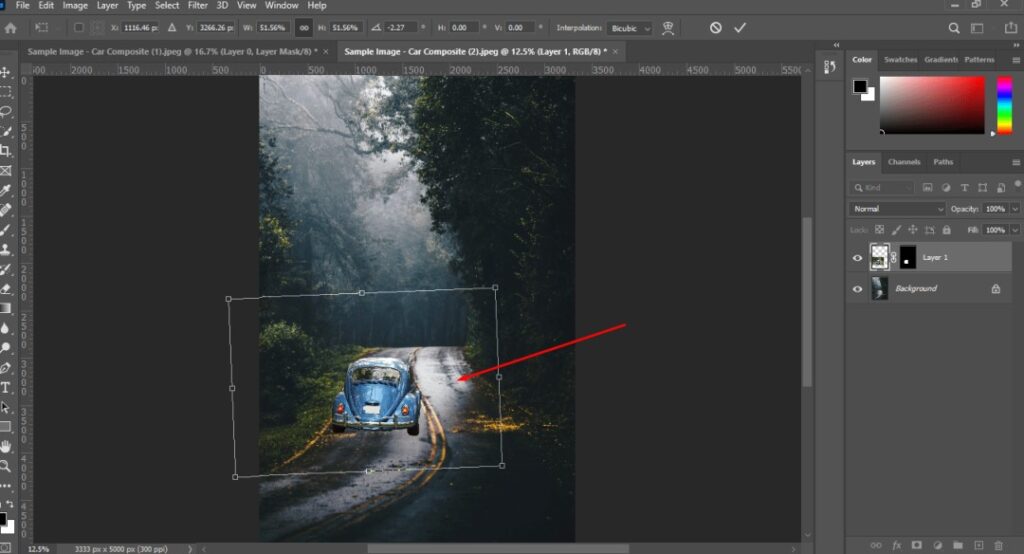
You can change the shape of the car by pulling the rectangular. When the picture looks natural, press “Enter” to save changes.
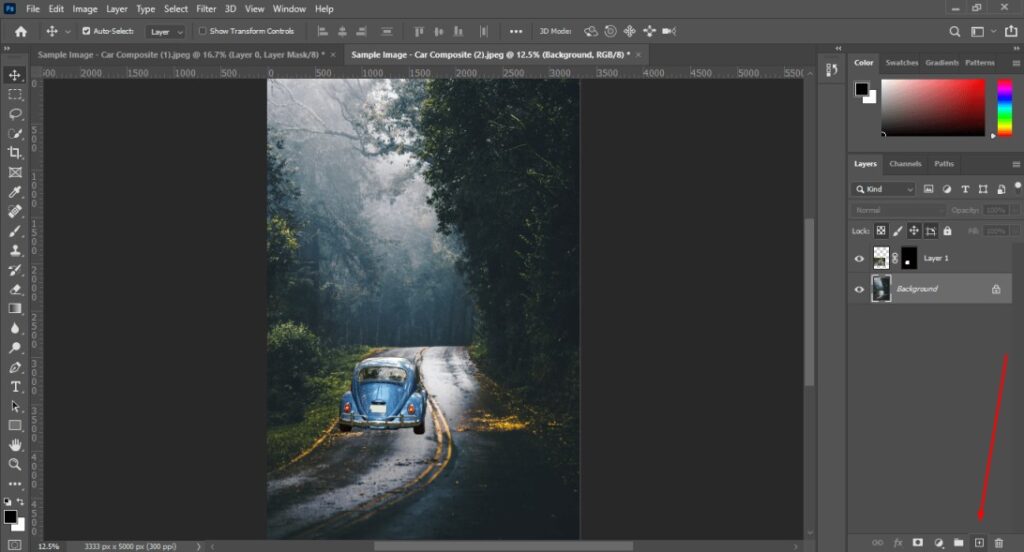
The picture will look more believable if we add some shadow below the car. You have to click on that icon and take a new blank layer.
Then, you ought to select the brush tool from the left side and paint the bottom of the car. Make sure that you have positioned the blank layer in the middle.
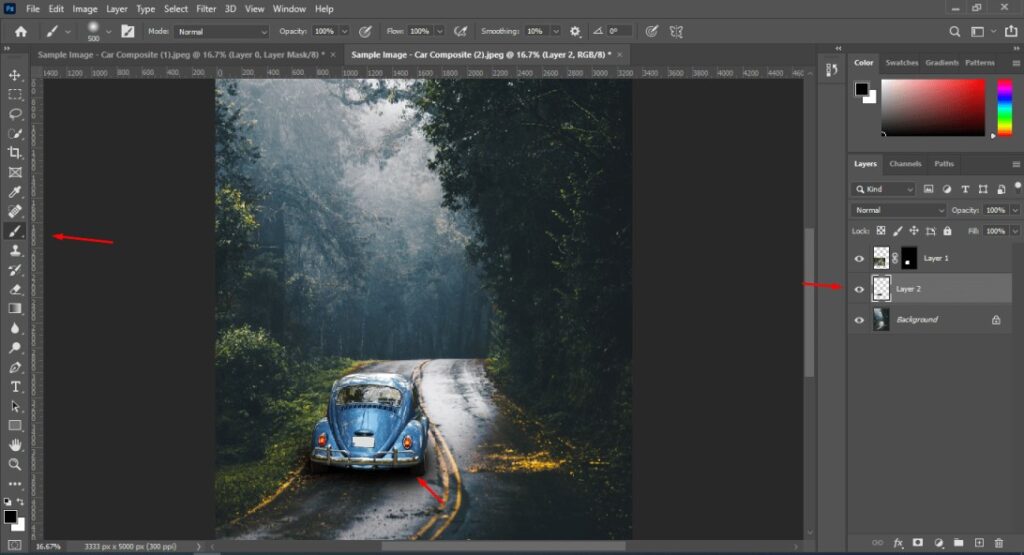
At this point, the picture is looking realistic, isn’t it? Now, we can proceed to the image-saving procedure.
Step 5: Save your image
To save the image, you have to open the “File” option from the top. After that, click on the “Save As” to get file saving options.
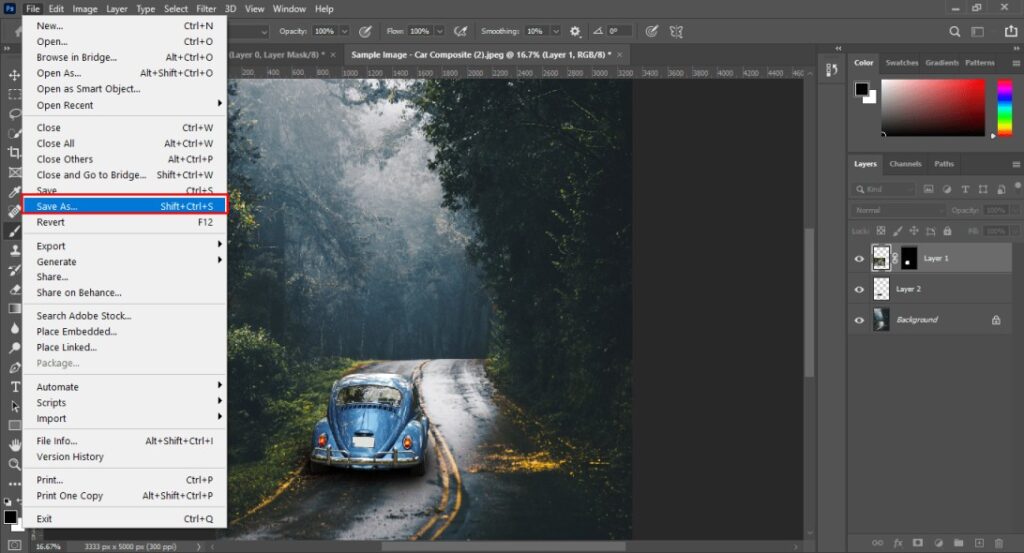
You can also do that by pressing “CTRL + SHIFT + S”. You can save the image in JPG, PNG, or any other file format as required.
Are you still wondering how to blend two images together in photoshop? We’re going to reveal three amazing methods to blend two images in photoshop. Let’s proceed to the second method.
Process 2: How to Blend Two Images in Photoshop with Blending Mode
In this method, we are going to apply the blending mode effect to blend two images in photoshop. Permit me to show you the easy explanation.
Step 1: Open selected images
You have to start with opening selected photos in two different tabs. Open Photoshop and select the “Open” option from “File”. After that, you have to press CTRL and click on your preferred photos.
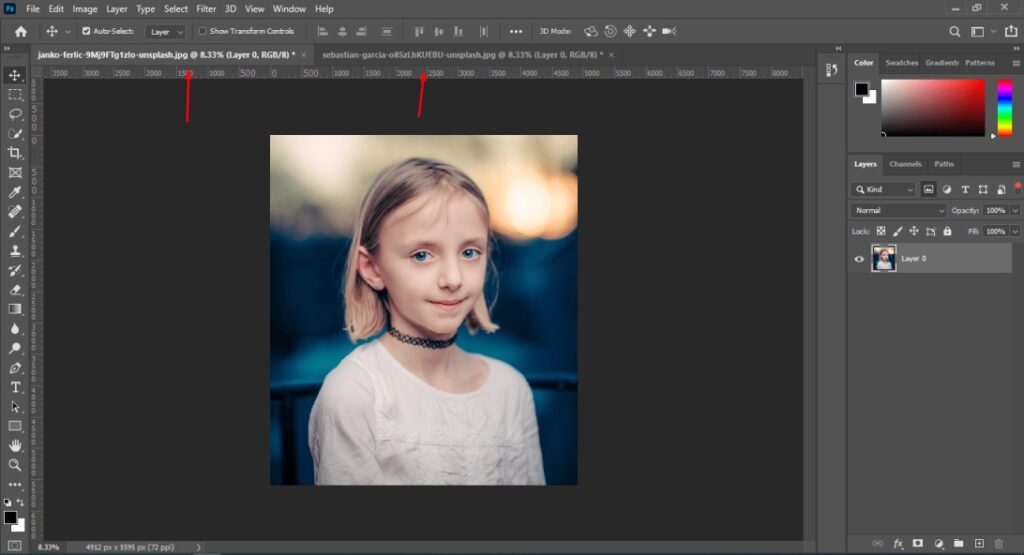
The first image is going to be the foreground and the second image will be blended as the background image.
Step 2: Open 2nd image as a new layer
To open the second image as a new layer, you have to unlock the layer and drag it onto the first picture. You have to place the new layer below the previous layer. Here’s the sample for you.
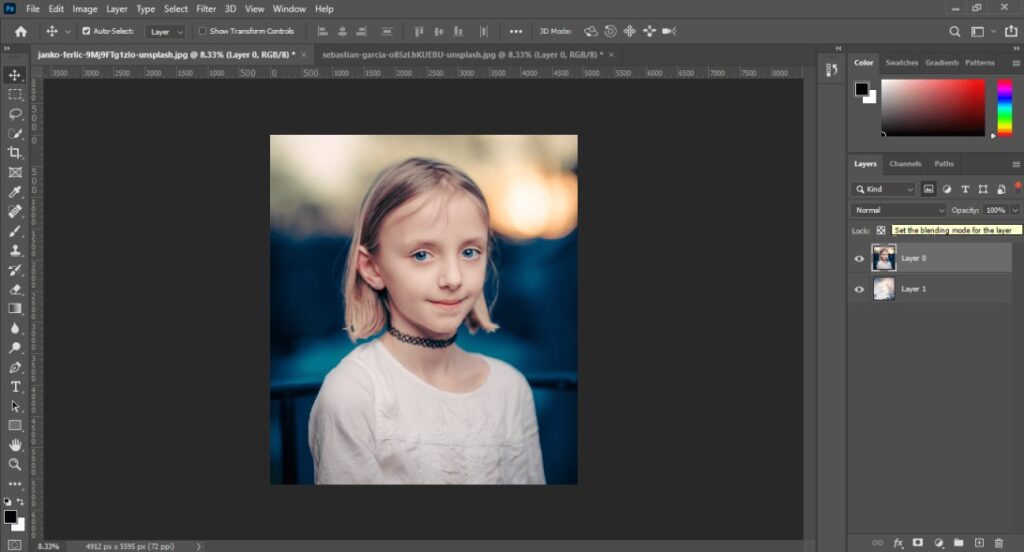
After that, we are going to change the blending mode.
Step 3: Change blending mode
You can find the blending mode at the top of the layer panel. By default, your blending model will be normal. Click on the blending mode and you will see a list of different blending modes. Here you can see the list.
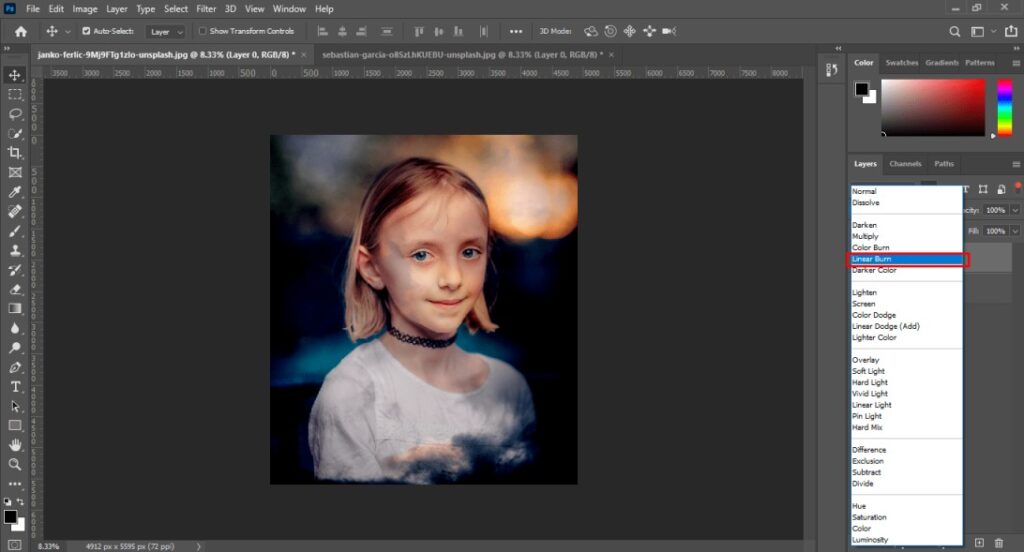
Here, I have applied the “Linear burn” option. You can also try darken, multiply, and screen effects.
Step 4: Save Picture
When you feel the blending effect looks suitable, press “Enter” to apply the effect. Go to the top and click on the “Save as” to get file saving options.
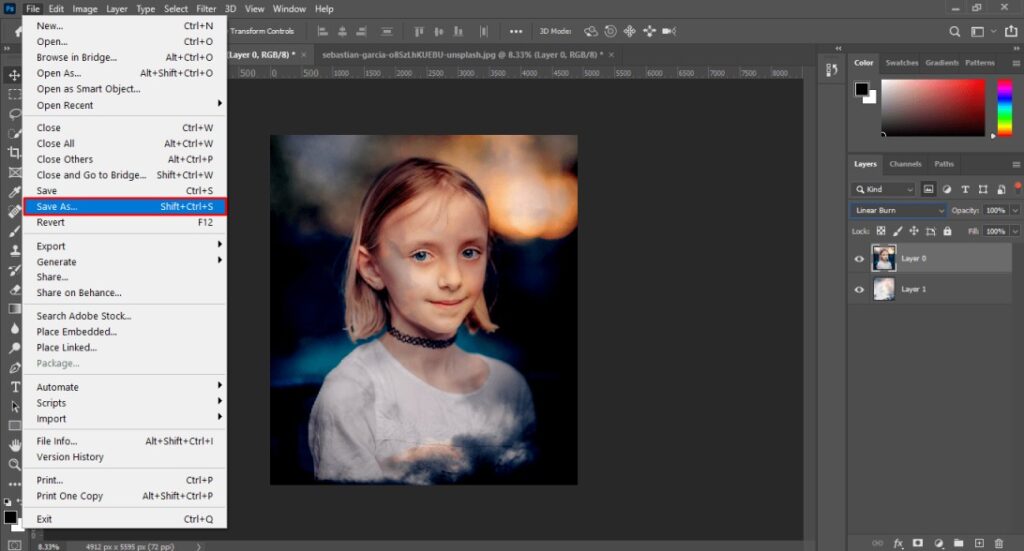
For uploading online, you should choose JPG or PNG format.
Read More: How To Retouch Photos Like A Professional Designer
This is the easiest method to blend images in Photoshop. Now, you’re going to be introduced to another exclusive method to blend images in Photoshop. Let’s know about that and apply the guidelines to your photography.
Process 3: How To Blend Two Images in Photoshop with Gradient Tool
In this method, we will use the Gradient tool to blend and merge two images superbly. Allow me to take you forward.
Step 1: Open foreground & background image
As we have done in the previous two methods, you have to start with opening your two preferred images in Photoshop. Here’s the first one I have chosen as the foreground image.
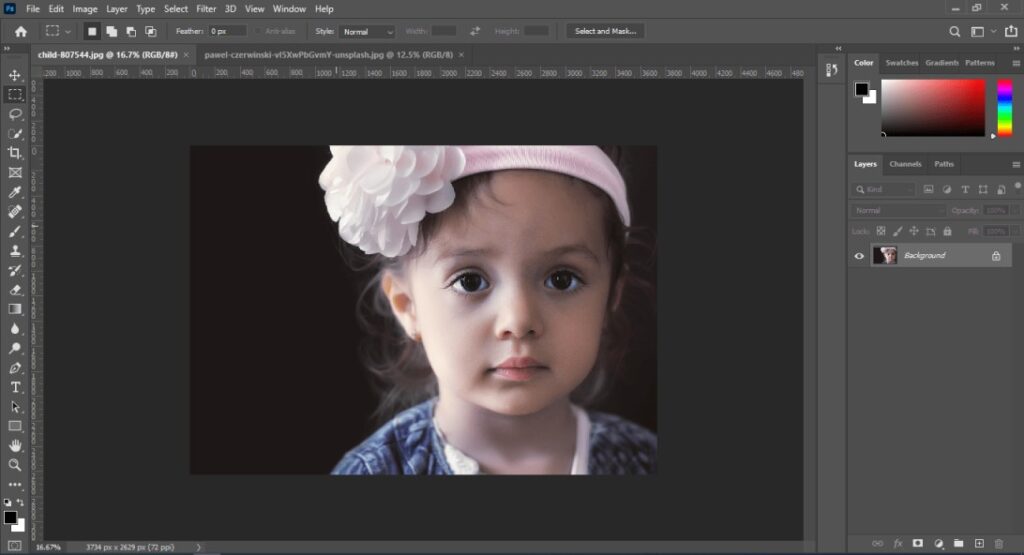
After that, we have to bring two different layers within the same layer panel. For doing this, click on the background image layer and put it inside the foreground image.
Step 2: Move foreground layer upward
After copying the background layer, you have to move the first layer upward. This image is going to work as the foreground. We will blend the background next to that image.
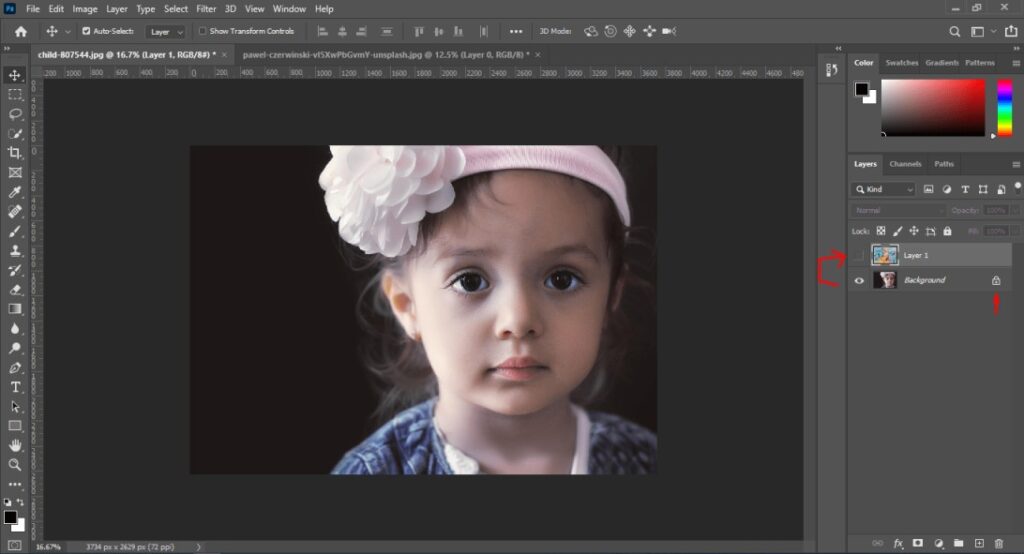
Have you got the tricks? Well, let’s move forward. At this point, you will get your image in this form.
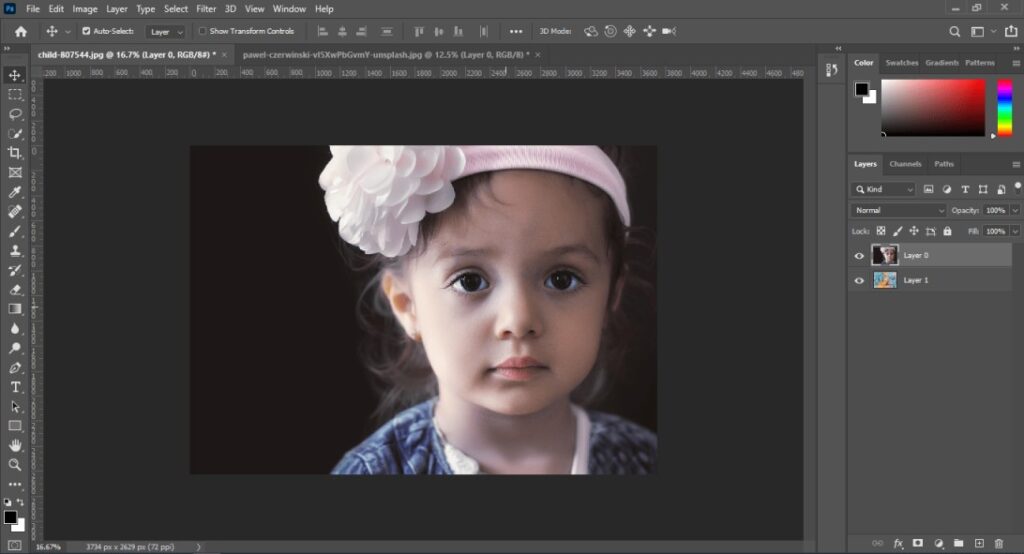
Now, we are going to apply the gradient effect to blend two images in Photoshop.
Step 3: Select Gradient Tool
From the left side toolbar, you have to pick the gradient tool.
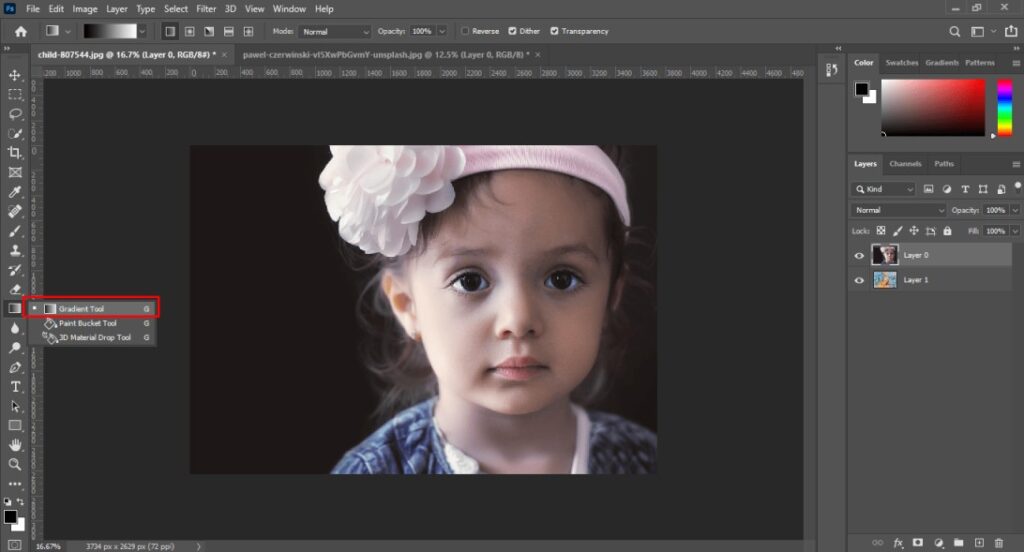
After that, go to the upper side from the top of the left side to select “black, white” as the gradient option.
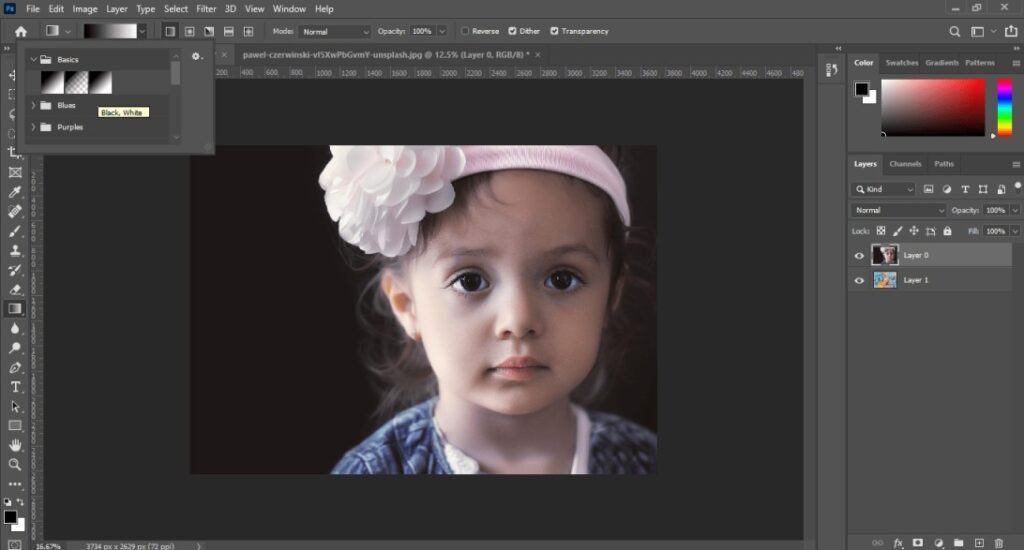
The black portion will make the background image visible. The white portion will be blending point between two images. Overall, it will provide an awesome blending effect.
Step 4: Add a layer mask & Apply gradient effect
At this stage, click on “Layer 0” to select the layer. Next to that, you have to click on the indicated icon to add a layer mask.
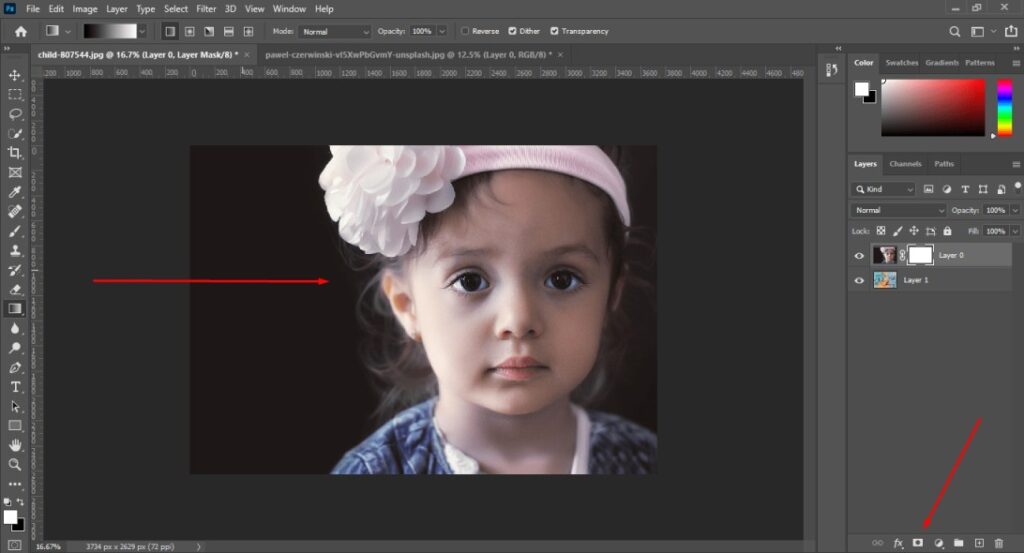
Ultimately, you have to move your mouse from the left side to the right side as shown in the arrow. You have to click and hold the left mouse key while doing that.
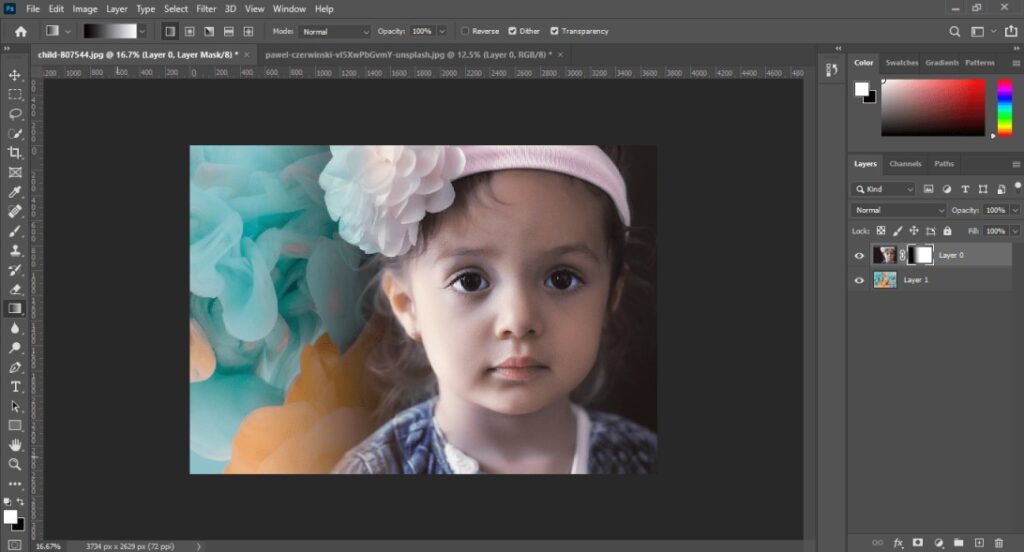
See, we have got two images blended in Photoshop. Have you already blended your photos? Hopefully, you have successfully done that.
If you don’t find the desired result on the first try, press CTRL + Z to undo the procedure. Then, draw straight lines from a different direction.
Step 5: Save blended image
At this point, we’re ready to save the blended image. Use the shortcut key “SHIFT + CTRL + S” to save your image. If your original images are also located in the same folder, you should rename the file before saving it.
Free 5 Bonus Tips:
- While blending two images in photoshop, always try to blend objects with a layer mask. It will keep the editing work non-destructive. As a result, you can recover missing portions whenever you want.
- If the blending outcomes look too sharp, reduce the layer opacity to soften the final image. Also, you can try different blending modes.
- Add shadows to the blended image to make it more realistic. You can use the brush tool on a new blank layer for adding shadows.
- Keep the layer unlocked while dragging the layer. It will keep the transparency active.
- Be familiar with different selection tools to cover different shapes. It will be better to choose the selection tool based on the object’s shape.
Final Thoughts
We have explained 3 best process of how to blend two images in Photoshop. By following those three methods, you can blend any images that you want. Which was the easiest method for you to blend photos in Photoshop? Share your thoughts in the comment box.
If you need Professional Image Editing Service, don’t hesitate to contact us. Clipping Way is available 24/7 to accept your order anytime.
FAQ’s
How do i create a seamless blend between two images in Photoshop?
Adding a layer mask to the background layer will assist you to create a seamless blend between photos.
What are some tips for blending two images in Photoshop?
You should choose photos with different colors and contrast to blend images in photoshop.
How do i make one image fade into another in Photoshop?
The Gradient Tool will assist you to create a fade effect from one image to another.
How do i create a smooth transition between two images in Photoshop?
To create a smooth transition, you have to do the selection work precisely. You can add a layer mask to make it even more precise.


