Noise and grain are two factors that can destroy a professionally taken image. Many times professional photographers face the noise issue. It can be for low light issues or shaking on the object. Whatever the reason is, noise reduction is the solution here. So, what is noise reduction in Photo Editing?
It is the image enhancement process to remove noise from photography. Adobe Photoshop is a best noise reduction software for performing image editing. Through this article, we are going to inform you how to remove noise from a picture and noise reduction in detail.
What is Noise Reduction?
Noise reduction is a comprehensive process that involves tasks that remove noises from an image. It’s not only about applying any specific effect or filter to get rid of noise. This is a comprehensive process that reduces and removes the noise without losing the picture’s details.
Professional photographers get rid of their noisy images through Photo Retouching Service. Without proper image-post processing, your noisy image will look dull, unattractive, and unprofessional.
How to Remove Noise from A Picture? Photoshop Noise Reduction
Step 1: Open The Image In Photoshop To Reduce Noise
First of all, you have to start with getting the image in Photoshop that has noise and grain. For this tutorial, we are going to use the below image how to exactly reduce noise in photoshop.
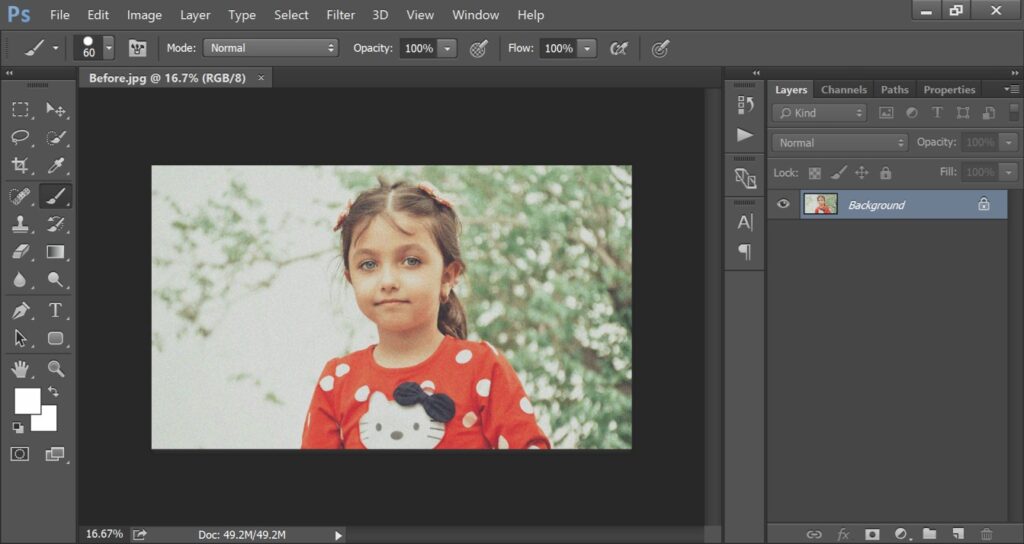
As you can see, this portrait has a lot of noise and grain that makes the image unsuitable. Let’s have a closer look.
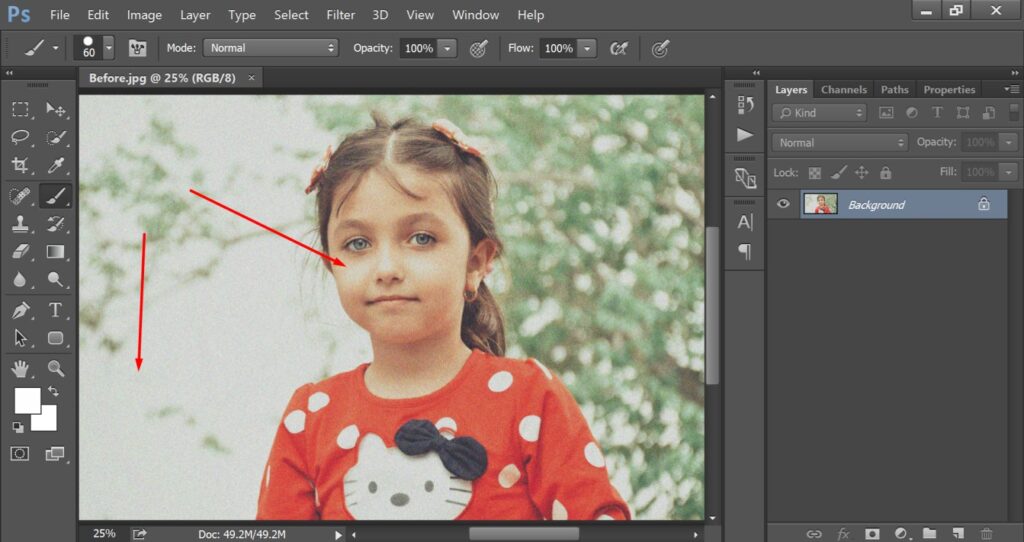
The noises are visible everywhere in the background and on the object. We are going to fix it and show you what noise reduction in photo editing.
Step 2: Create A Duplicate Layer
To start the procedure, we have to create a duplicate layer with CTRL + J. Then, we need to select the copied layer. Then, you need to go to the “Reduce Noise” option from the filter option.
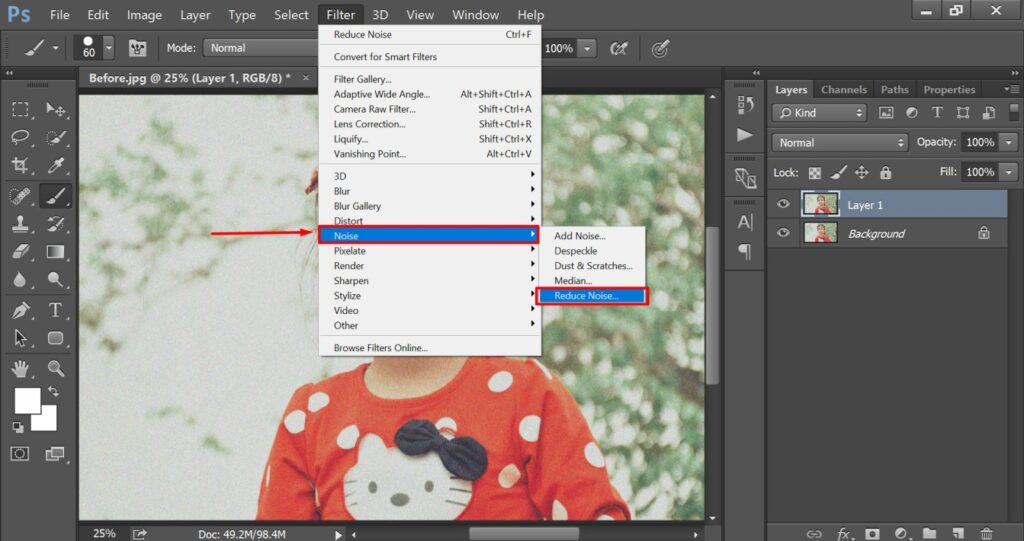
Now, we are going to remove the basic noises using this feature.
Step 3: Apply reduce Color Noise
From the reduce noise option, we need to adjust the “Reduce color noise” and “Strength” option.
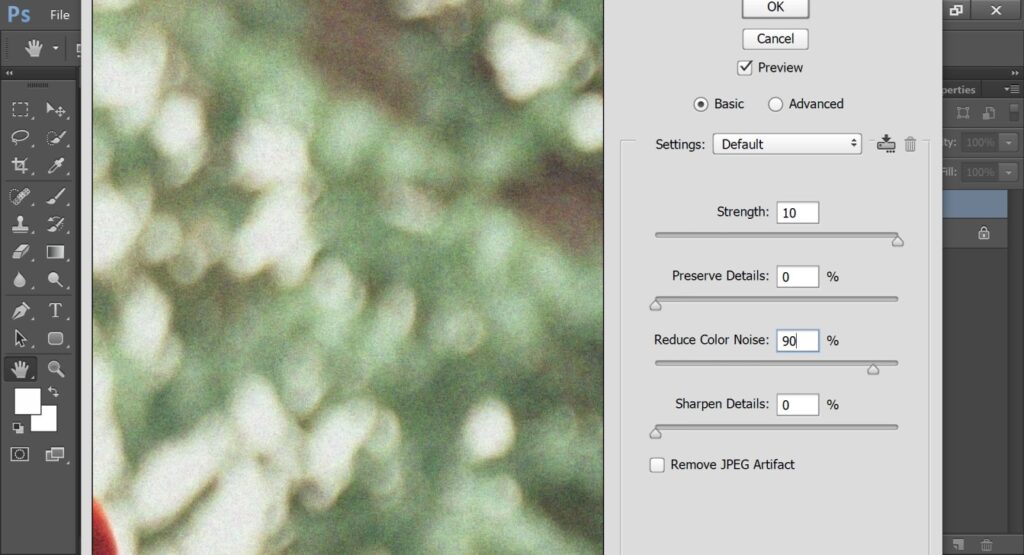
You have to set the Reduced color noise to 90% and strength to 10. After that, you have to press the OK to confirm the action.
Step 4: Apply Surface Blur
At this step, we need to make another copy of that 2nd layer. In total, you will get three different layers. Then, you have to select the top layer and go to the surface blur option from the blur section. You can get the option from here.
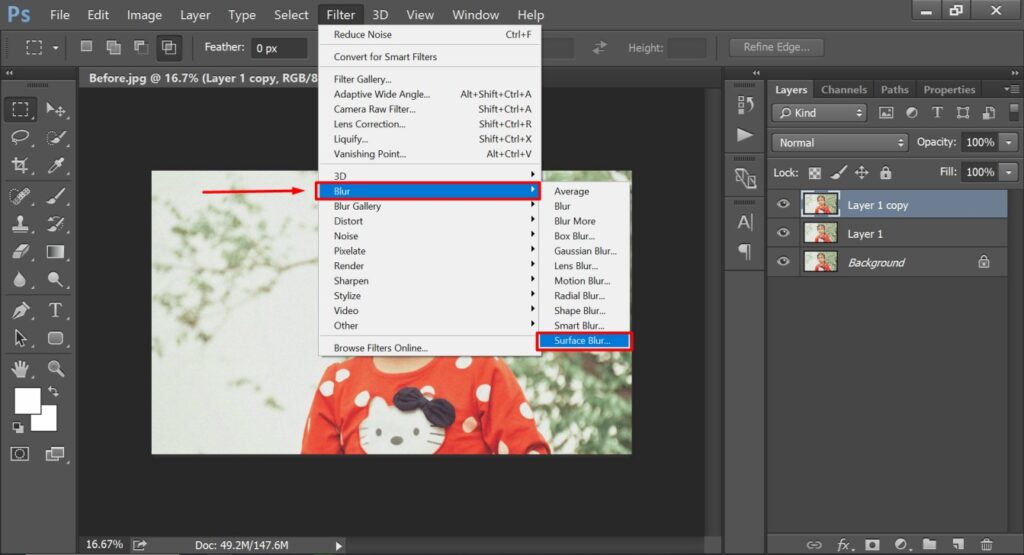
Then, you have to apply a radius and threshold of 10 pixels from the surface blur. It will remove additional noise from your image but at the same time, it will make the image a bit blurry. We are going to fix it from the sharpen option.
Step 5: Apply Smart Sharpen
You have to go to the filter option once again. This time, you have to click on the sharpen option and choose smart sharpen from the list.
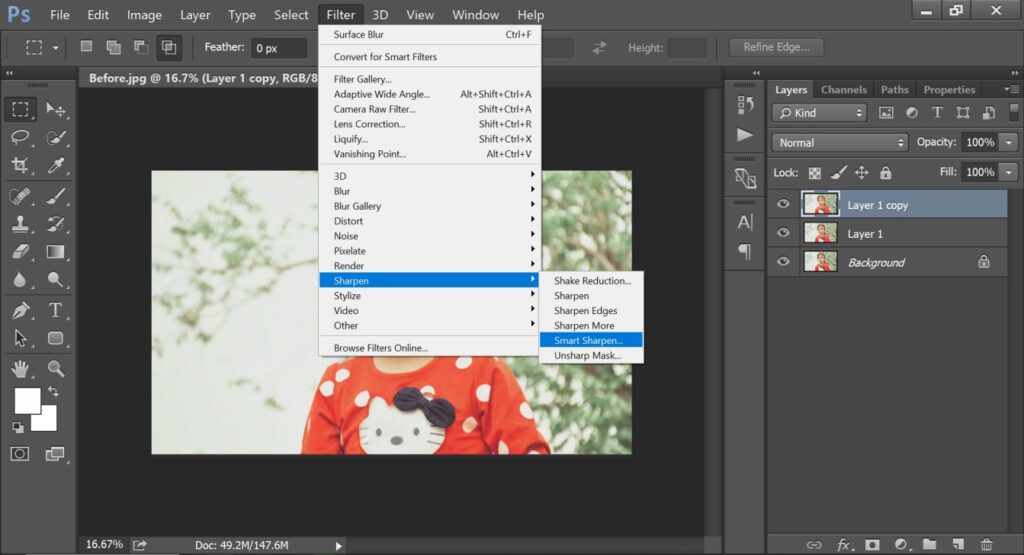
Then, you have to choose Guasssian blur on the box and adjust the sharpening amount to 90%.
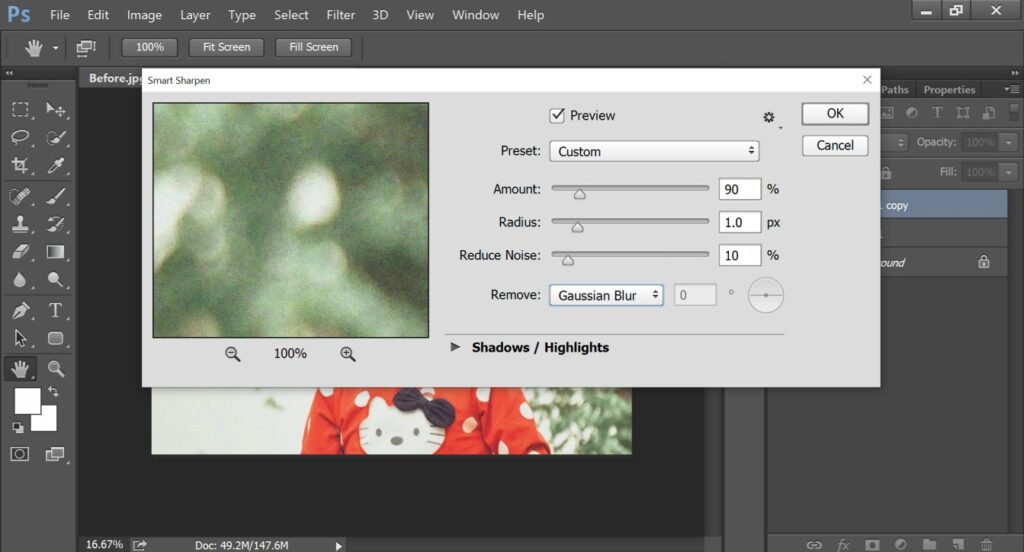
The radius value should be 1 px and the reduce noise option will be 10%. It will reduce noise in your image and make the image look sharp.
Step 6: Reduce Layer Opacity
Now, you have to remove the layer opacity to 70% and select the two copied layers. Then, you have to create a group for those two layers. You can create a group by pressing CTRL + G. To do some more enhancement, you can add a mask to the group and apply the brush tool on the eye area to make the area even sharper.
Here is the result.
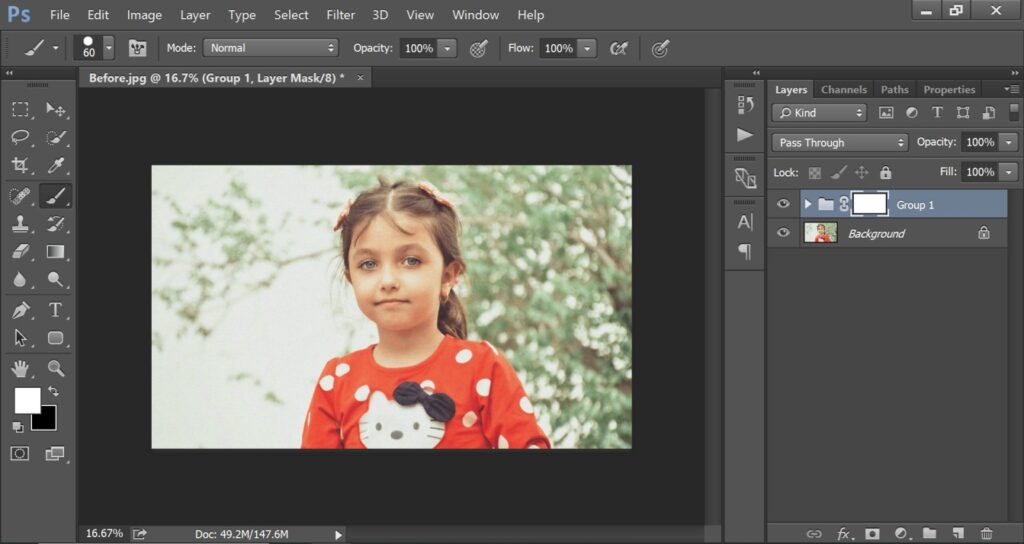
As you can see now, we have got rid of the noises from that picture. By following the same method, you can also remove noise from an image in Photoshop. This process is the noise reduction in photo editing.
Tips
- Always create a duplicate layer before you apply noise reduction.
- Make sure that you reduce the layer opacity after applying the blur.
- You have to apply the brush tool on the eyes and years to remove grain.
Mistakes
- Always create a duplicate layer before you apply noise reduction.
- Make sure that you reduce the layer opacity after applying the blur.
- You have to apply the brush tool on the eyes and years to remove grain.
Why Noise Reduction is Important in Photography?
1. Preservation of Image Quality: Noise reduction ensures that the essence and clarity of your image remain intact. It preserves the image quality.
2. Print Perfection: If you’re going to print your photos, noise reduction becomes even more crucial. It allows you to print your noisy image clearly.
3. Professionalism: For professional photographers, it’s highly important to deliver crystal-clear images to their clients. Noisy images are going to make their clients disappointed.
4. To Shoot In Low-Light: As a photographer, you may have to shoot in low-light conditions. That can often lead to noise. Noise reduction allows you to capture in low light without getting noisy images.
How To Avoid Noise in Photography?
1. Capture With Proper Light
The best prevention of noise in Photography is to capture images with proper light. When you capture with enough light, chances are very few that you may get noisy images. If there is a lack of sunlight, you can use additional light sources.
2. Low ISO Settings
ISO is the sensitivity setting of your camera. While capturing in low light, you need to keep it at a lower setting. You can set it around 100 or 200. It can significantly reduce noise. Higher ISO values amplify the sensor’s sensitivity. That can produce noise.
3. Proper Exposure
You should always capture images with proper exposure. Underexposed or overexposed images tend to reveal more noise. You have to learn the proper use of your camera settings to achieve that perfect balance.
Sum Up
At this stage, you should not have any confusion about noise reduction in Photoshop editing. We come to the conclusion that it is an image editing process that removes noises and grains in Photography. If you are a photographer and looking to remove noise from your images, you can outsource photo editing to Clipping Way.
Professional designers are going to edit your image to work on your image for noise reduction. Do you want to have a try without any payment? A free trial is available for you. We are available 24/7 to serve with a Professional Photo Editing Service.
FAQ’s
What is image noise reduction?
Image noise reduction is an image post-processing method used for removing noise from photography.
What does noise reduction do in editing?
The main objective of noise reduction in editing is to remove noise and grain from an image. It makes the photography look sharp with proper details.
Should I use noise reduction on photos?
If there is any visible noise in your image, you must use noise reduction on your photos. You can use Photoshop to do that.
What is meant by noise reduction?
In photography, noise reduction is the image editing process that removes noise and grain from the image.
Which software is best for noise reduction in Photography?
Professional designers prefer Adobe Photoshop for noise reduction without losing the object’s details and image depth.
Which one is better for noise reduction between Adobe Photoshop and Adobe Lightroom
Both Adobe Photoshop and Lightroom have noise-reduction features. But Adobe Photoshop is preferable for reducing noise in photos.
