Whether you want to print photos or upload them online, getting crystal-clear images is the primary requirement.
Visible pixels in the image can ruin your beautiful photography. Are you looking for a solution to remove pixelation Photoshop?
Through this article, we are going to assist you with that. Today we are going to discuss 2 effective ways to remove pixelation in Photoshop.
After reading this article, you will learn how you can get rid of unwanted grainy and pixelated pictures in photoshop.
Method 1: Remove Pixelation Photoshop with Noise Reduction Tool
Step 1: Open pixelate photo in Photoshop
First things first, you have to start by opening your image in Photoshop that you want fix a pixelated image. I am going to show you the procedure with this image.
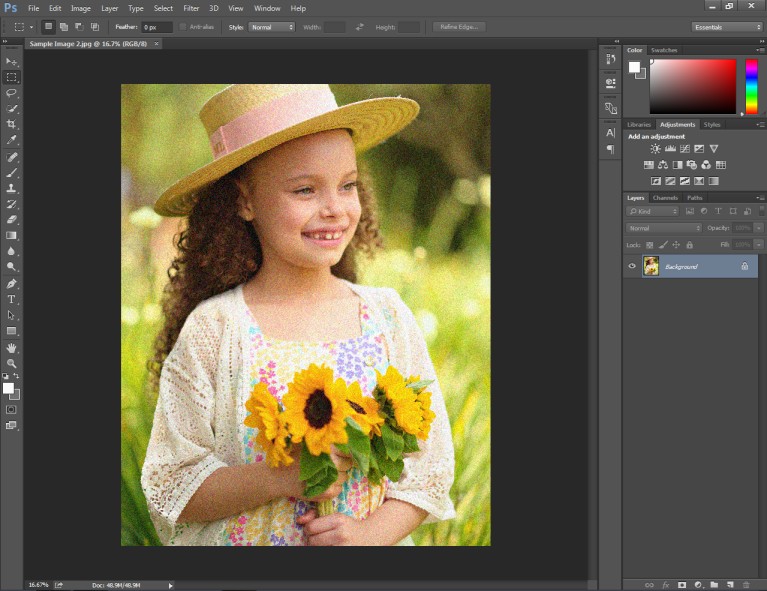
As you can see, the image doesn’t look attractive at all with visible noises and pixelation. To fix a pixelated, we need to increase the image resolution.
Before doing that, you should copy the background layer by pressing CTRL + J. Then, disable the previous layer and work on the new layer.
Step 2: Set higher image resolution
You need to go to the image option from the top and select “Image size” from the list.
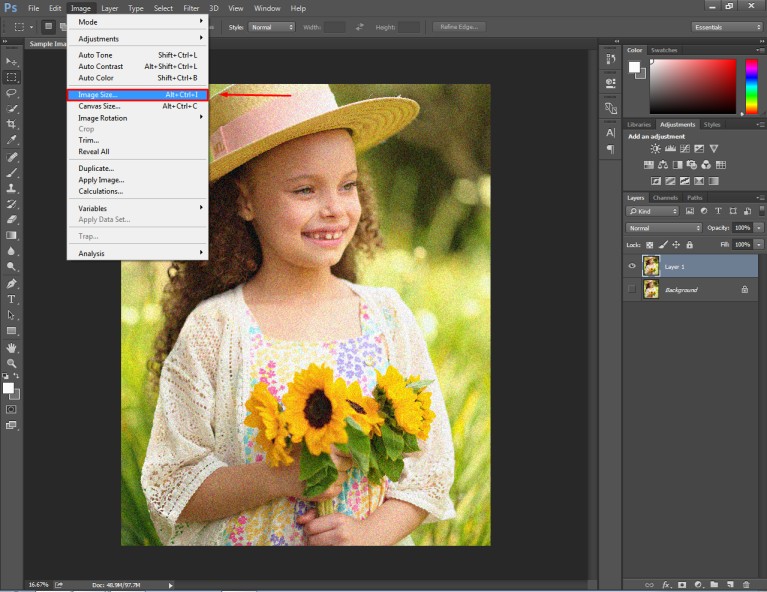
Also, choose the bicubic smoother option from the resample option.
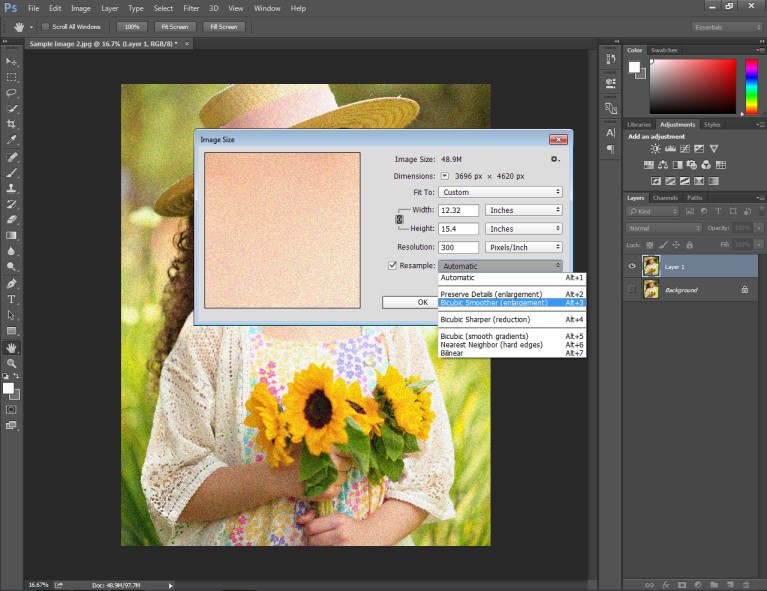
Then, press Enter to apply the effect to your image. It will make your image look a bit clearer than before. However, we are not done yet. We need to apply noise reduction.
Step 3: Reduce Noise
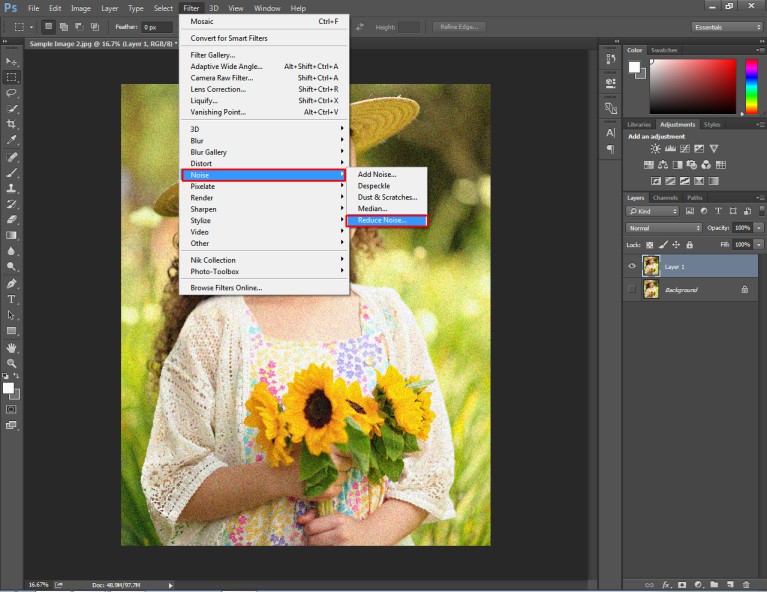
In the 3rd step, you should go to the Filter option from the top and choose the “Noise” option. Then, you need to click on the noise reduction feature.
There you will find the Strength, Preserve details, Reduce color noise, and Sharpen details options. You have to set the value according to this: Strength-10, Preserve details -0, Reduce color noise -84, and sharpen details 56.
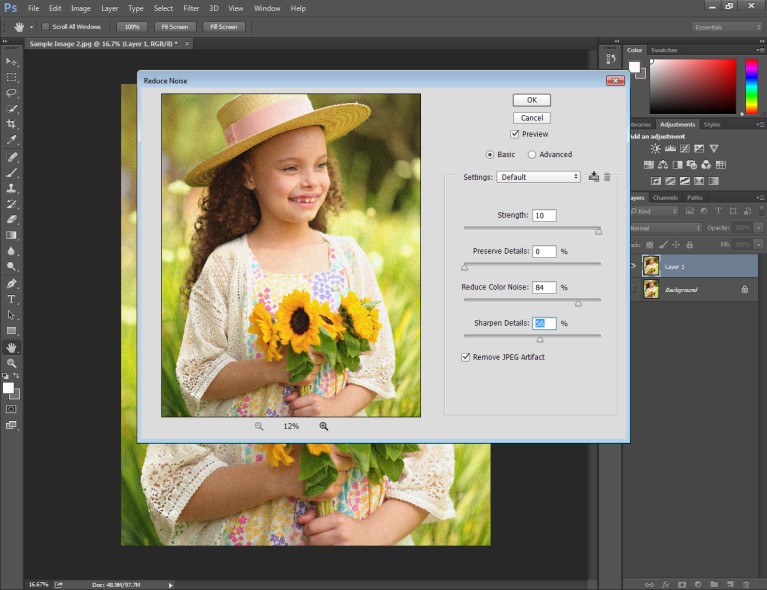
If you can’t to fix pixelated pictures with these settings, you can change it according to the condition of your photograph.
Step 4: Save Your Image
Now, our image is ready to get saved. Here you can see the final result.
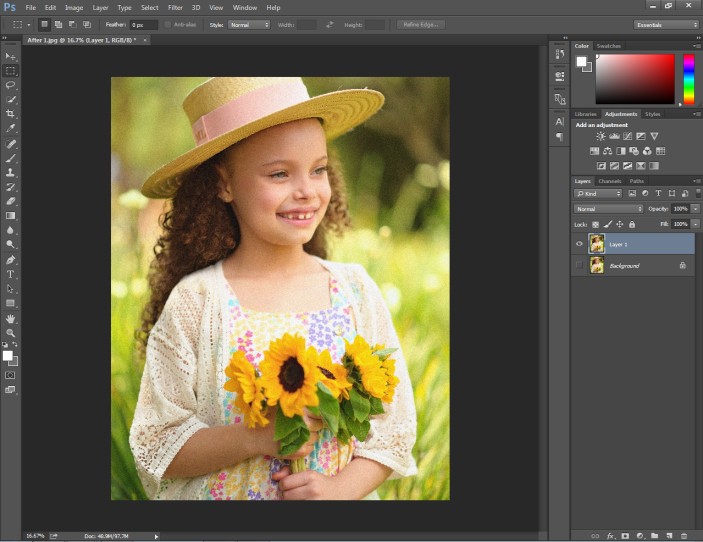
Go to the file option from the top and select the format in which you want to save the image.
At this point, the image quality has improved noticeably. By following the above instruction, you can also fix pixelation in Photoshop. You can also follow the technique for removing blur in Photoshop.
If there is too much shakiness in your image, you may not be able to fix that with this technique. What should you do then?
Alright, you don’t have to worry about that as we are going to inform you of another technique to remove pixelation in Photoshop.
Method 2: Fix Image Pixelation in Photoshop with Smart Sharpen
Step 1: Open the pixelated image in Photoshop
Once again you have to open your pixelated image file in Photoshop. For this method, we are going to use the below picture.
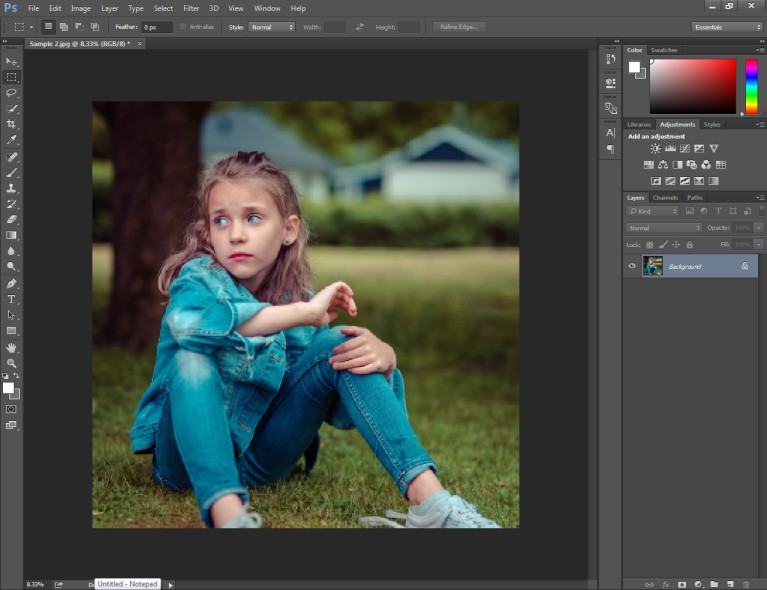
This picture looks a bit more pixelated compared to the previous one. That’s why we have to increase the resolution before jumping on the pixelation removal procedure. Here you go
Step 2: Increase image resolution
Go to the image size option from the top menu.
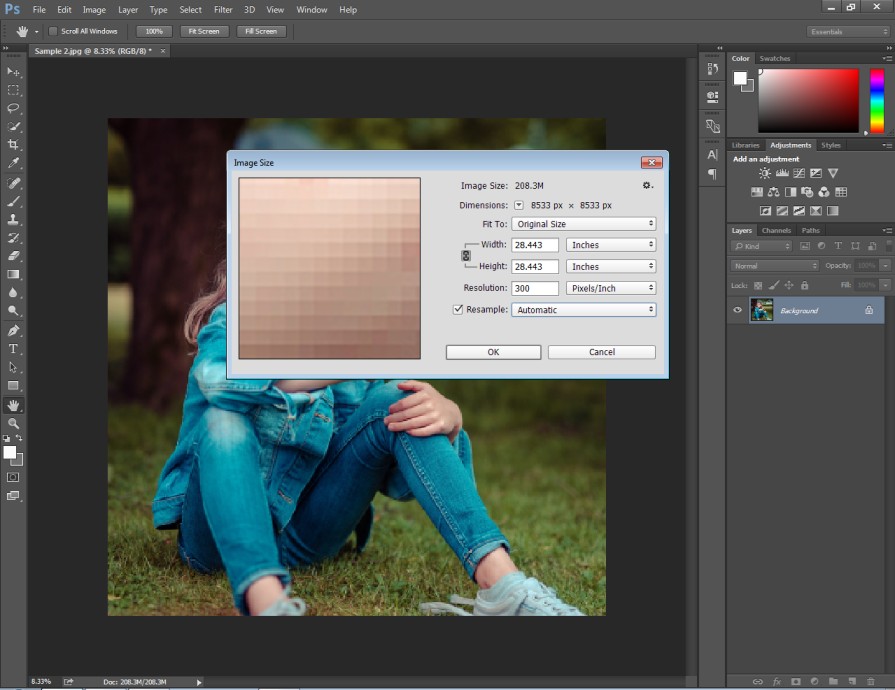
In this step, we have to keep the resample option automatic. Now, we have to create a new layer.
Step 3: Copy the background layer
Click on the background layer and press CTRL+J. You will get a copy of the background layer. Here you can see that.
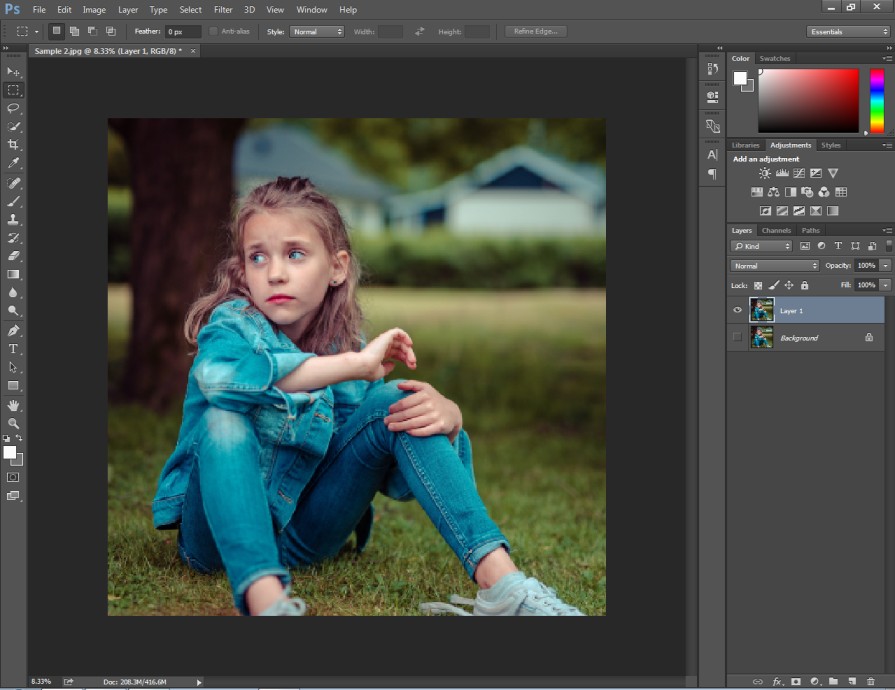
Disable the background layer and select the newly created layer. Let’s jump to the next step.
Step 4: Apply Surface Blur
At this step, we have to apply the surface blur to get rid of the pixelation. Go to the filter option from the top and find the blur option.
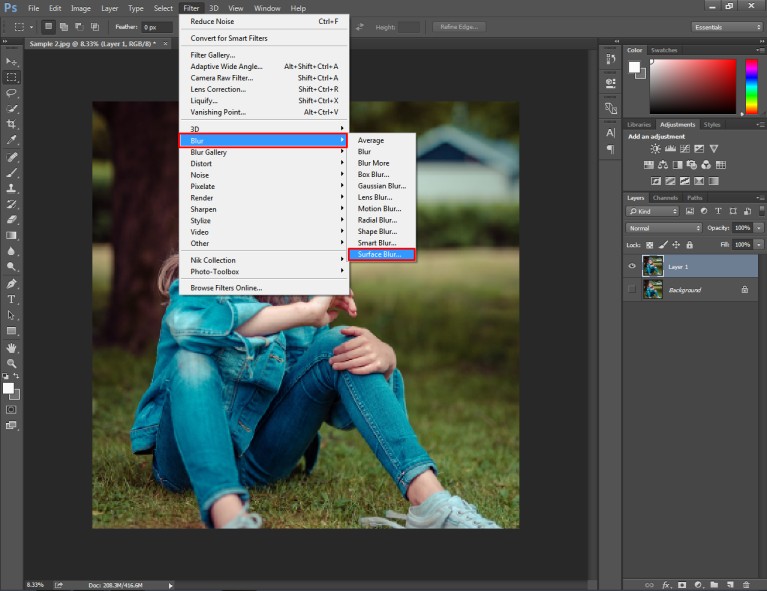
You need to set the radius to 5 pixels and set the threshold to 10 levels. Here is the sample image.
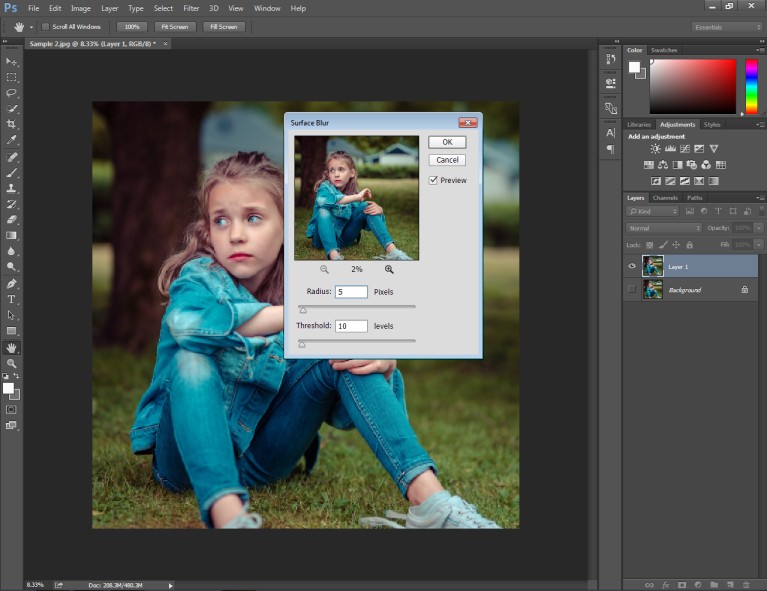
Now, we are going to utilize the smart sharpen option to make the image look clear.
Step 5: Apply Smart Sharpen
Once again, you need to go to the filter option at the top and select the sharpen option. From there, you have to click on the smart sharpener.
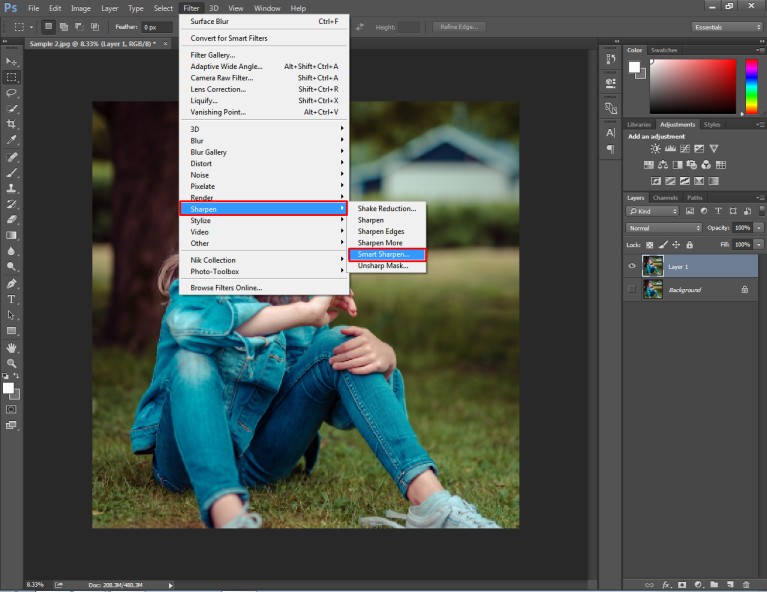
Next to that, you will get an interface like this on your screen.
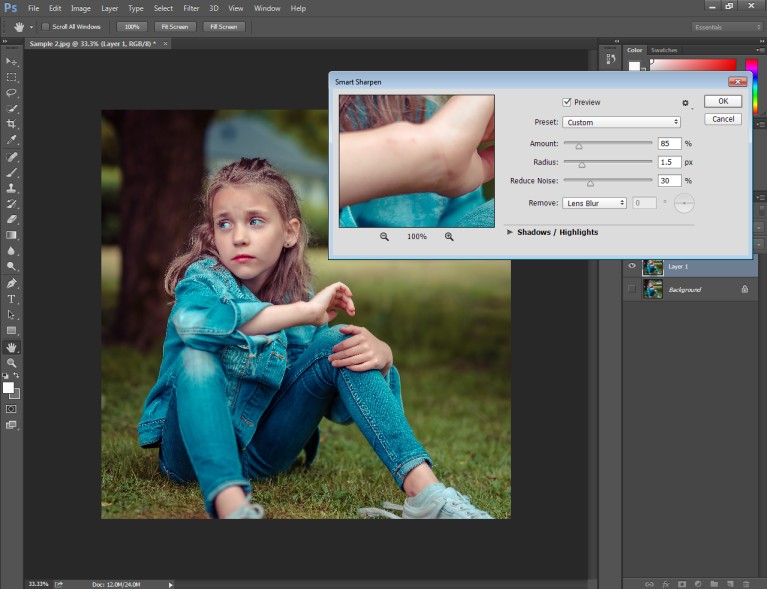
You have to select the preset custom. Then, you need to set the amount around 85%. Also, you should change the radius value to 1.5px. Keep the reduce noise option around 30% based on the pixelation of your image.
Step 6: Apply Color Balance
This is the final step to remove pixelation using Photoshop. You need to go to the image adjustment layer option below. From this option, you should choose “Color balance”.
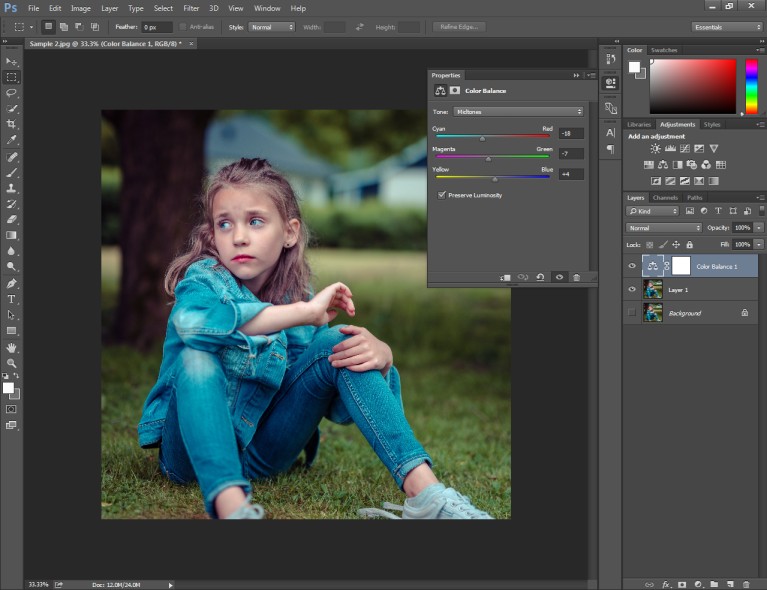
After that, you will get the option to change Cyan, Magenta, and Yellow color. You have to adjust those colors according to the color combination of your photography. Here’s the final look of our sample image after making corrections.
That’s it. Using this method, you can successfully remove pixelation from any image.
Tips
- Always copy the background layer before applying any effect so that you can have a look at the sample image.
- Save the image with the maximum quality.
- Apply the image sharpen option to provide the final touch.
Mistakes
- Don’t change the image size unnecessarily while increasing the resolution.
- Don’t set the surface blur amount too high.
- Don’t apply the color balance effect without adding a new layer.
Conclusion
At this stage, you have learned 2 of the best methods to remove pixelation in Photoshop. So, pixelation can’t ruin your photography anymore.
However, it would be great if you can prevent it while shooting images. It’s difficult for photographers to manage time for post-processing work.
Therefore, Clipping Way is available to assist photographers and studio people with the best quality Photo Retouching Service. Do you want to try us? You can start now with a free trial. You won’t have to pay for it.
FAQ’s
Why does my image appear pixelated in Photoshop?
Pixelation occurs when an image is displayed at a lower resolution than its original size. It results in visible square pixels and loss of detail.
Can I fix pixelation in Photoshop?
Yes, Photoshop has the necessary tools to reduce and eliminate pixelation in images.
How can I resize an image without pixelation in Photoshop?
To resize an image without pixelation, use the “Image Size” option under the “Image” menu. You need to make sure to choose the “Bicubic Smoother” resampling method.
Is there a way to fix a pixelated image in Photoshop?
Yes, you can try using the “Sharpen” filter in Photoshop to enhance the edges. It will reduce the appearance of pixelation. You should be careful not to overdo it.
Can I remove pixelation caused by low-resolution images?
Photoshop “Smart Sharpen” or “Unsharp Mask” filters can enhance the edges. It makes the pixelation less noticeable.


