If you have a lot of images to work with, it will consume a lot of time. Also, you may lose your concentration for applying a similar effect again and again. To overcome this issue, you can edit multiple photos at once.
This technique is also known as batch editing. We are going to share how to edit multiple photos in Photoshop. This is going to save you valuable time as you don’t have to work on the image individually.
You can apply any change including adding text to all of your images at once. We are going to introduce you to the simplest method to edit multiple photos to apply the same effect.
What is Multiple Image Editing in Photoshop?
Multiple image editing is the process of editing several photos together and applying the changes to all photos. For example, you are going to use Photoshop for Ecommerce Image Editing. In that case, you don’t have to edit your product photos individually.
If all of your photos have similar light conditions, you just need to edit any one specific photo. Then, you can apply the effect to the rest of the photos. Isn’t that a great option for Photographers and sellers?
Now, let me show you the process in simple steps.
How to Edit Multiple Photos in Photoshop?
Step 1: Open multiple photos in Photoshop to edit together
First of all, you have to begin by opening several images in Photoshop that you want to edit at once. Here, I have opened 3 images to edit them. That’s the first one.

This is the second picture that I also want to make corrections on.

This is the 3rd image that I have opened in Photoshop.
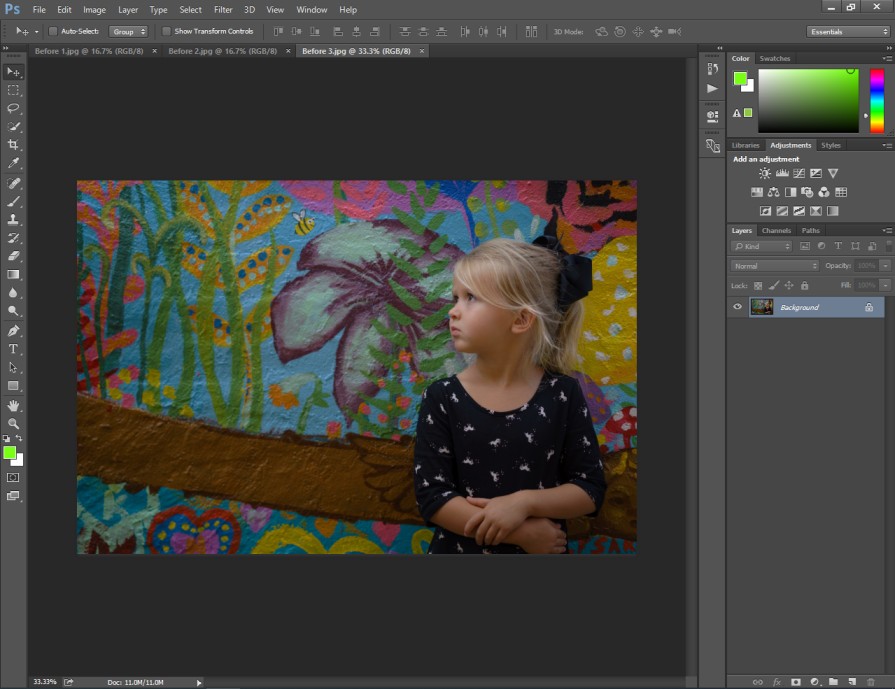
As you can see, all of those images are captured in low light. All 3 images are looking dark. That’s why I would like to adjust the brightness. But before doing that, we have to perform an action.
Here you go.
Step 2: Enable Action
You have to go to the Window option from the left side and select “Actions” from the list. You can also use the short ALT + F9 to enable it.
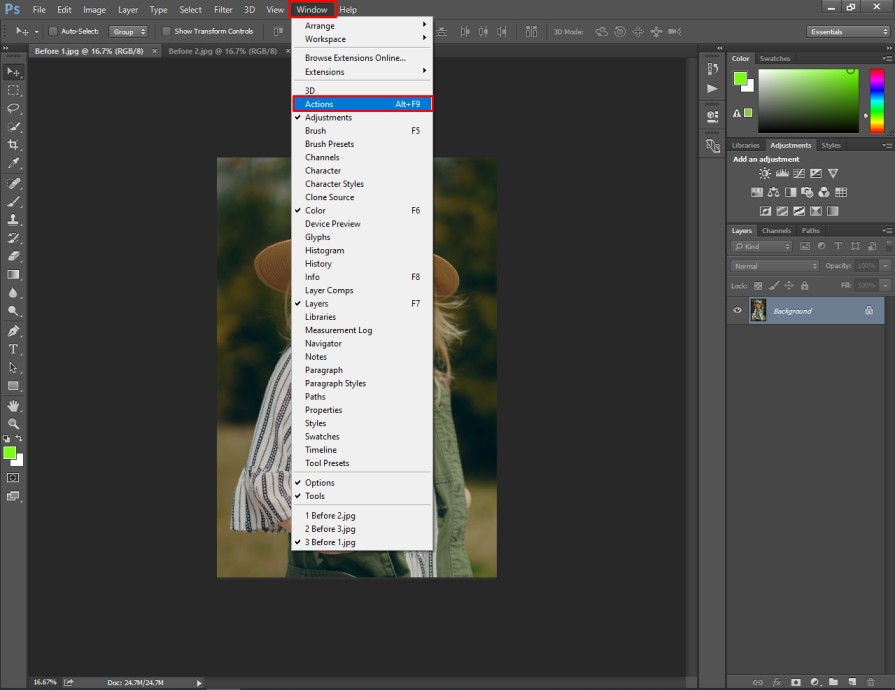
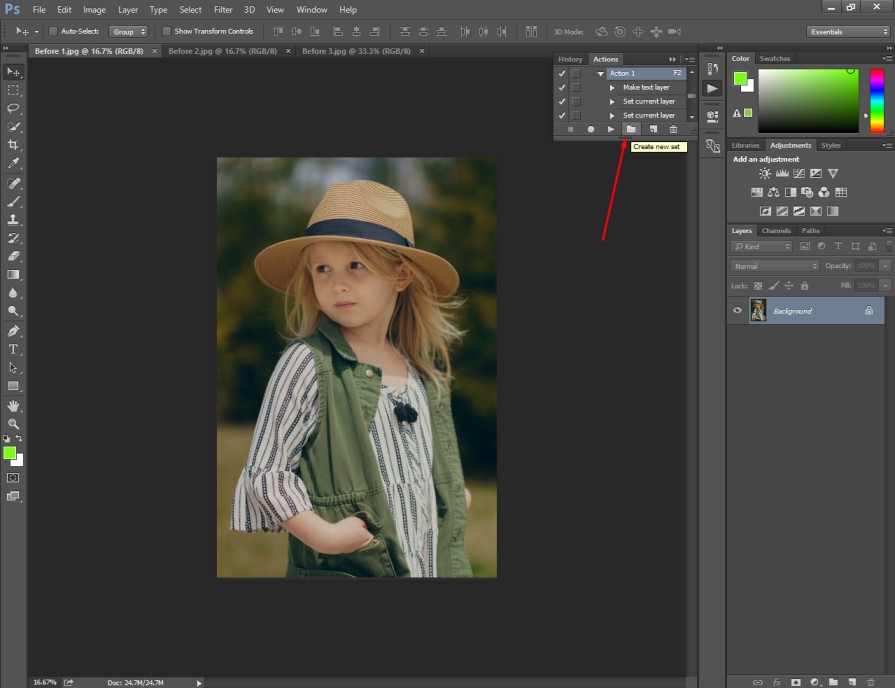
After that, you will get the action menu on your display. It will be located at the top of the right side. From this option, you need to select the “Create New Set” option.
You can find it here.
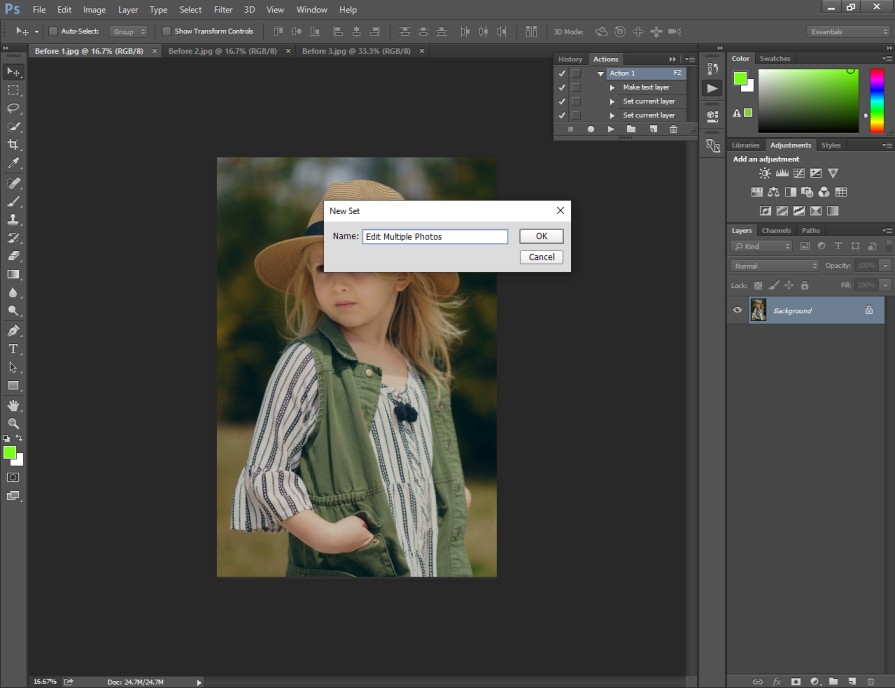
Then, you will get a small pop-up window to set the name of that action. I am going to rename it as “Edit Multiple Photos”.
Now, we are going to set a command for that action.
Step 3: Create a new action
In this step, you have to click on the “Create A New Action” icon from the action box.
This is the option.
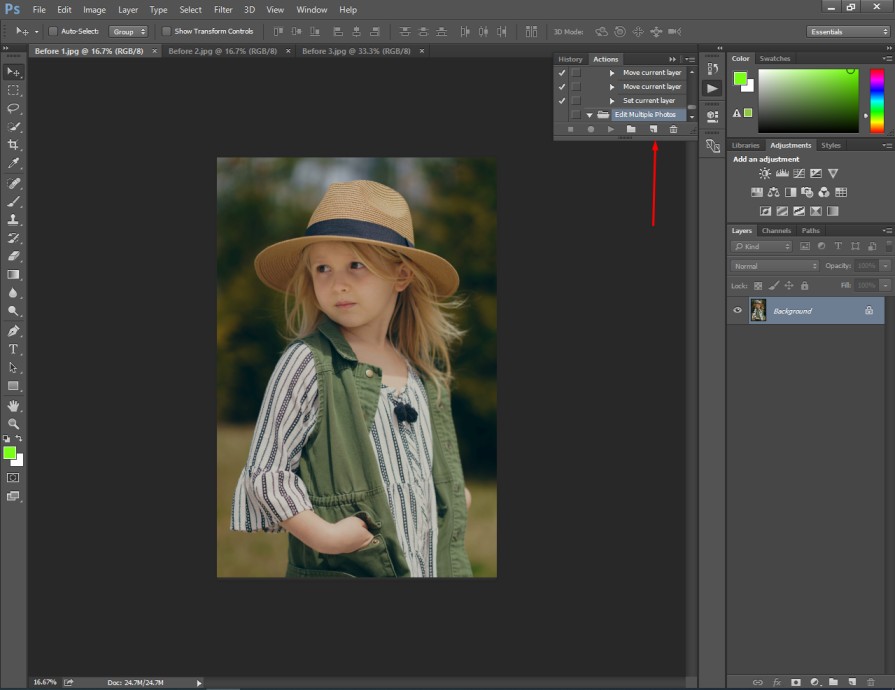
After that, an action creation box will appear on your screen. You can also set a name for this if you want. However, I am going to continue with the default name. You have to select a function key for the command. I am using “F3” for that.
Here’s the sample for you.
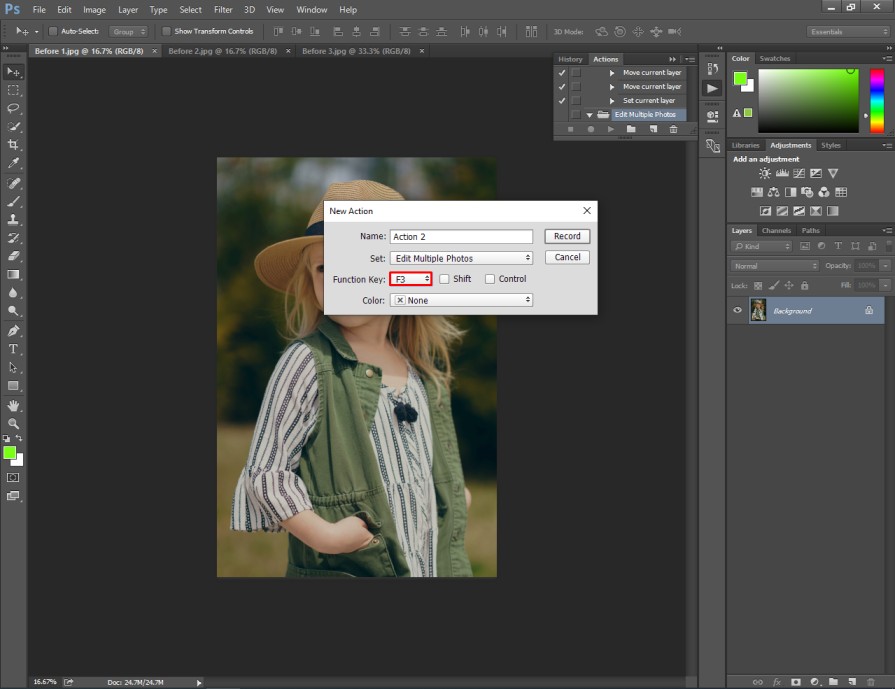
You have to press the “Record” option to proceed forward.
Step 4: Image correction
In this step, we are going to make necessary corrections to the image. For this image, I would like to change the brightness.
After that, I am going to add text to the image. You have to click on the brightness option to change the lighting condition of your image.
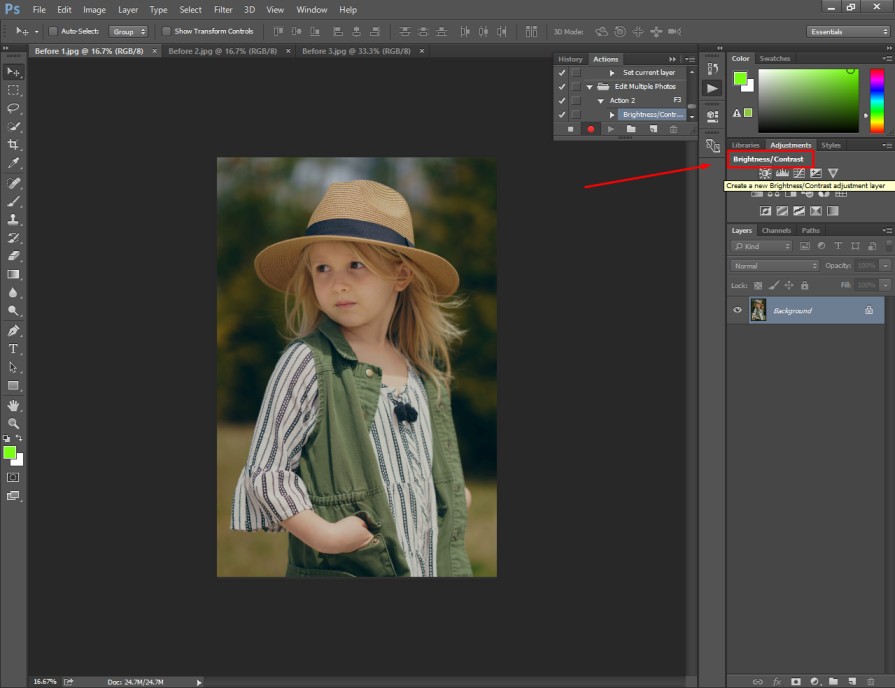
Next to that, you will get a box to change brightness and contrast. As the photo is looking too much darker, I am going to increase the brightness by 50%. At the same time, I am going to set the contrast to 10%.
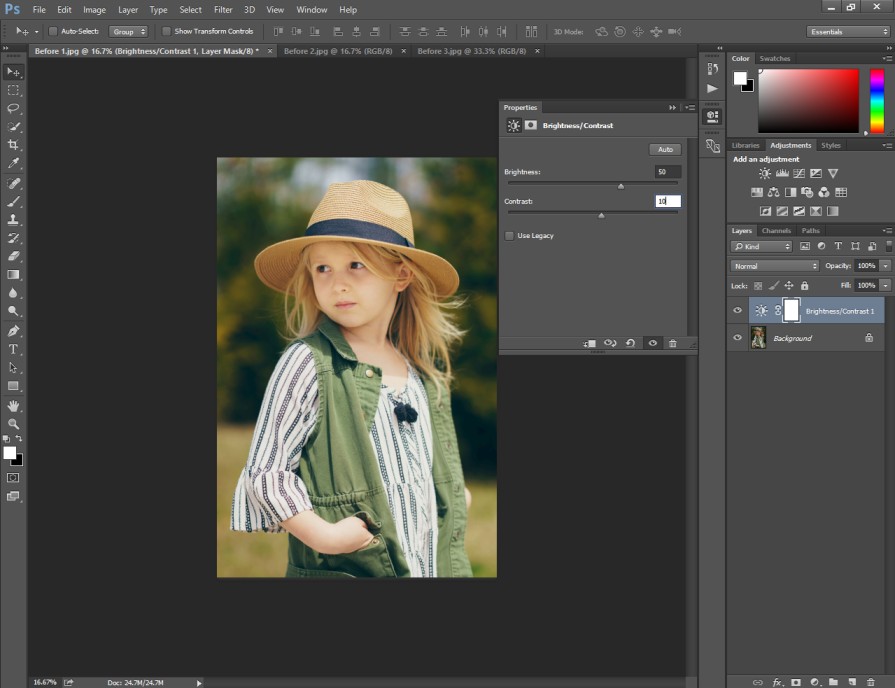
You can change those values according to the light condition of your picture. When you are okay with the changes, you can close this box. After that, we are going to add some text to the image.
Step 5: Add a text layer
In this step, you have to click on the text icon from the left side. Then, you have to select the first option named “Horizontal Type Tool”.
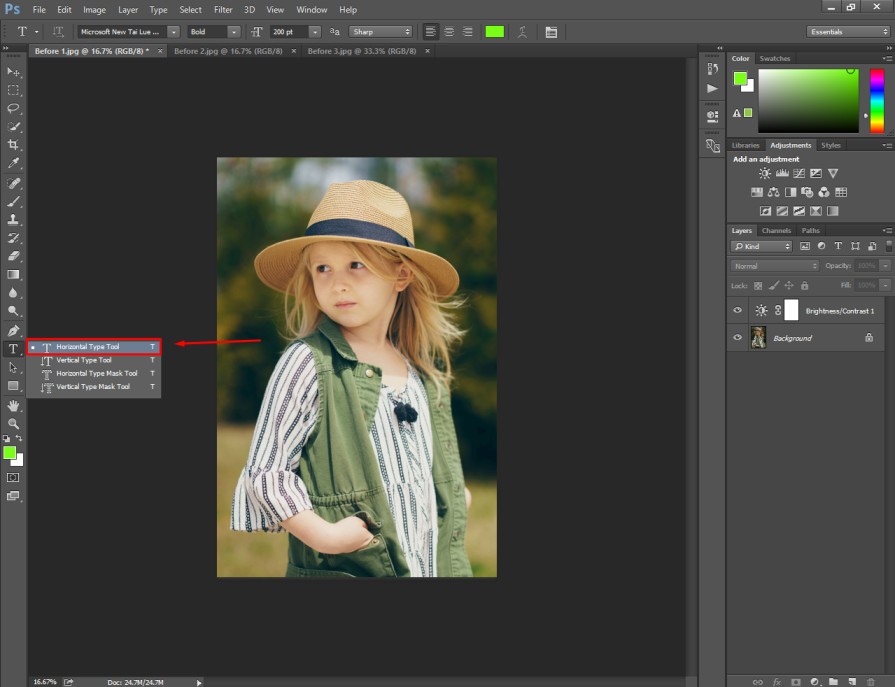
After that, you just need to click anywhere on your image to start writing. You can change the text size, color and texture from the top. Double-click on the text layer to get more customizable options for the text.

To change the position of the text, you can use the arrow key. For this image, I am going to position the text at the bottom of the left side. Also, you can change the opacity of the text to make it look suitable for the image.
At this point, the changes that we are making to the image are getting saved automatically in the action command. Now, we are going to save the command.
Step 6: Save created action
You just need to click on that stop icon to save the created action till now. Changes that you have applied to the image will be saved as a new set of actions.

Now, we can apply those changes to any other image with a single click. Let me show you how you can edit multiple images in Photoshop. You just need to click on the image that you want to apply the command.

After that, you only have to press the command key that you have set earlier. As I have set “F3”, I need to press that key to apply the saved action. Here you can see the result.

So, the text layer and brightness adjustment layer has automatically been applied to the image. If you want, you can make further corrections also. Here is the result for another image.

With that method, you can easily manage and edit multiple photos in Photoshop at a time. It will save you from working on individual images.
If you feel that you need to make some small corrections after applying an action command, you can do it according to your requirements.
Hopefully, the above steps will assist you get your editing job done. Now, let me tell you you should use this editing technique.
Who Can Benefit Through Multiple Image Editing in Photoshop?
- Professional Photographers
- Freelance Photographers
- Studio People
- Designers
- Online Sellers
- E-commerce Owners
4 Tips
- Rename the action considering the changes that you are going to make.
- While choosing the function key, Set the “Function Key” maintaining a serial.
- Choose images that have similar types of objects and light condition.
- Create a new adjustment layer for each change.
4 Mistakes
- Don’t pick images with different contexts and exposure.
- Don’t apply contrast from the “Edit” or “Adjustment” option.
- Don’t close the action panel without saving the records.
- Don’t apply changes to the original background layer.
Sum Up
At this point, you should have got an in-depth idea of how to edit multiple photos in Photoshop. Hopefully, it will save you valuable time and you will be able to edit bulk images conveniently.
Now, you need to practice your photos. Gradually, you should be able to extract the most benefit from this method.
If you face any difficulties while editing several images together, you can contact us to get a solution from Image Editing Experts.
FAQ’s
How can i edit multiple photos at once in Photoshop?
You can use Photoshop’s action feature to edit a whole bunch of photos together. It will save you time and effort.
How to organize photos before batch editing in Adobe Photoshop?
You should create a separate folder for the photos you want to edit. Then, the file format needs to be similar to perform batch editing.
What are presets in batch editing?
Presets are pre-defined editing settings that you can apply to multiple photos. You can get the presets in the “Action” menu. Also, you can set customized presets.
Can i still access individual photos while editing multiple photos?
Surely, Batch image editing doesn’t mean that you can’t edit images separately. After applying the preset, you can make unique adjustments to each photo.
What is the “Action” feature in Photoshop?
The “Actions” are recorded sequences of editing steps. You can record your edits once and apply them later to any photos with a single click.
Can i resize images in a batch using Photoshop?
Yes, you can. To do this, you have to apply the crop tool and save the action as a new set.
