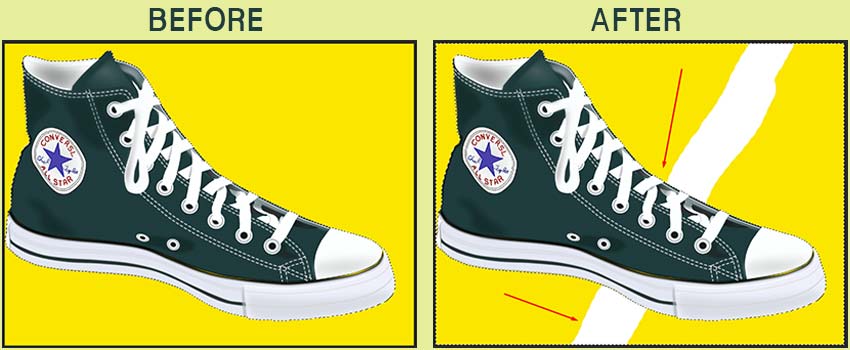
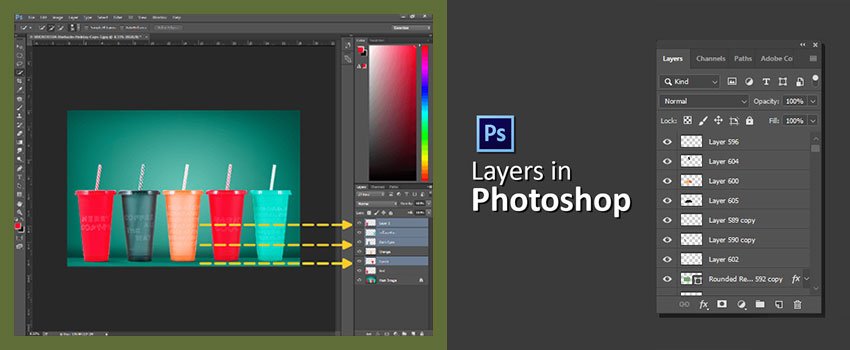
When you have captured several photos of a similar condition, it takes a long time to edit those photos separately. How would it be to edit a specific image and apply the same editing changes to the rest of the photograph?
Batch photo editing can make this happen for you. Using this photo editing technique, you can save valuable time to spend on other activities. If you are a professional photographer and going through a busy schedule, this tutorial is going to assist you to make how to batch edit in photoshop.
What is Batch Photo Editing?
Let me start by giving you a brief on batch photo editing. It’s a photo editing process that allows editing bulk photos with a single click. In this process, you just need to work on any single image.
After that, you can apply the same editing effects to other images. Sometimes, photographer’s Outsource Photo Editing to reduce their workload.
After reading this article, you are going to save a lot of your time. The interesting part is you can edit 100 images within 1 minute with a single click. That sounds pretty much exciting, isn’t it?
This is going to be an easy process to follow. You don’t need to have a high skill level in image editing to follow this procedure.
How to Batch Edit in Photoshop?
Step 1: Open several photos in Photoshop
At the very first, you have to start by opening several images in Photoshop. You can select multiple image files and drag those files into Photoshop. Also, you can choose image files from the “File” option.
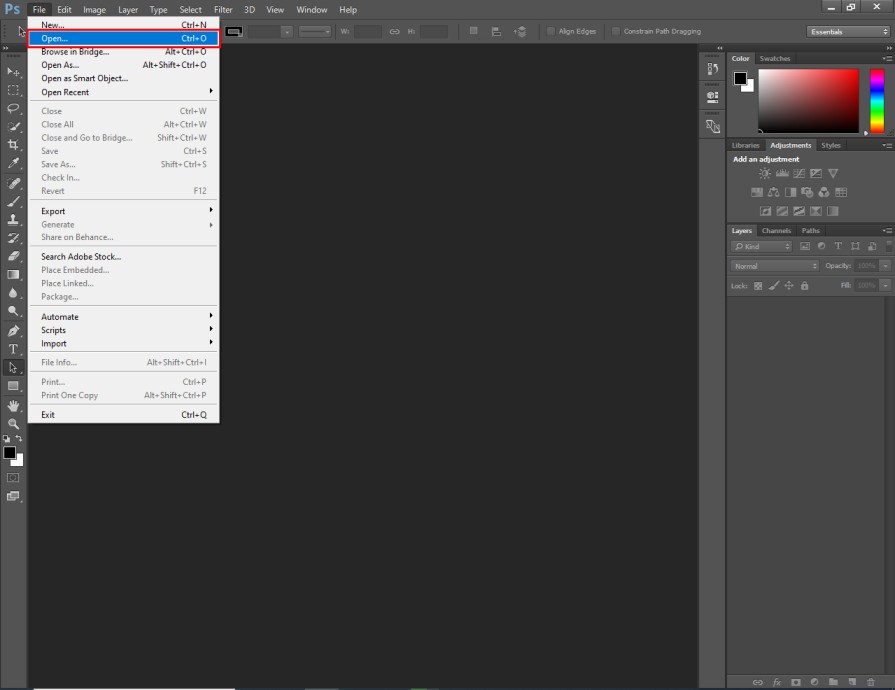
In this process, you just need to open the folder having your images. You need to hold the CTRL key to select several images.
Next to that, you need to click on any images that you have opened. For example, I am going to batch edit in Photoshop by editing the below image.
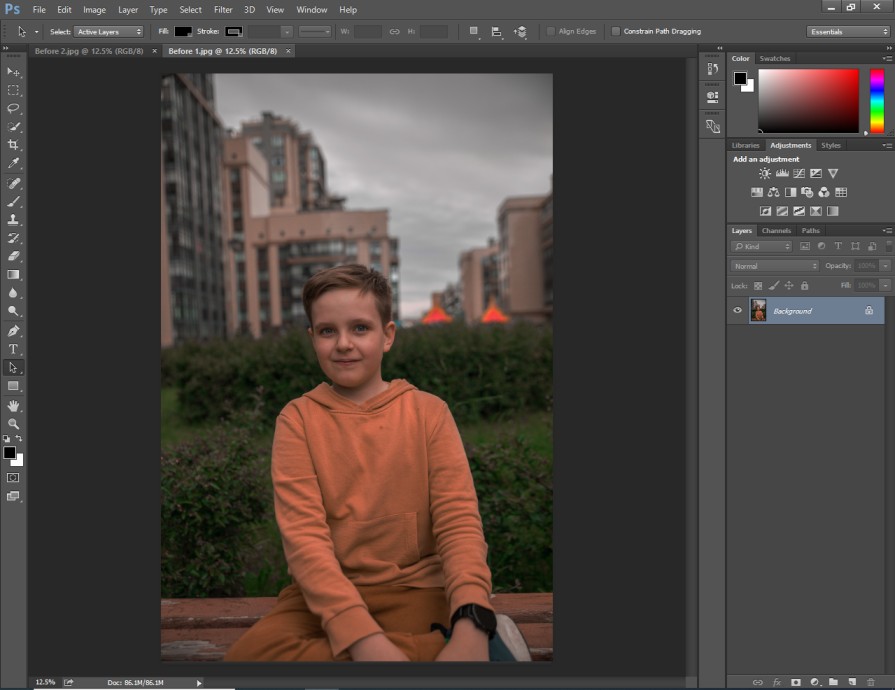
Now, we need to work on that image.
Step 2: Choose action
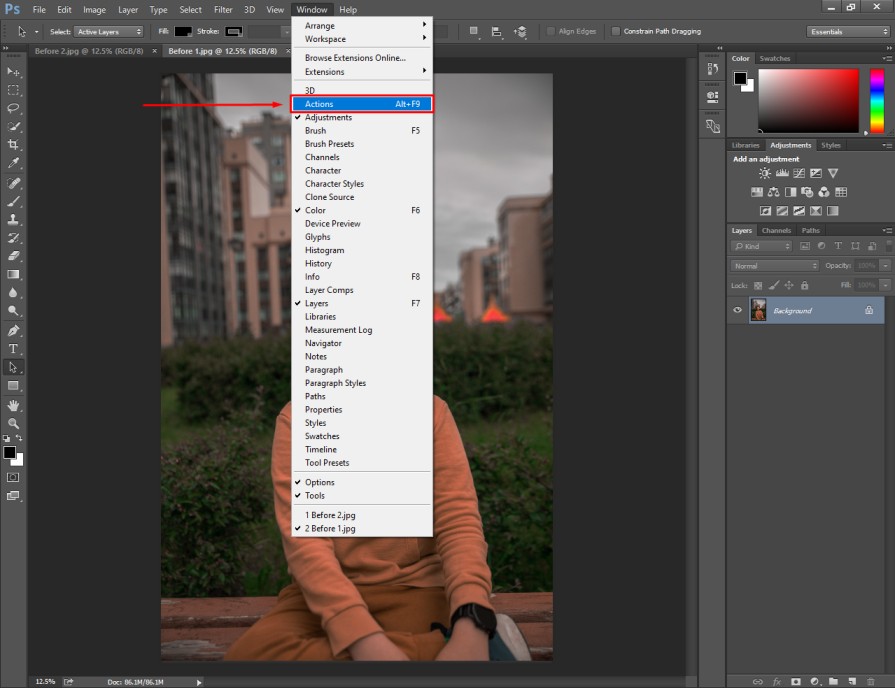
Before applying any changes to the image, you have to open the “Window” option from the right side. Then, you have to click on the “Action” option to process batch editing.
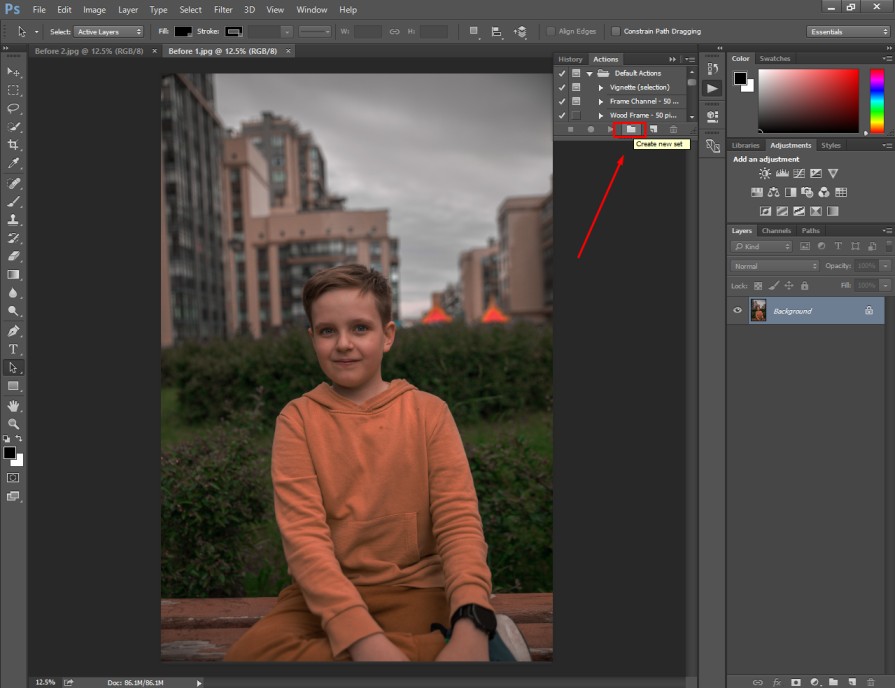
Next to that, you have to click on the “Create New Set” option to create a new action for your photo editing task. It will get this option from here.
Then, you will get a new box to rename the action. You should rename it according to the editing effects that you are going to apply to the image.
For this image, I want to make color adjustments as there is low brightness in the image.
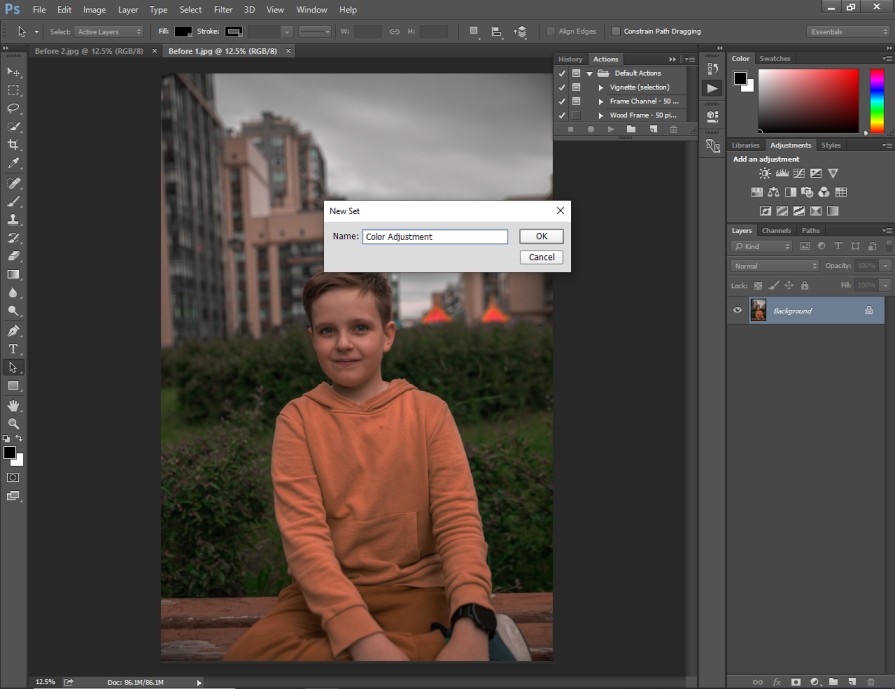
Therefore, I have set the name as “Color Adjustment”. When you have several saved actions, you can easily identify the individual action by seeing the name.
Step 3: Create new action
In this step, you have to click on the “Create new action” feature from the action menu. You will get this option just at the right of the new set button.
Here you go.
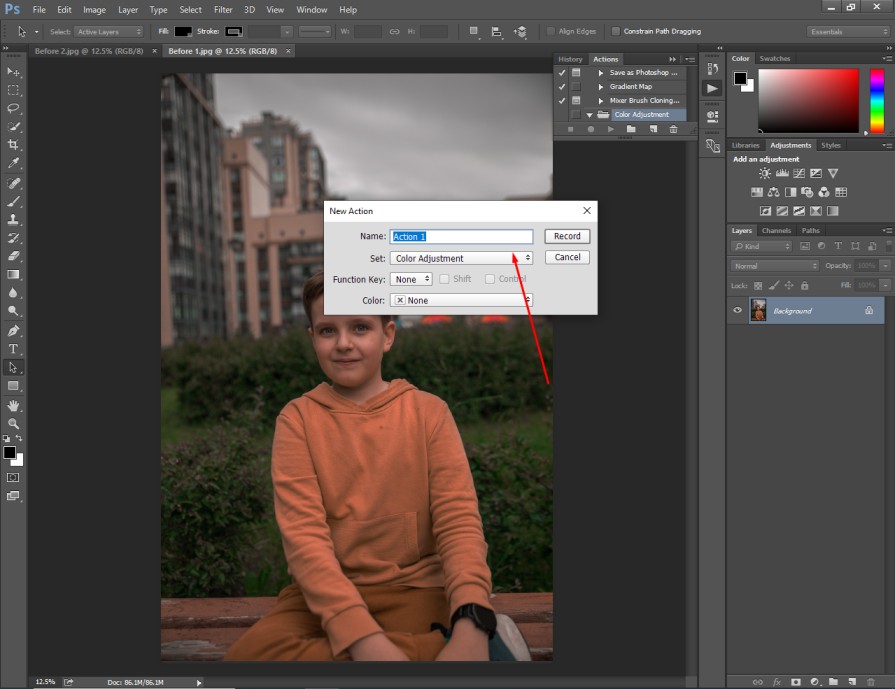
Next to that, you have to click on the record option to start recording your editing. Basically, it will save all the editing changes that you are going to make.
Later on, you can apply those changes to other images with a single click only. That’s how batch editing in Photoshop works. Now, we are going to edit the opened image.
Step 4: Edit your photograph
As you can see in the sample image, it’s looking too dark. So, we have to work on its brightness. You have to go to the image adjustment option from the top and select “Brightness/Contrast”.
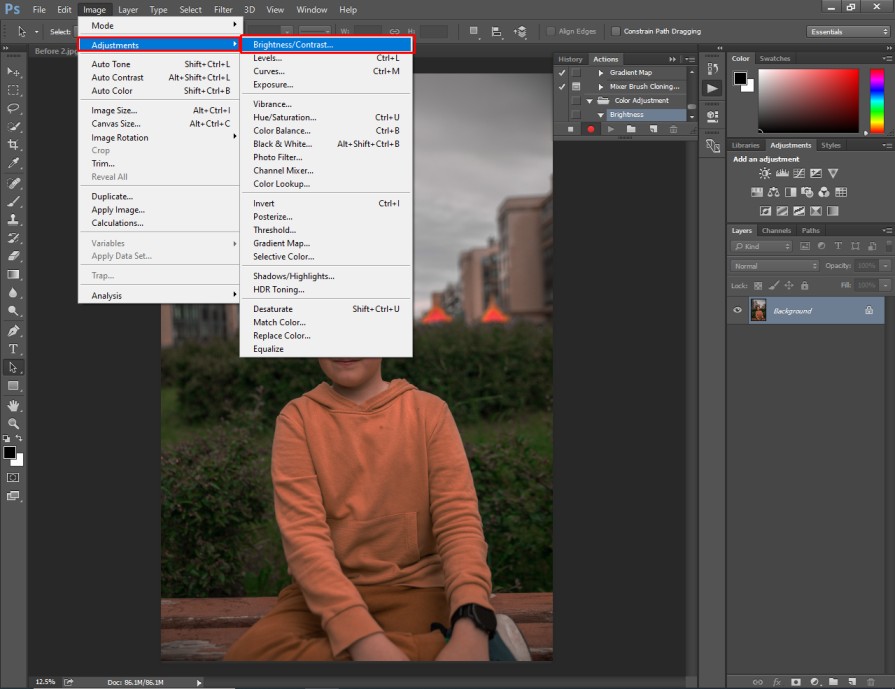
After choosing this option, you will get a slider on your screen to adjust the lighting. For this image, we have to increase the brightness and decrease the contrast value.
Some new photo editors make the common mistake of increasing both brightness and contrast at the same time. But you shouldn’t do that.
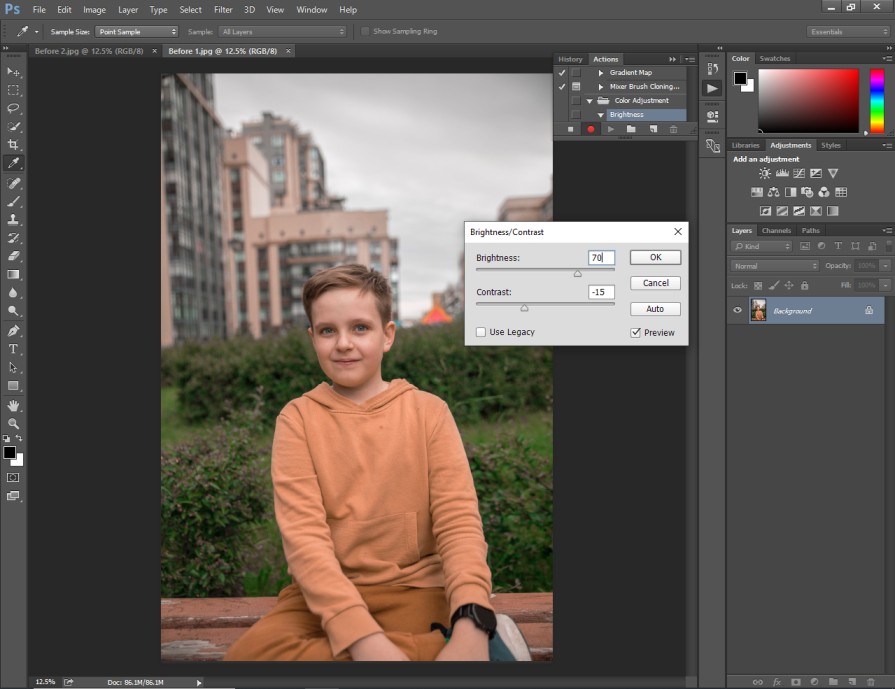
As the picture is looking too dark, I have increased the brightness to 80. Then, I set the contrast to -15. Let me remind you that this is not a universal value for all images.
You have to choose brightness and contrast considering the picture that you are working on. If there is too much light, you have to reduce the brightness.
When the image has low light, you should increase the brightness. Hopefully, you have got the basic concept of how brightness and contrast effects a photo. Now, we are going to move to the next step.
Step 5: Crop your image
Using the batch edit feature, you can crop bulk images with a similar image size. This is also important for online sellers. Different eCommerce websites have their specific product image requirements.
Using the crop feature, you can crop your photos according to the required aspect ratio. You can find the crop option here.
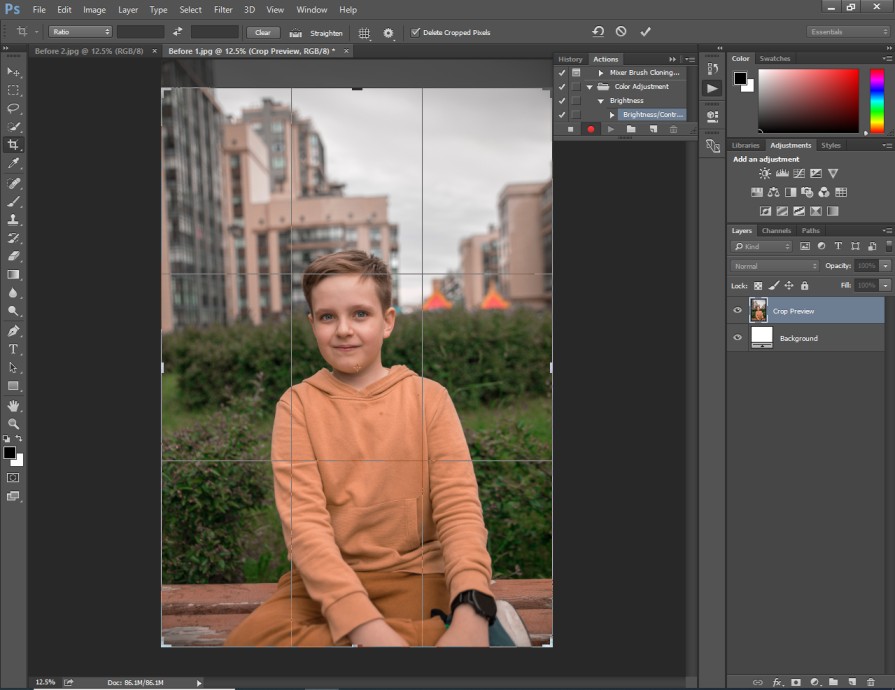
On that note, you should remember that to apply crop effect all of your images need to be in similar size. Otherwise, you won’t get perfectly cropped photos.
As those two images that I have opened are different in size, I am not going to apply the cropping effect here.
Step 6: Add watermark
Sometimes professional photographers want to put their brand watermark on the images. You can do that with a single click using batch editing in Photoshop Tricks. You just need to click on the text option from the left side.
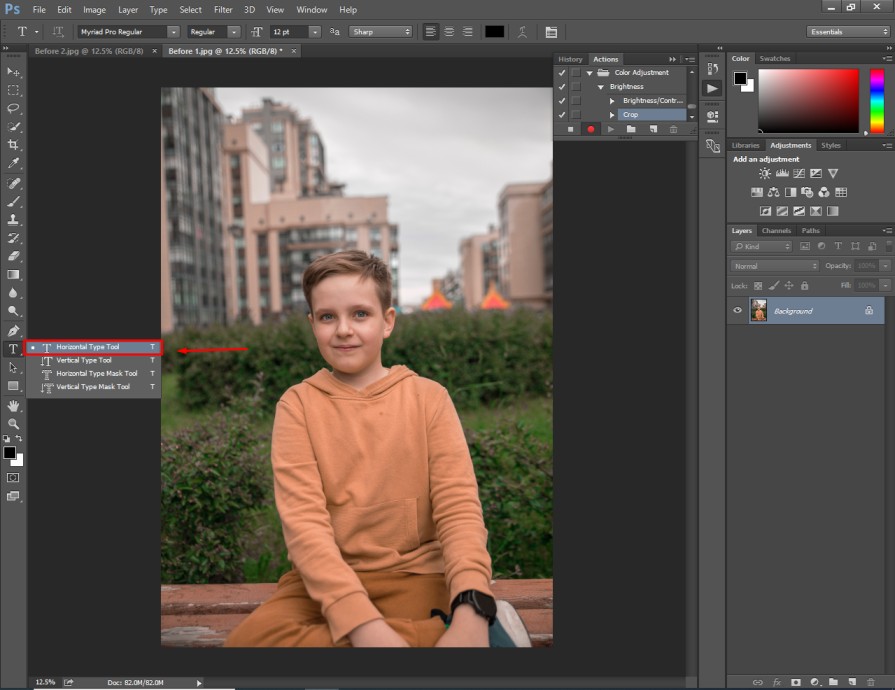
I am going to pick the Horizontal Type Tool. It will create a new text layer on your image. From the top, you can choose the text style, size and spacing.
Also, you can control the opacity from the layers panel. Here’s the watermark that I would like to have as a sample. You can use the arrow key to center the text.
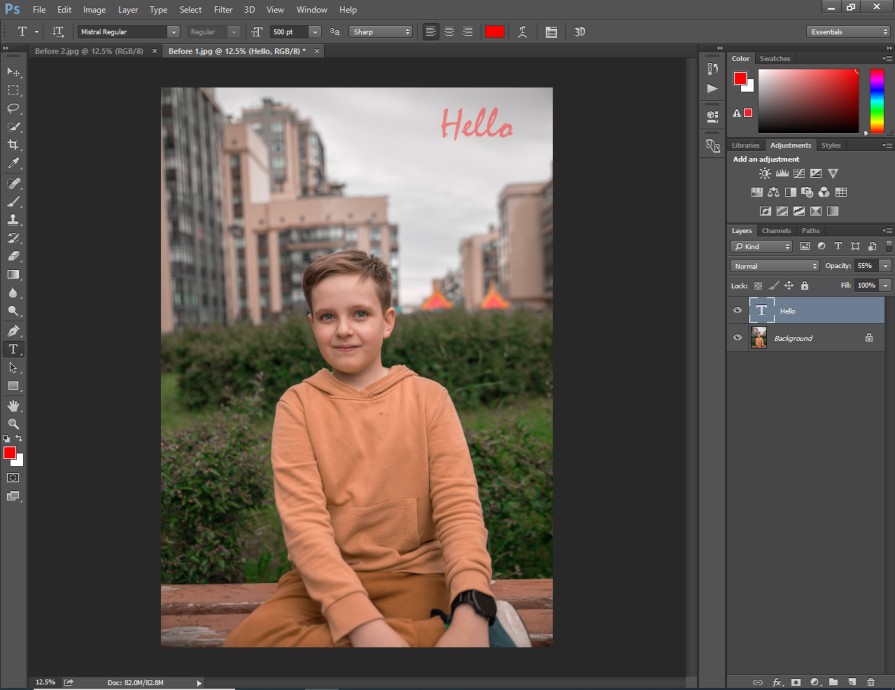
After finishing that, you can proceed to apply other editing effects as well if required. When you are done with the editing stuff, it will be time for saving all those recorded actions. You can do it just by pressing this button.
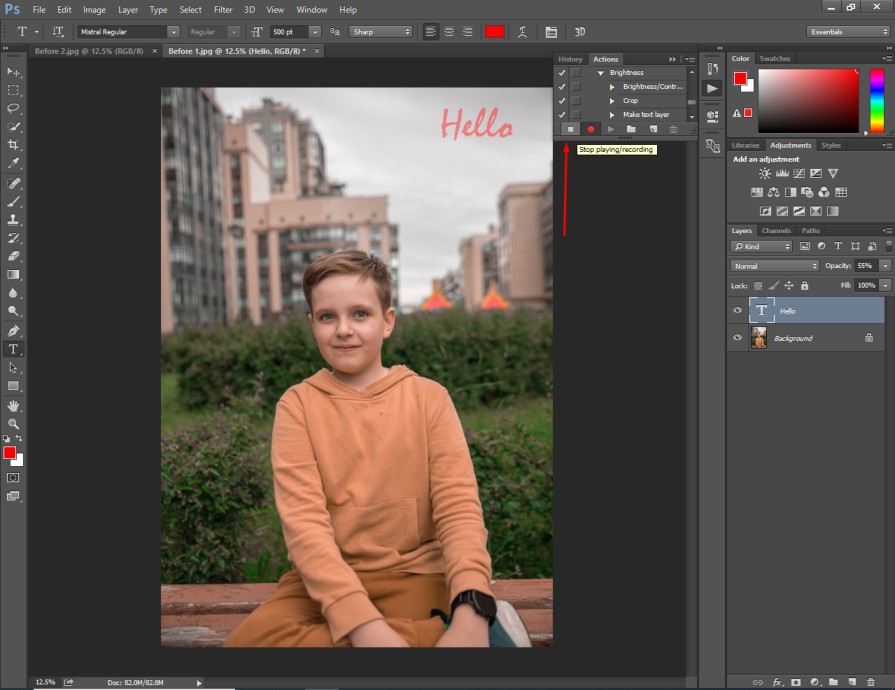
You have to click on “Stop Recording”. It will save the actions automatically. Then, we are going to apply batch image editing effects in Photoshop to edit bulk photos at once.
Step 7: Appy batch edit in Photoshop
Now, you have to click on any other image that you have opened in Photoshop. Also, you can add a new image in Photoshop to include in the batch image list. I have opened this image to apply the previous action.
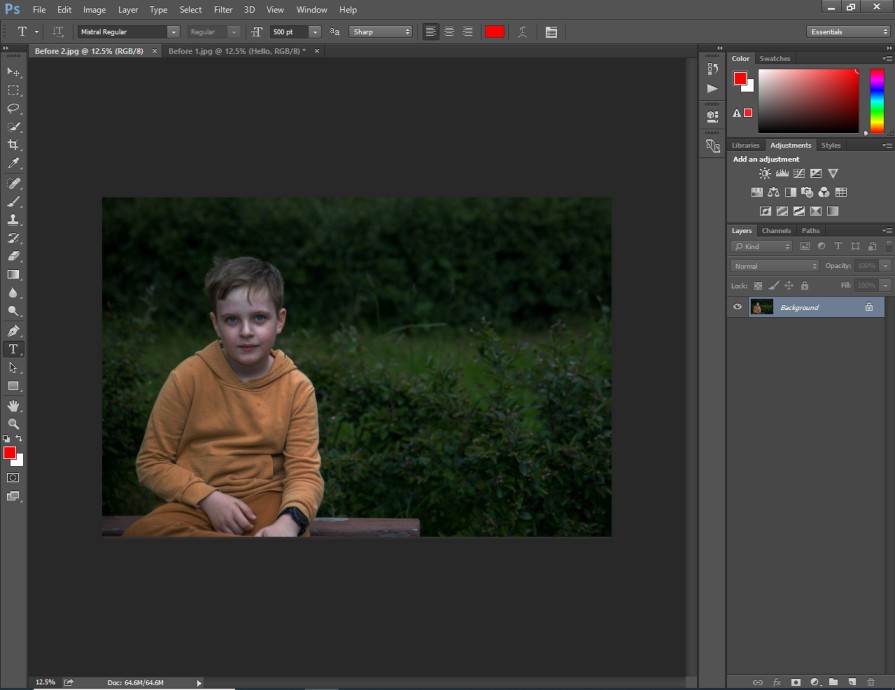
Before you apply batch image editing in Photoshop, you have to close the previous image that you have already worked on.
The batch editing will apply the same editing to all opened images in Photoshop. You need to open the file option from the top and choose “Automate”. Then, you need to click on the batch option.
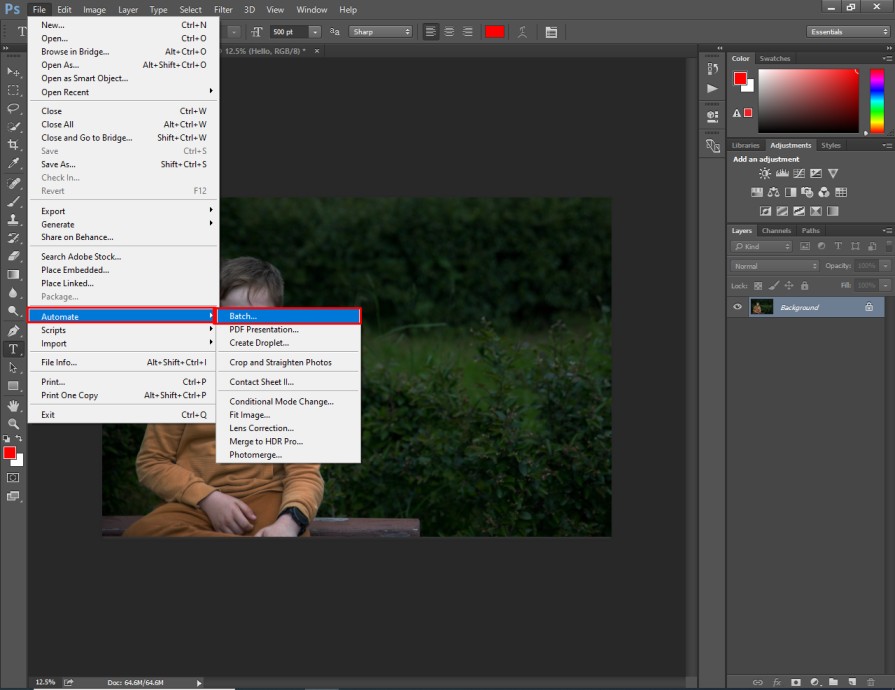
After that, you will get the list of available action lists saved on your Photoshop.
Step 8: Customize batch edit
At this point, we are just one step away from applying the batch editing process. You have to select the action that you would like to apply. I am going to choose the “Color Adjustment option that I saved earlier”.
Here you can find that.
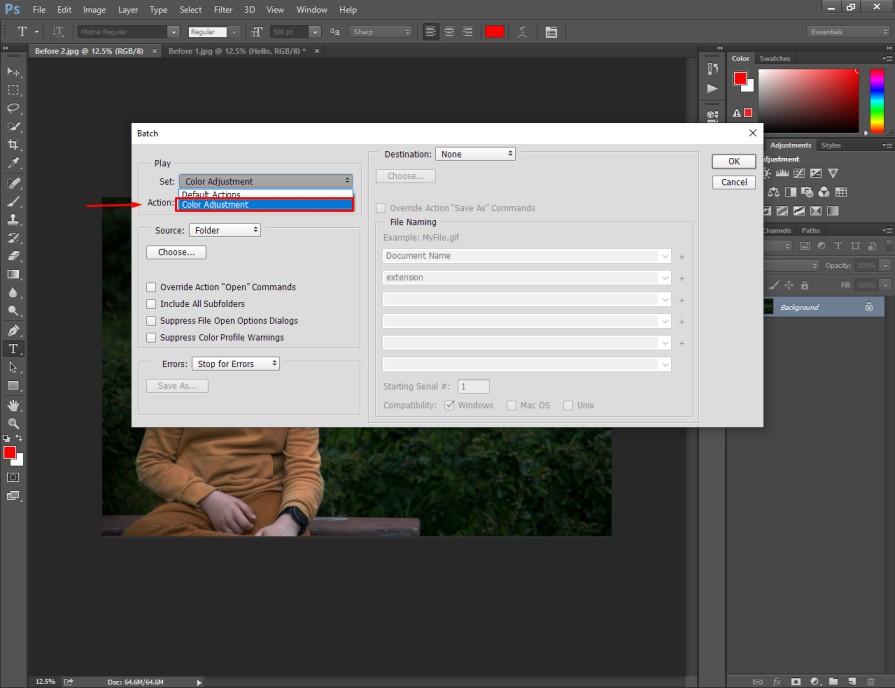
After that, you have to select the action and Source. You should choose “open files” as the source. It indicates that the batch editing effect will be applied to all opened images in Photoshop. At the same time, you should select “stop for errors” from the error button.
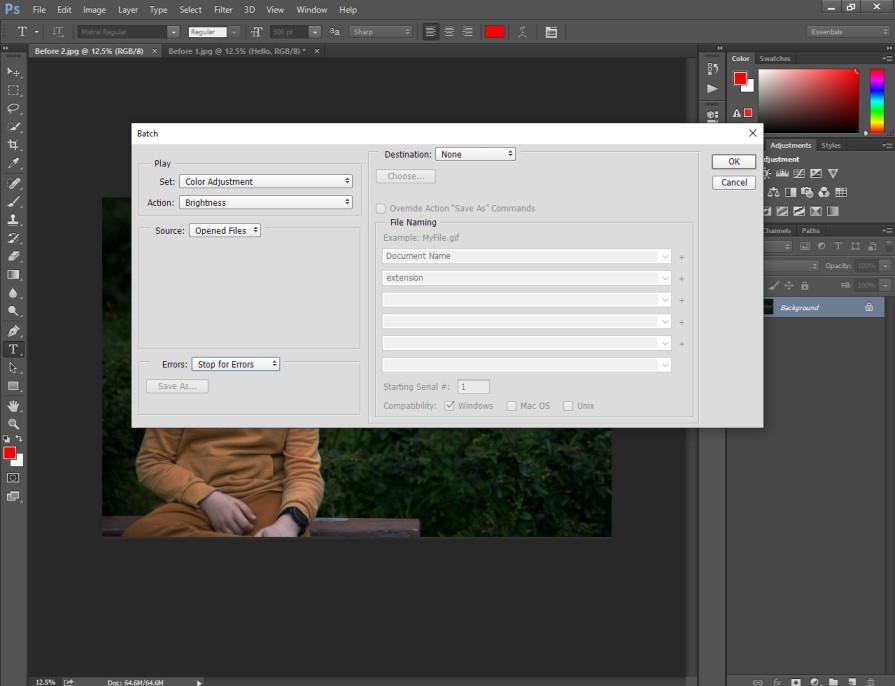
After that, all the previous image editing actions will be applied to that image immediately.
You can see the result here.
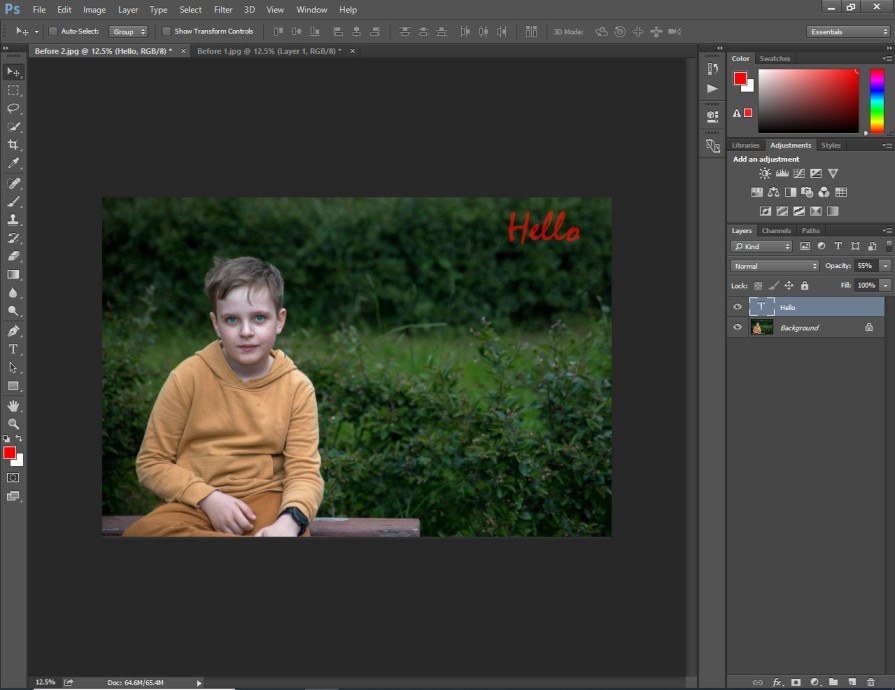
You can apply this action to as many images as you want. You just need to open those images in Photoshop and apply the changes. That will do the job. The best part is you don’t have to edit individual images for bringing similar changes. Overall, it will be useful for all photographers.
Who Needs Batch Image Editing in Photoshop?
- Professional Photographers and Studios
- Ecommerce Businesses
- Social Media Managers and Influencers
- Event Photographers
- Wedding Photographers
- Real Estate Agents
- Bloggers
- Content Creators
- Digital Marketers and Advertisers
- Web Designers
- Graphic Designers
- Anyone Dealing with Large Image Collections
When Should i Apply Batch Editing in Photoshop?
Similar adjustments
One ideal scenario for batch editing is when you have a set of images that require similar adjustments. For example, if you have a bunch of landscape photos taken under similar lighting conditions. In that case, you can apply batch editing to ensure a consistent look across the entire series.
Event photography
Are you a professional event photographer capturing hundreds of shots at weddings? Batch editing can be a boost for you to speed up your workflow.
You can easily correct exposure, apply color grading, or resize images all at once. It will give you more time to focus on capturing those precious moments behind the lens.
Product photography
For e-commerce businesses, batch editing is a time-saving blessing. If you are dealing with product photography, consistent editing across product images creates a professional appearance. It will boost your brand’s visual appeal. That will be helpful in attracting potential customers.
3 Tips
- Always use an adjustment layer to keep the editing process flexible.
- Before applying any filter convert the layer as a smart abject.
- Rename the action to identify them easily when required.
3 Mistakes
- Don’t apply the batch editing effect for images with different formats.
- Don’t crop the images when image sizes are different for each one.
- Don’t apply the batch automate process without closing the edited image.
Conclusion
At this point, you should have got an in-depth knowledge of how to batch edit in Photoshop. By following the above steps, anyone can apply automated batch processing in Photoshop for their images. Batch editing is the best option for editing similar types of photos.
You should follow our bonus editing tips to enhance your image editing quality. At the same time, you need to stay away from those common mistakes that we have mentioned.
FAQ’s
Why should i use batch edit in Photoshop?
Batch editing allows you to apply the same edits to multiple photos automatically. It saves time and ensures consistency across your images.
How can i create a batch action in Photoshop?
To create a batch action, open the Actions panel, and record the edits you want to apply. Then, you have to go to File > Automate > Batch and choose the action.
Can i customize batch edits for individual photos?
While creating the action, you need to leave certain settings flexible. During the batch process, Photoshop will prompt you to adjust those settings for each photo.
Is it possible to undo batch edits if I’m not satisfied?
Yes, you can always undo batch edits by opening the History panel. You just need to select the step before the batch action. Also, you can do that with CTRL + Z.
Can i add watermarks to photos during batch editing?
You can Include a watermark in your action by creating a text layer. You should position it where you want it in the photo.
What file formats are supported for batch editing?
Photoshop supports formats like JPEG, PNG, RAW, TIFF, and some other formats as well. You should ensure that your images are in a compatible format before starting the batch edit.
Can i apply batch edit to only a specific part of my photos?
Yes, you can use the selection tools to isolate the area you want to edit. Then, you have to record your actions.
