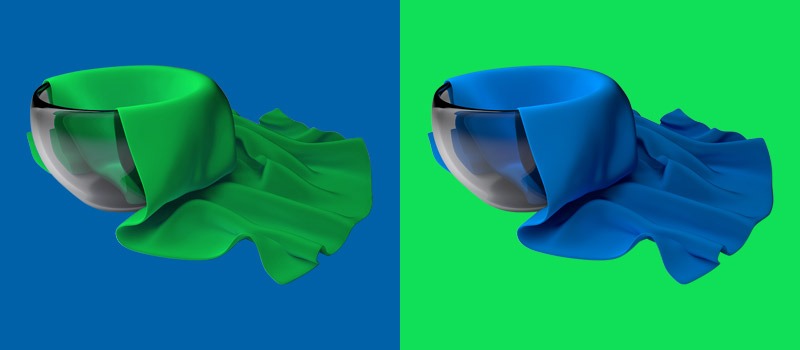
Every photographer wants to make their photos look great. More than 83% of people get attracted to an image depending on the color of the image.
If you can express the proper color of an object within your Photos, it will help you to attract more viewers.
Most of the time, photographers aren’t happy with the color condition of raw images.
Are you also getting worried about that? Here you can find the solution. Through this article, I am going to inform you about color-corrected photos.
Firstly, I am going to share 10 Tips to Accurately Edit Color in Photographs. Then, you will learn how to make the image photo color correction in photography.
Finally, I will notify you where you can order the best Color Change Service. So, this article will provide valuable information for all types of Professional Photographers. Beginner photographers can also be beneficial from this article.
Here’s the first tip.
10 Tips to Accurately Edit Color in Photographs
Tip 1: Use gray cards
Are you wondering after seeing this at the first tip? Gray cards are a far better option to use in Photography to get the colors in your image according to the expectation.
If you don’t know about the gray cards, let me inform you shortly. This is a gray color flat object that assists to get consistent image exposure. .
Using gray cards will make post-production work easier for the image photo color correction. It will be also helpful for color grading camera adjustment.
Have you never used gray cards yet? You should start utilizing a gray card to get the perfect colors in your images.
Tip 2: Use a good display screen
Unfortunately, many photographers aren’t concerned about the quality of their displays. It leaves a negative impact on their image for color correction.
Without good color accuracy of the screen, it becomes too difficult to get color-corrected photos. Therefore, you should use a good display screen. It will show you the color distribution of your images properly. Your screen should support at least 99% sRGB.
Otherwise, you will see limited color on your screen. That isn’t good for any type of Photography including commercial photography. Following this tip will help you to deal with hundreds of Photos with ease for color correction.
Know More: How To Change The Color Of A Shirt In Photoshop
Tip 3: Work on color correcting in the morning
More than 65% of photographers work on color correction at night. This is not the right approach of how to color correct an image. You know, small details of an image are also important in Photography and image editing. Do you know when our eyes give their best performance? This is in the morning. While working on color correction in the morning, you will be able to notice the color more accurately.
Besides, you will be able to work with a fresh mind. Overall, it will give you the best outcomes. To accurately edit color in Photographs you need to follow this golden rule.
Tip 4: Print your work!
This might sound a bit strange to you. But trust me you are going to love this tip. It helped lots of Photographers to get color corrected photos and accurately edit color in Photographs.
A physical print of an image will show you the actual look of the color distribution. It will help to determine the way of improving an image.
Besides, you will get an idea about the images whether you want to make changes in colors or not. You can start practicing this golden tip of color correction from today and feel the difference.
Tip 5: Four eyes are better than two – Have a friend help you check your work
Sometimes, we don’t find any issues to change the color of an image. But after delivering the image to the clients, they inform the editors of some issues and ask for revisions. Isn’t it better to find the issue before delivering it to the client? Our 5th tip will help you to get rid of these situations.
You can ask some of your friends about the colors in your images. Their feedback will help you to get the best color corrected photos. That will be excellent, won’t it?
Tip 6: Remove color casts within the levels channel
You are going to love this tip. In this step, you’ll know how you can seriously improve your photography using Photoshop. Open your image in Photoshop and follow the steps given below.
From the image adjustment option, you have to click on the “Levels”. Here you can see the instructions.
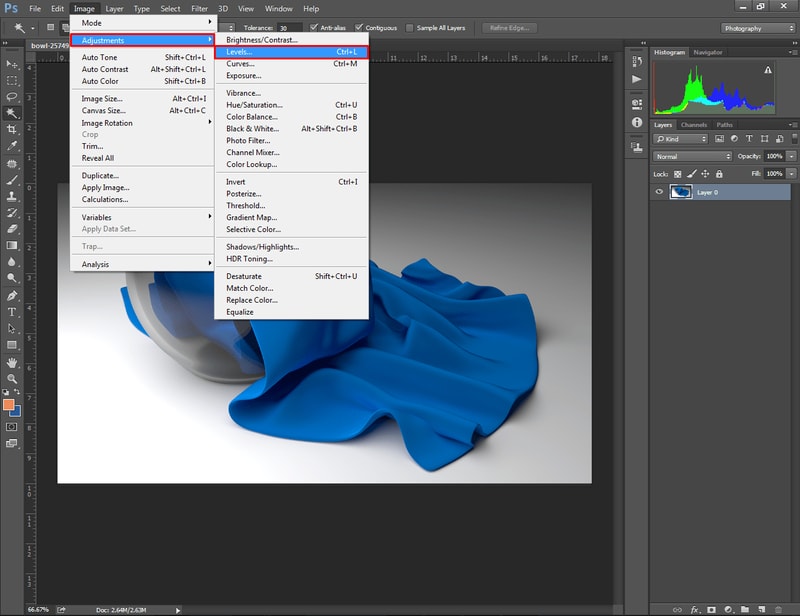
After that, you will get a pop-up window that will allow you to correct the colors in your images. You can change the color red, Green and Blue. Also, “RGB” allow you to change the overall color of an image.
Want to see the example?
Here you go.

The object of my image is blue so I am going to select “Blue” from the options. You can see three boxes under the input level. If you move the arrows, it will change the color of your picture.

In this method, you can make a color light or deep. Also, you can change the color and convert it into another color.
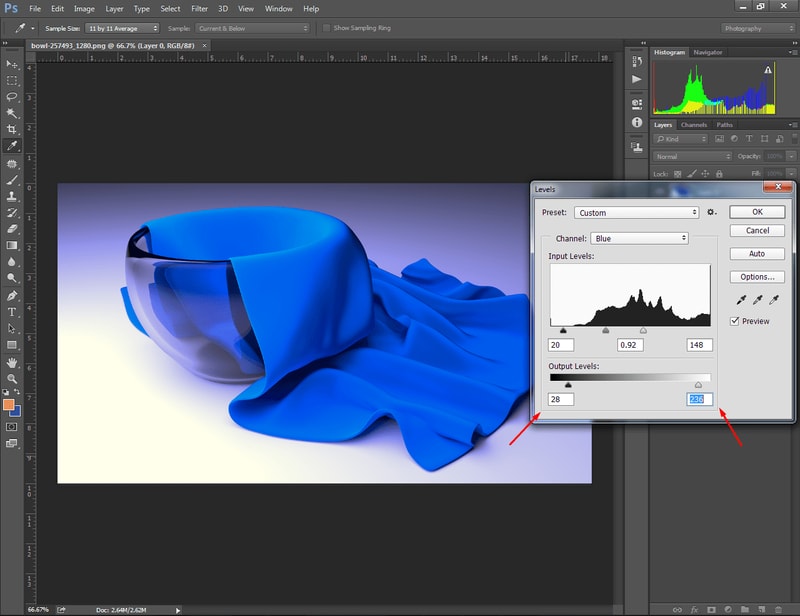
You can also control the outside area from the output level option. So, this is an effective technique to create a cinematic photo.
Tip 7: Utilize a curves correction layer to mask out individual problem spots
We can also use Photoshop’s “Curves” option for color correction of an image. Where to find the curves option in Photoshop? Let’s see.
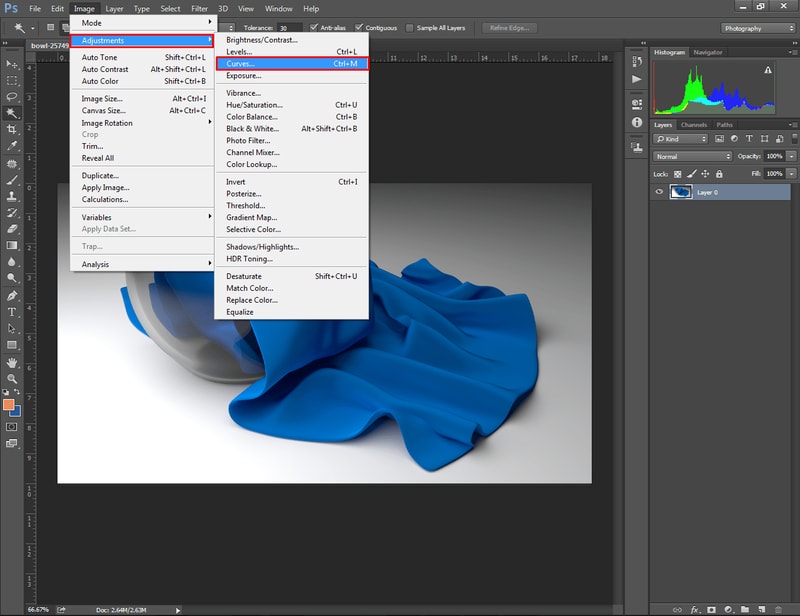
Just to the bottom of “Level”, you can find the curves option. It will assist you to change the brightness, contrast, and shadow of an image. You have to change the curves up and down to apply the effects.
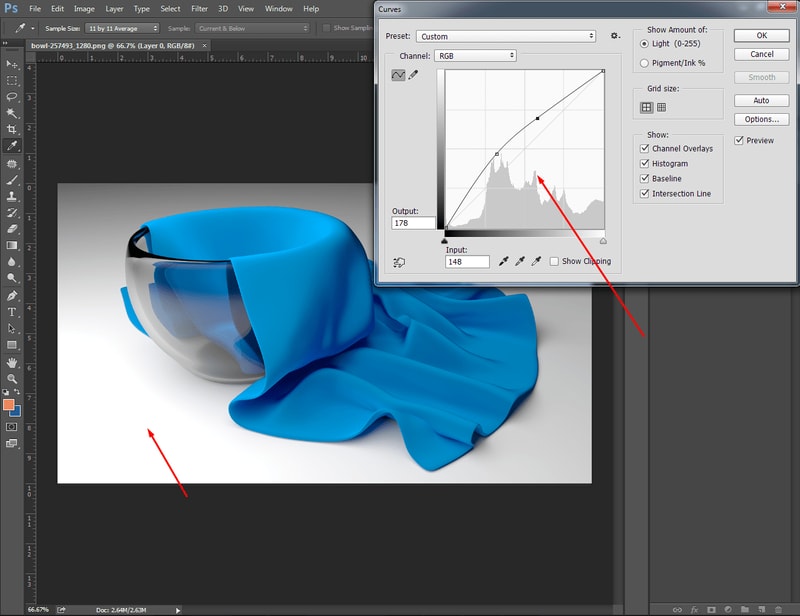
Moving the curves upwards will make the image look brighter.
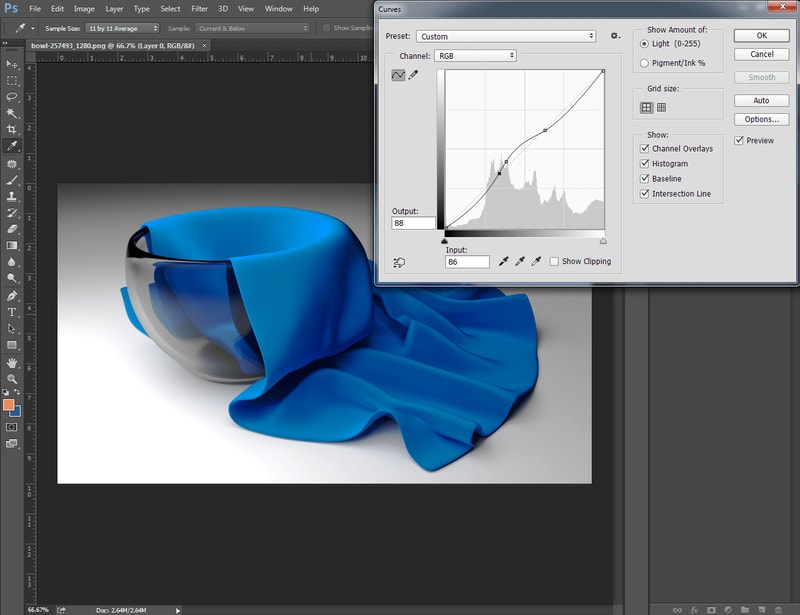
On the opposite side, moving the curves downwards will make the image look darker. To utilize the curve correction properly, you have to do some practice.
To apply the changes to a specific area, you have to select those areas with any of the Photoshop selection tools.
Tip 8: Refine the areas you are working in
To get a perfect color-corrected image, you have to refine the areas of an image that you are working on. These three options can assist you in this operation.
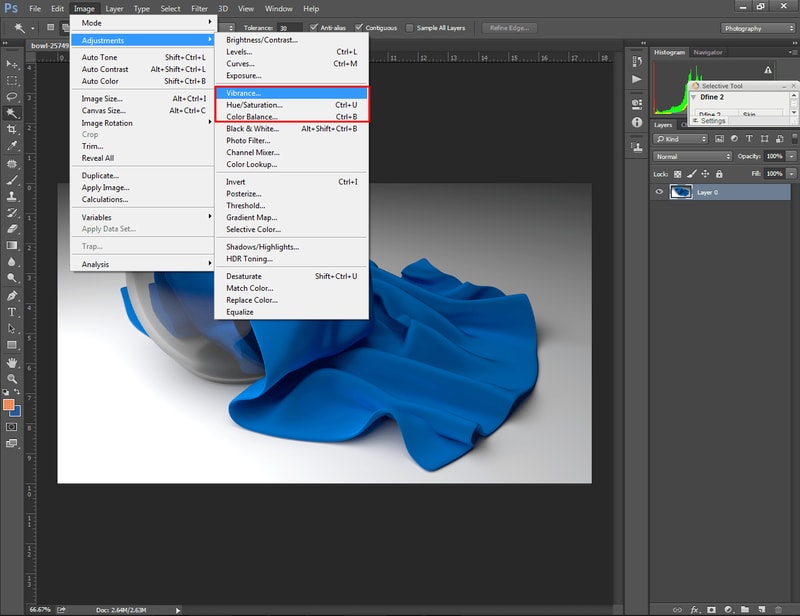
You can use the “Vibrance” option for making photo vibrant. Hue and Saturation will be useful for colorizing and decolorizing a picture. Looking to change the color of an image? Hue and saturation will help you.
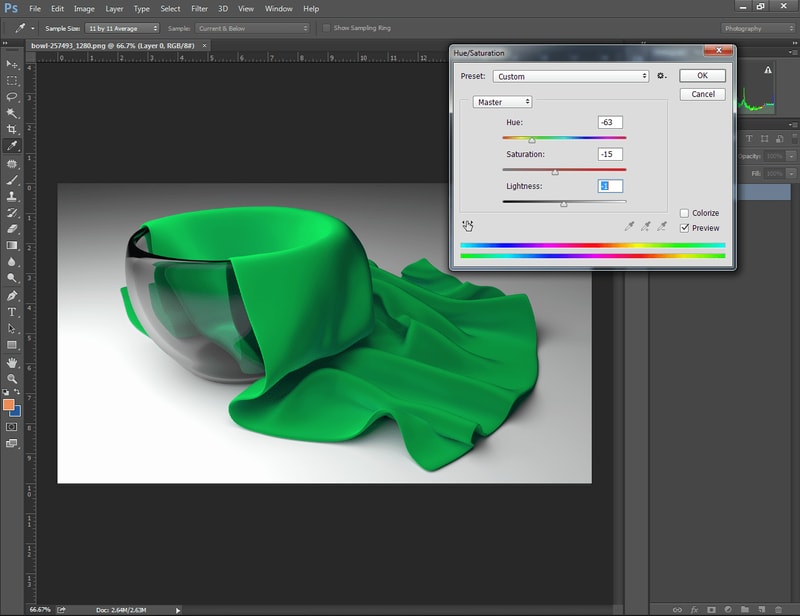
Last but not the least; the color balance option will help you with image color correction. An image might not get the perfect color due to the light source, environment, or camera lens issues.
This option can assist you to get rid of those issues.
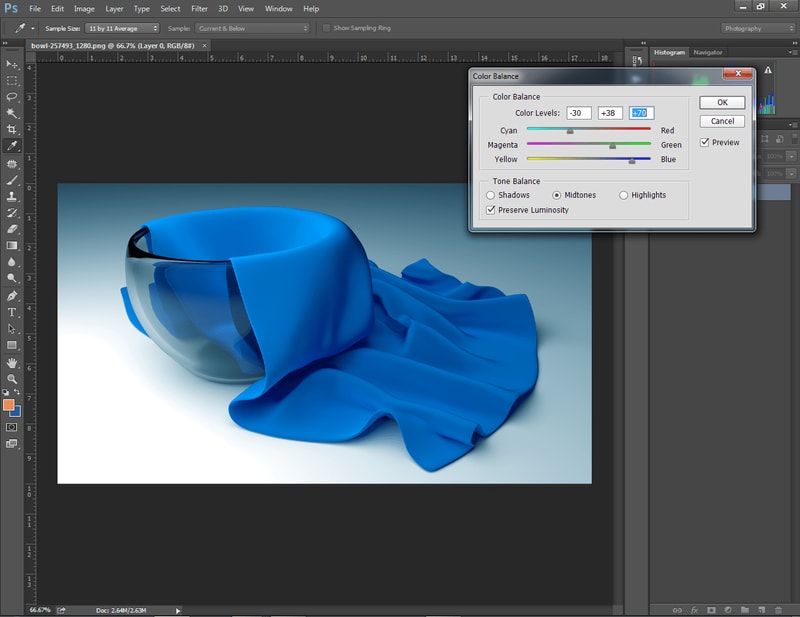
With the combined use of those three options, you can refine the areas you are working on a picture and get color-corrected photos.
Tip 9: Use curves to adjust the color casts
You can utilize the curve adjustment option for advanced color correction of an image. You have to enable the curves option by following the above tip 7 instruction.
For advanced color correction, you have to master the art of using individual color presets. Along with working on the RGB, you need to know how to use the Red, Green and Blue color presets for color grading and photography improvement.
Also, you can use the mask option to apply the color changes to a specific area in a non-destructive method. Non-destructive editing allows you to bring back any previous changes. If you master the technique, you will be able to edit color in Photographs accurately.
Tip 10: Capture in raw
This is the last tip that you are going to get from our top 10 lists. For a better post-production opportunity, you have to capture the image in Raw format. Some of the beginner photographers think that the Raw format needs extra storage so it is better to avoid the format.
But, it limits your post-production image improvement opportunities. Let me explain why. Capturing an Image in Raw format saves the image with proper details.
When you capture the image in JPEG or other formats, the picture loses its proper details. That’s why you should capture in Raw to ensure better colors in your images.
That was the list of the top 10 golden rules to accurately edit colors in Photography. Hopefully, you will get color-corrected photos after following those tips.
As I have promised you earlier, I’m going to inform you how you can make the image color correction process easier without using the Photos. Getting excited to know the procedure? Allow me to show you.
Color correcting made easy with the color tool
Color grading and photography are closely connected to each other. Online Photo editors can help to make color correcting easier. We are going to use the “Befunky” online image editor for this process.
Tools for Color Correcting and Enhancing Image Color
Open your image in “Befunky” and go to the “edit” option from the right side. There you will find Hue, Saturation, and Temperature options. Using these three tools we can make color corrections to an image and enhance the image color.

Now, permit me to show you the process of using the color tool.
How to use the Color Tool?

The color tool gives you proper control over the color components of an image.
# Hue
Let me start with the Hue option. You can change and adjust the color of an image by utilizing this feature. Here you can see an example,
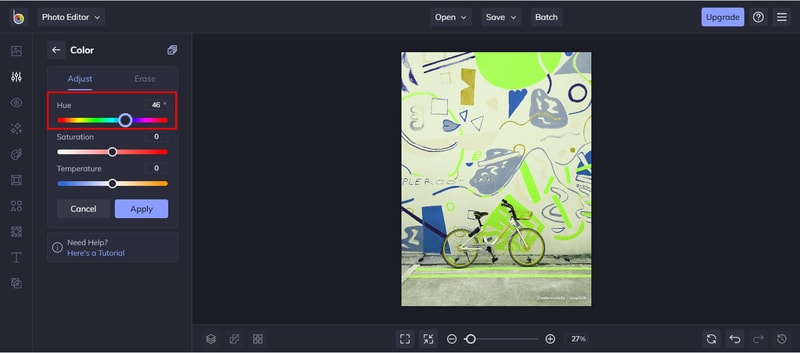
I’ve changed the hue value and it has changed the color of the entire image. This is a great tool for image color manipulation within a few seconds. All you need to do is change the slider.
You can change the color of an image even with a single click. Let me remind you that it will change the entire picture’s color.
# Saturation
Next to the hue, you will find the saturation option. You can increase and decrease the color opacity of an image from this option. An example will make things more clearly to you.
Here is the normal picture.

After increasing the saturation:
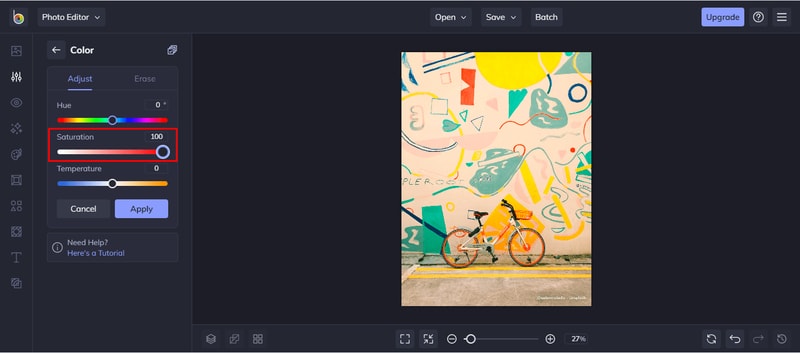
So, it has made the color stronger. You can use this option to change the color intensity of your images. If you set the value too high, the image isn’t going to look realistic. So, you have to increase or decrease the value as much as you need.
# Temperature
This is the third option of the color tool. You might have guessed its task seeing the name. It is required for an image to bring a warm or cold look.
If you reduce the value, it will bring a bluish tone to the image.

On the contrary, it brings a warm tone when you increase the temperature. The temperature option is useful when you want to bring a warm look to your photos.
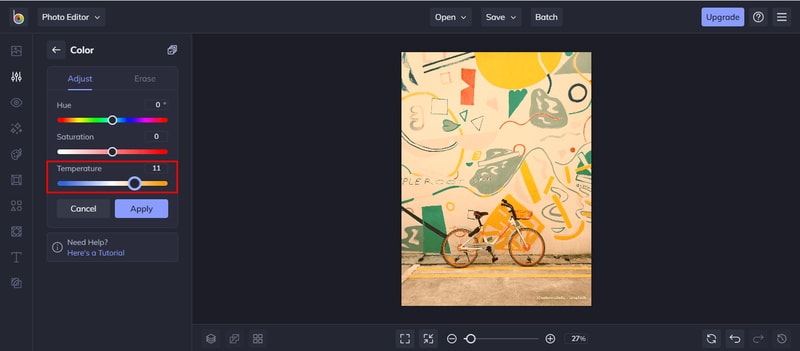
You can also utilize the feature to create cinematic images whether you want to keep it in a cold tone or warm. The process is pretty simple and fun to do, isn’t it? I think so. You can share your opinion in the comment box.
Conclusion
That’s all for today. You have known about the process of getting color-corrected photos. I hope you have liked the 10 tips to accurately edit color in Photographs. Do you have any questions? Feel free to ask us.
Stay with us for more exciting and helpful articles for Photographers and Online sellers. Contact Clipping Way to get the best Professional Photo Editing Services. Wish you all the best.
FAQ’s
How do you color correct a picture?
Photoshop color adjustment can help you to do that.
What does color correction mean in photography?
Color correction is the post-processing task for color adjustment of an image.
How do you color correct old photos?
Using Photoshop you can color correct and restore old photos.
Is color correction photo manipulation?
Yes, you can call color correction one sort of photo manipulation.
How do you color correct your face?
Retouching options in Photoshop allow you to color correct your face.
What is hand color corrected images?
Manual color correction can be defined as the hand color corrected images.
