To display an image appropriately, image size is the most important factor to consider. When you are going to use images online, you need to maintain a proper image for that particular platform.
Image resizing allows us to make an image suitable for different platforms with different image size requirements. Resizing a single image doesn’t take much time.
But it gets challenging when you need to resize bulk images at once. So, how to resize images in Photoshop? We are going to share a super helpful method on how to batch resize images in Photoshop.
You can apply this method for bulk image resizing. You can apply it for maintaining Amazon Product Image Requirements or any other images resize requirements.
What is Batch Image Resize?
Batch image resize is the process of resizing bulk images at once. In that process, we don’t have to resize each image individually. As a result, you can resize multiple images with a similar image size within a short time.
It is particularly mandatory for Product Photography and eCommerce Image Editing. Resizing an image makes it suitable to get the image properly displayed.
Who Needs Batch Image Resize in Photoshop?
Professional photographers, product photographers, online sellers, eCommerce owners, and real estate agents have to use photographs on different platforms.
Image size guidelines are different for separate platforms. Bulk image resizing is the only solution here that can assist them in making their photograph perfectly displayed.
So, anyone involved with photography for commercial purposes or advertising needs batch image resize in Photoshop.
How to Batch Resize Images in Photoshop? 7 Steps to Follow
Step 1: Open a single image in Photoshop for batch resize
First of all, we have to start with a single image. We are going to proceed to the batch image resize an image in Photoshop with this sample image.
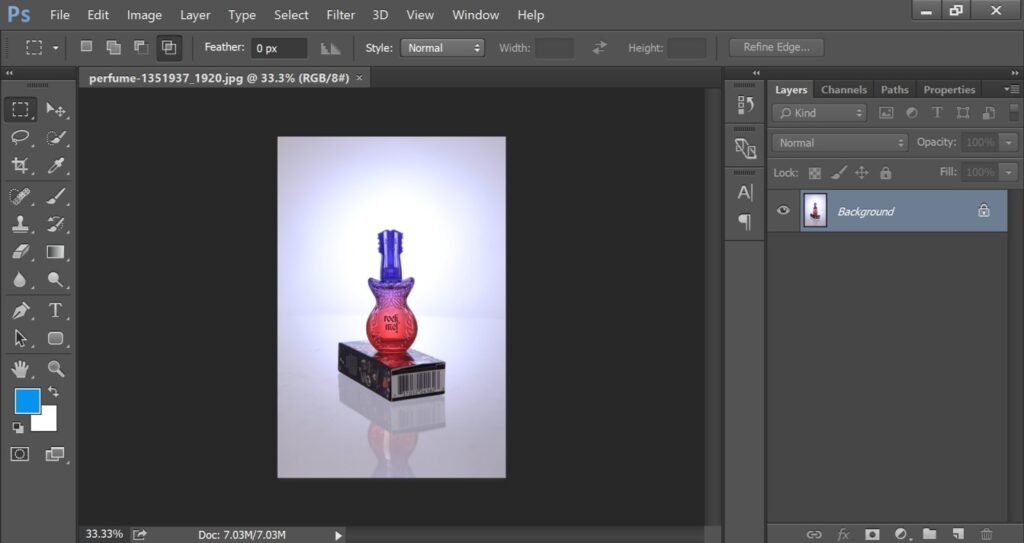
Now, let’s go to the image size option from the top and have a look at the current size. Here it is.
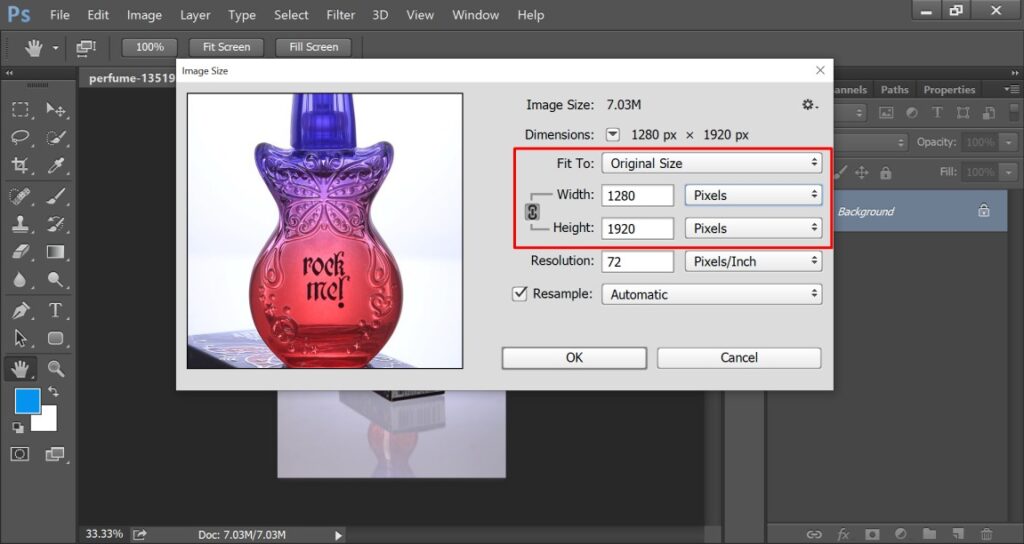
As you can see, the current image width is 1280 pixels. We are going to change it to 600 pixels.
Step 2: Go to Action
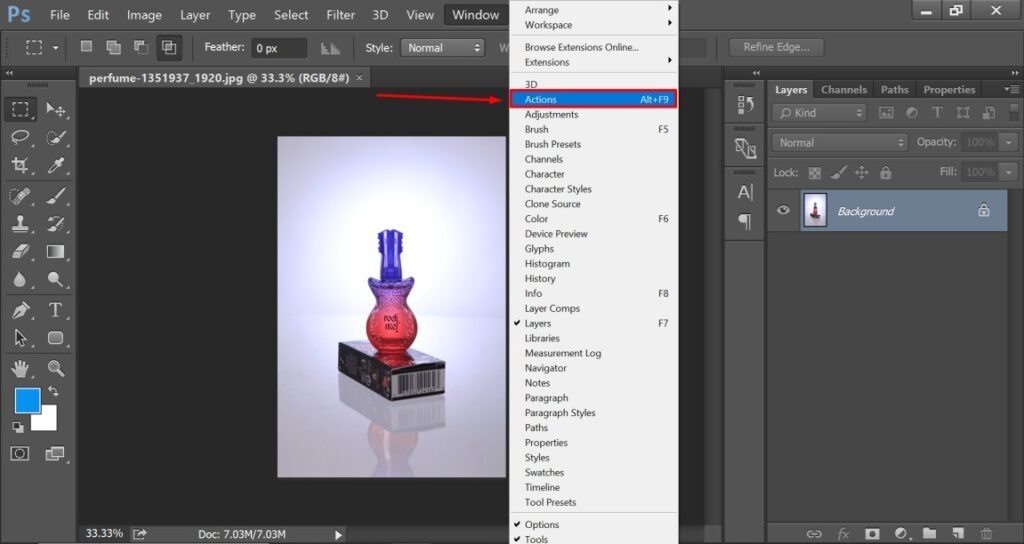
You need to click on the “Window” option from the right side and choose Action. You can get it from here.
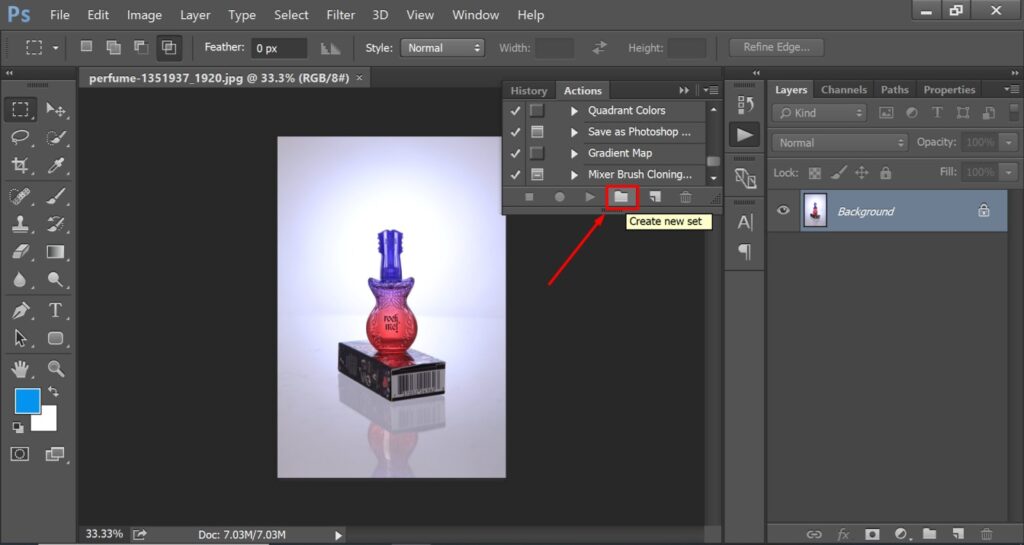
After that, you have to create a new folder within the action to resize multiple images at once in Photoshop. You have to click on the “Create New Set”.
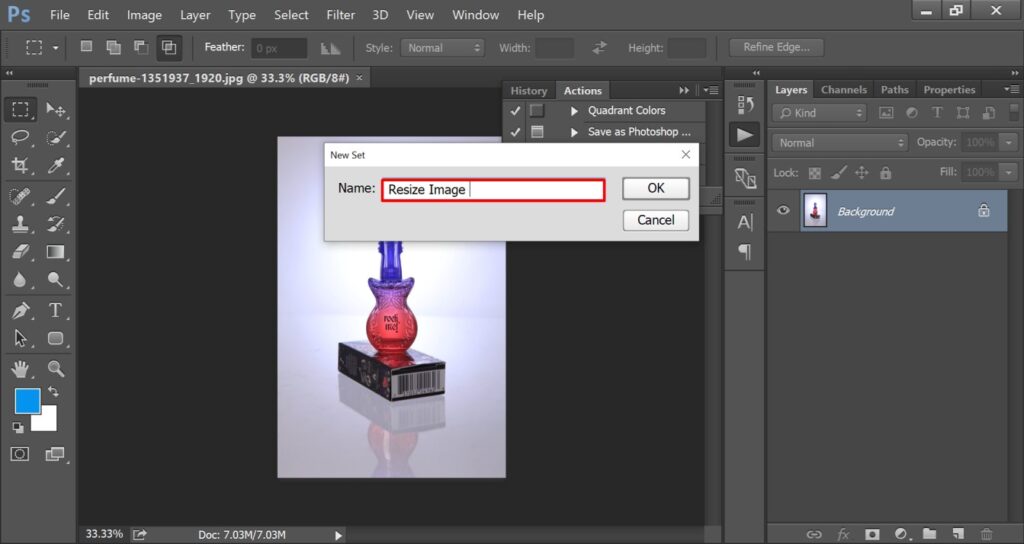
At this point, you need to rename the set so that you can easily choose the action for bulk image resize in Photoshop.
Step 3: Rename new set
We are going to rename the set as “Resize Image”. After that, it will be easy to identify the action how to resize images in Photoshop.
After that, you have to click on “Create New Action” from the action menu. Then, you have to rename the action as well to identify it easily.
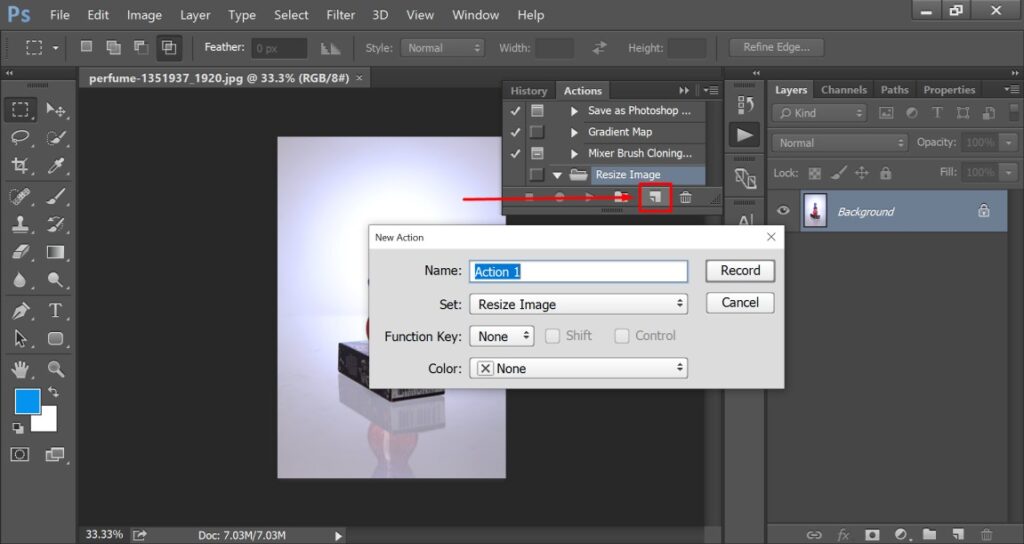
We are going to rename it as 1000px. You can put any convenient name according to your preference.
Step 4: Resize the image in Photoshop
At this point, we are going to resize images in Photoshop. To do that, you have to click on the Image Option from the top and click on the “Image Size”.
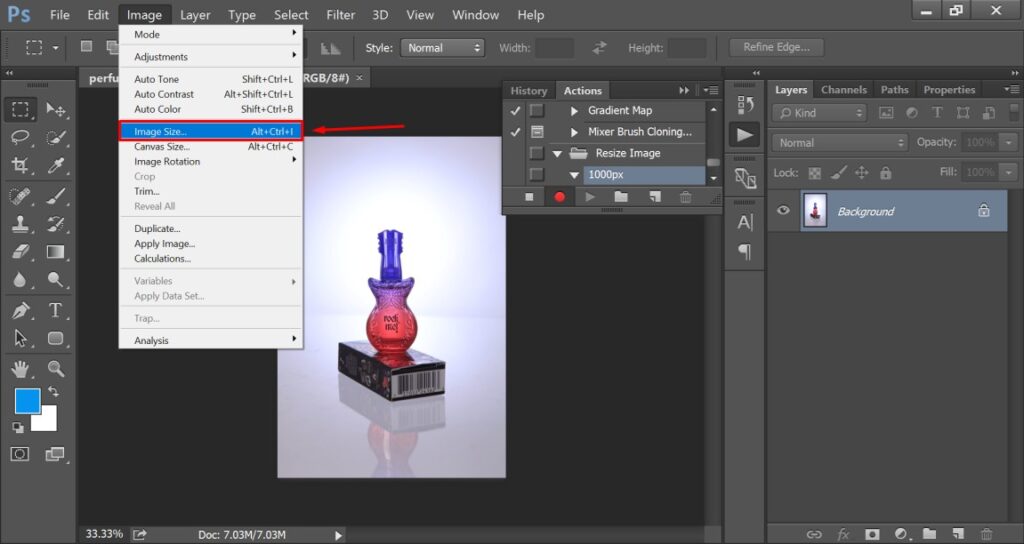
Next to that, you have to choose the image size that you prefer for your images. If you are going to upload the images to eCommerce websites, you have to follow product photography guidelines to resize the images.
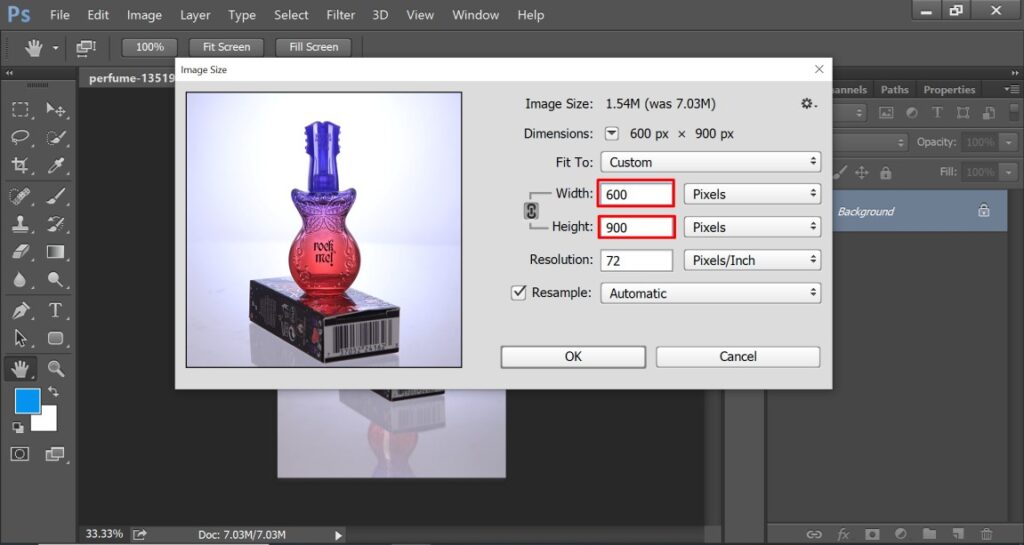
For those images, we are going to set the image width as 600 pixels. It will automatically change the height according to the width.
Step 5: Stop recording action
In this step, you have to save the image after resizing. Go to the File option from the top and choose “Save As”. You can find the image-saving option from here.
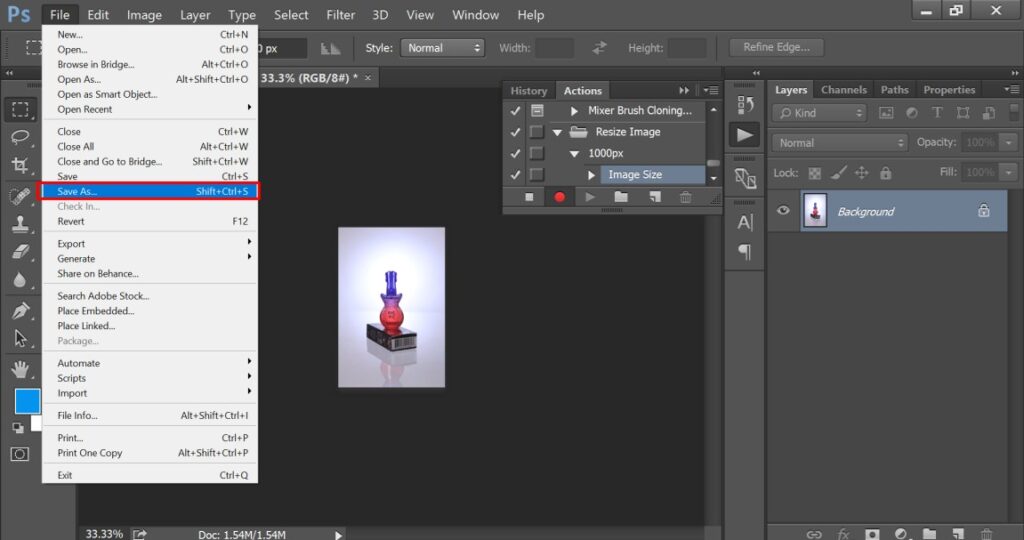
Till now, Photoshop has recorded the process of how to batch-resize images in Photoshop. You have to click on the stop recording to stop the action recording.
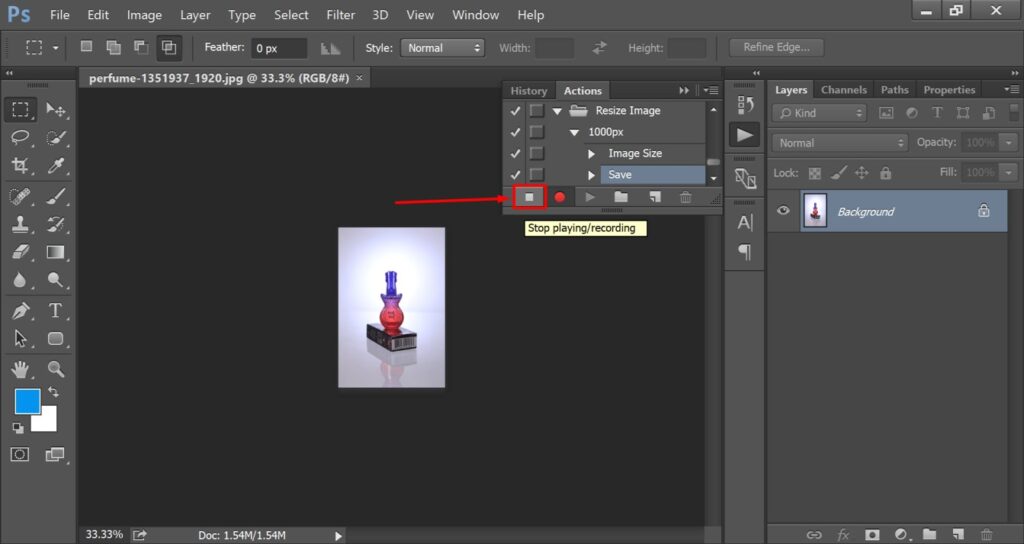
Now, our primary task is done for bulk image resizing in Photoshop. Now, we are going to apply the action on multiple images to resize them at once.
Step 6: Batch resize images in Photoshop
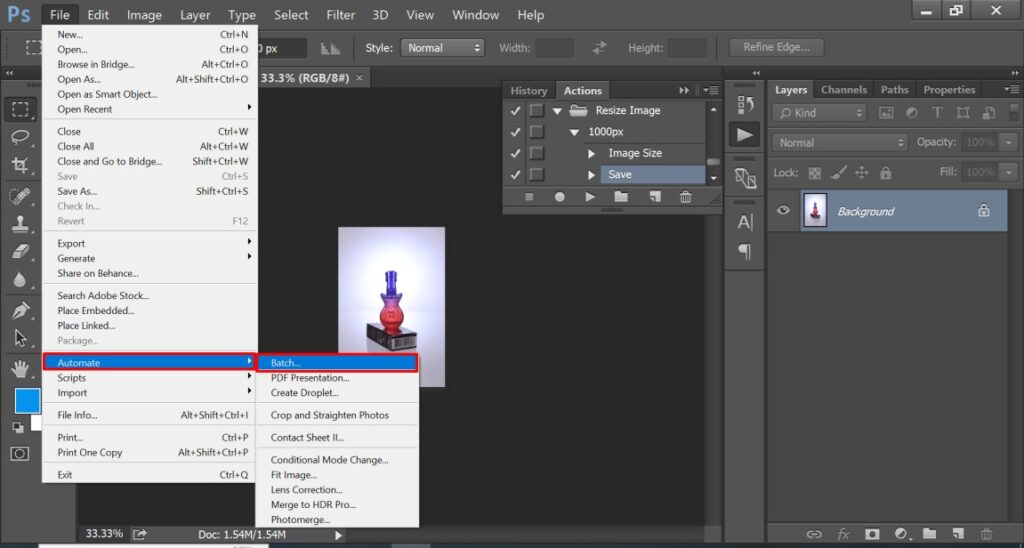
Now, you have to click on the “File” option from the top and choose “Automate” from the list. From there, you need to click on the “Batch”. You can access the option from here.
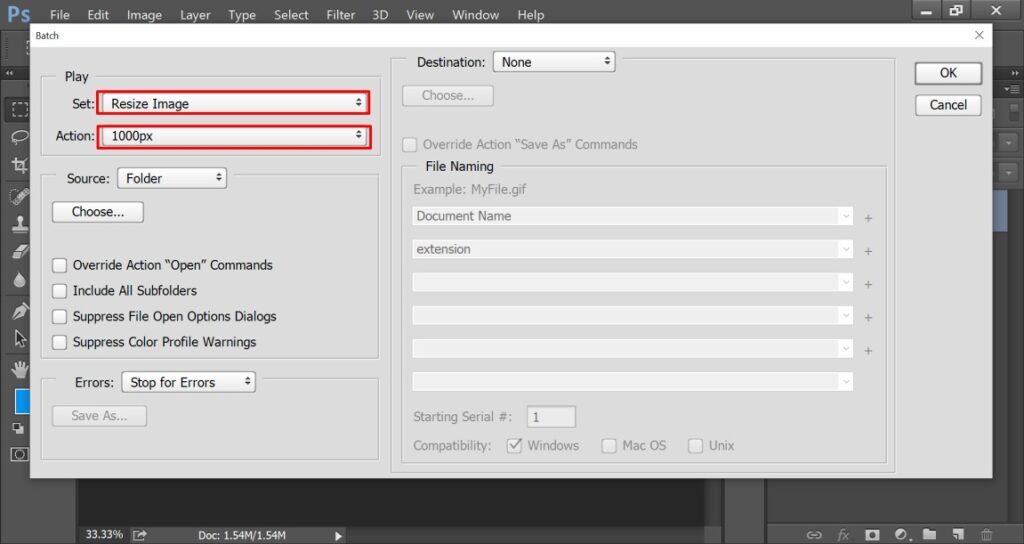
Next to that, you will get a new window for batch image editing in Photoshop. You need to choose the set as “Resize Image” and Action that you have saved for the image resizing. The new interface will look like this one.
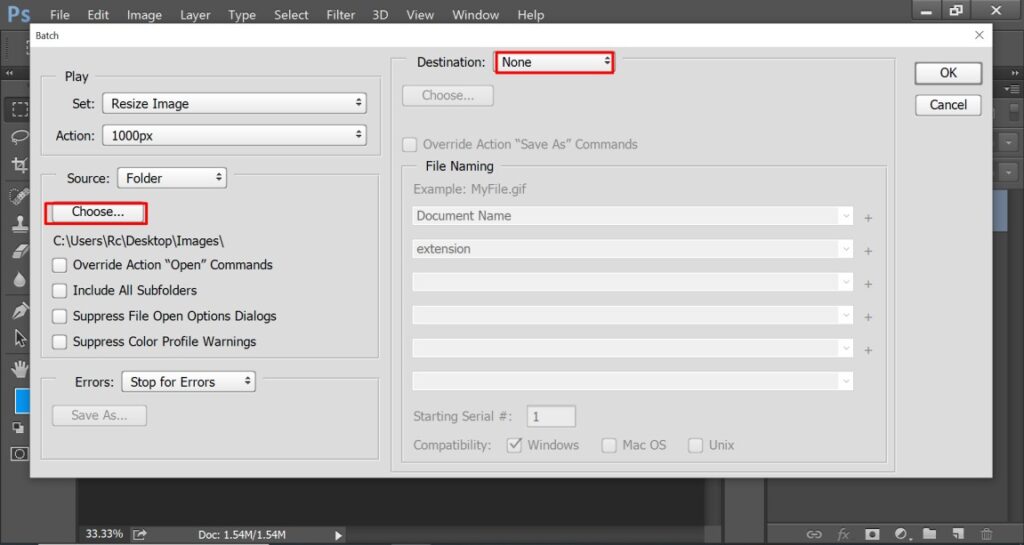
After that, you have to choose the “Source” folder. You can select the folder by clicking on the choose option from the top. Also, you have to set a destination folder to save the resized images in that folder.
At this stage, we are just one step away from bulk image resizing in Photoshop.
Step 7: Apply the image resize action
You have to enable “Suppress File Open Options Dialogs” and “Suppress Color Profile Warnings” from the above window. At the same time, you have to choose “Override Action Save As Commands. All those options are available here.
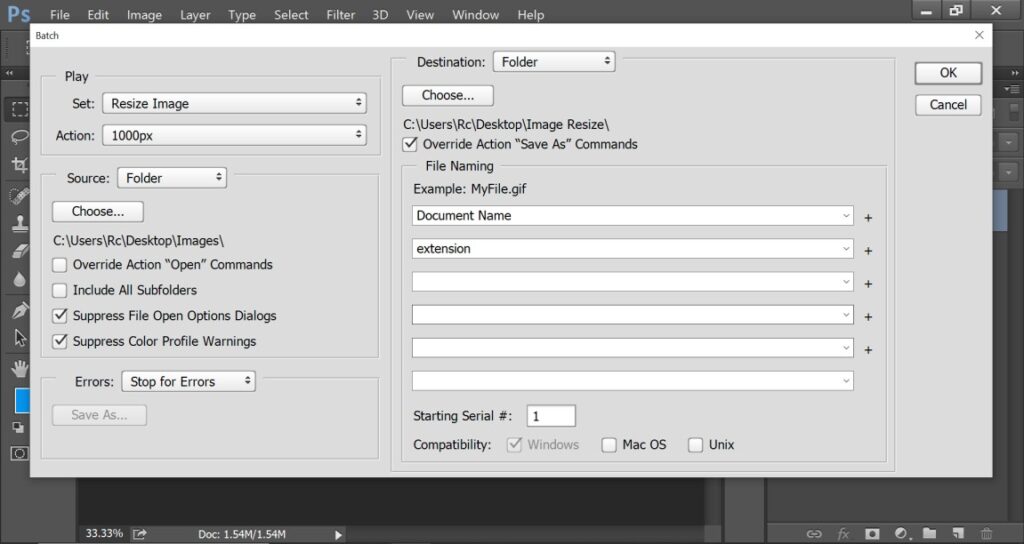
When you are done with those options, you need to click on the OK button or press the Enter key. It will resize all images of the selected source folder and save the images in the destination folder. Here you can see the result.
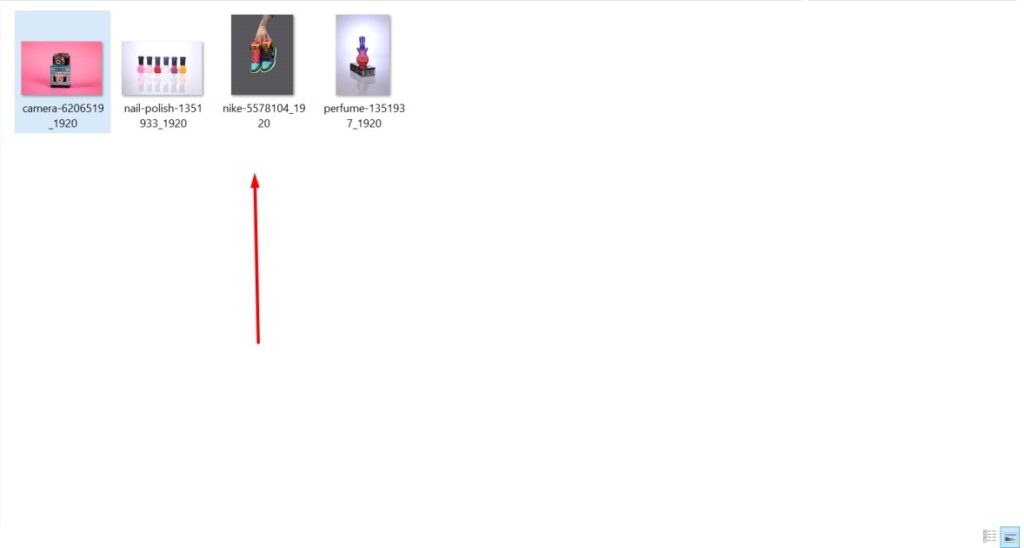
All those images have been resized according to the preference set in the action. By following the above method, you can also resize bulk images in Photoshop at once. It will take less than 2 minutes to apply the batch image resize action.
3 Golden Tips
- Make Sure that you enable the “Resample” option as automatic while image resizing.
- Make sure that all images have the minimum width or height that you want to get after image resizing.
- You have to stop the action recording after saving the first image. Otherwise, the new images won’t be saved.
3 Big Mistakes
- Do not stop the action before you complete resizing the first image. It will interrupt the batch image resize process.
- Do not proceed to bulk image resizing command action without choosing a specific destination folder and “Override action”.
- Do not choose the same folder as the source and destination folder. It will create problems with file names.
Sum Up
That’s all about the step-by-step guidelines on photoshop how to resize images in Photoshop. By following the above method, you can resize bulk images at once in Photoshop within a really quick time. You can resize as many images in photoshop how you want.
Do you have any special requirements for an eCommerce Image Editing Service? You can choose Clipping Way to fulfill your image editing requirements.
You can start now with a free trial. You don’t have to pay any charge or credit card information for that. 24/7 services are available.
FAQ’s
How can i open multiple images for batch resizing?
You need to go to “File” and choose “batch”. Then, you will get a dialog box that allows you to select and resize multiple images.
What settings should i choose in the bulk image resize?
You have to choose the source folder that has your images. Then, you need to set the destination folder for the resized images. Also, you should select your desired file format for the resized images.
Can i maintain the original aspect ratio during batch resizing?
Yes, you can do it by choosing the “Resample” option as automatic while resizing the image. You need to do it while recording the image resize action.
How can i apply specific quality settings to the resized images?
In the Image Resize options, you can choose the desired quality settings for your images. You can set both lower quality and higher quality according to your image resize requirements.
Can i batch resize images with specific canvas size settings?
Yes, you can do it from the “Canvas Size” option. You have to select the required canvas size for your batch-resize images.
How do i start the batch resizing process in Photoshop?
You have to open the automate option from the file and click on the batch option. Then, you can select which action to apply for the batch image editing.
