It happens so often that graininess ruins the beauty of an image. Particularly, photos become noisy when you shoot them in low light. Have you noticed that your photographs appear grainy?
Through this article, we will inform you of 5 tips on how to make photos less grainy. It will improve your photograph quality by a big margin. After that, you can capture sharp images without any grain or noise.
Here are those 5 tips.
How to Make Photos Less Grainy?
Grainy photos are those pictures that display a texture of tiny, visible dots or grains across the image. Photos become grainy when you capture images in low-light conditions. Photo retouching are required to fix that issue.
High ISO settings can be the reason for making images grainy. In the past, the grain was a natural result for the printed images. Nowadays, people don’t like to have graininess in their images.
Top 5 Tips to Make Photos Less Grainy
Apply lower ISO setting
Using a high ISO setting is the main cause that makes photos grainy. ISO measures the sensitivity of your camera’s sensor to light. The higher you set the ISO; it will make the sensor more sensitive.
As a result, your photo may appear grainy. Therefore, you should lower your camera’s ISO setting. It will produce sharp images in low light conditions.
Try to shoot in sufficient light
You can try to shoot in sufficient light to get rid of grainy photos with designify. When you shoot in sufficient light, it will produce less noise in photographs. If you are shooting indoors, you should try to turn on more lights.
If you are shooting outdoors, try shooting during the golden hour. The more light you can bring into your photo; the better quality photos you will get.
Apply a slower shutter speed
You can reduce graininess in your photos using a slower shutter speed. When you use a fast shutter speed, you are letting less light into your camera. This means that you need to use a higher ISO setting to compensate for the lack of light.
Ultimately, it results in producing grainy photos. If you use a slower shutter speed, you are allowing more light into your camera. It will make images less noisy.
Use a tripod
A tripod assists a lot to make photos less grainy. Sometimes shaking the hand can make photos blurry and noisy. Are you wondering how it produces noise photos?
Well, when you hold your camera in your hand, you may unintentionally move it slightly. That can cause grainy images. You can keep your camera steady with a tripod. It will reduce the chances of any unintentional movement.
Photo post processing
Have you already taken a photo that appears to be grainy? Don’t worry! There are still ways to reduce graininess in post-processing. You can use Adobe Photoshop to remove blur in your images. If there are too many noises in your images, it could be difficult to fully fix it in photo post-processing.
On that note, you have to be careful while capturing images. If you follow the tips that we have mentioned here, you are more likely to get crystal-clear photos.
However, you might be wondering to know the reason behind getting grainy photos. It can be so frustrating to deal with grainy photos. But do you know the actual reason that causes grainy photos?
Permit me to reveal some key reasons why your photos might be grainy. Then, it will be easier for you to prevent that issue.
How to Fix Grainy Photos in Photoshop?
You can fix your grainy photosPhotoshop by following a simple procedure.
Here is it.
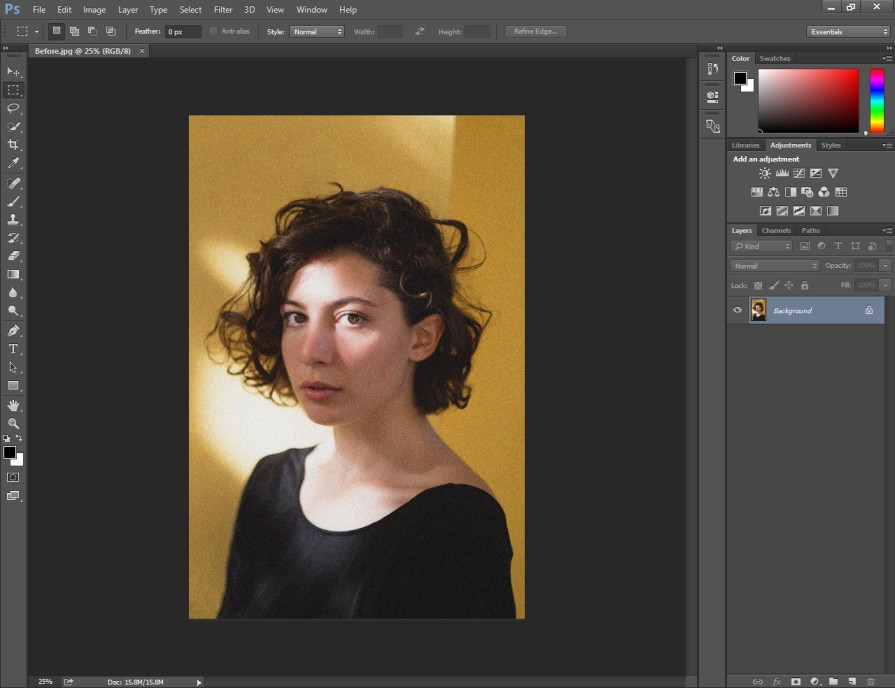
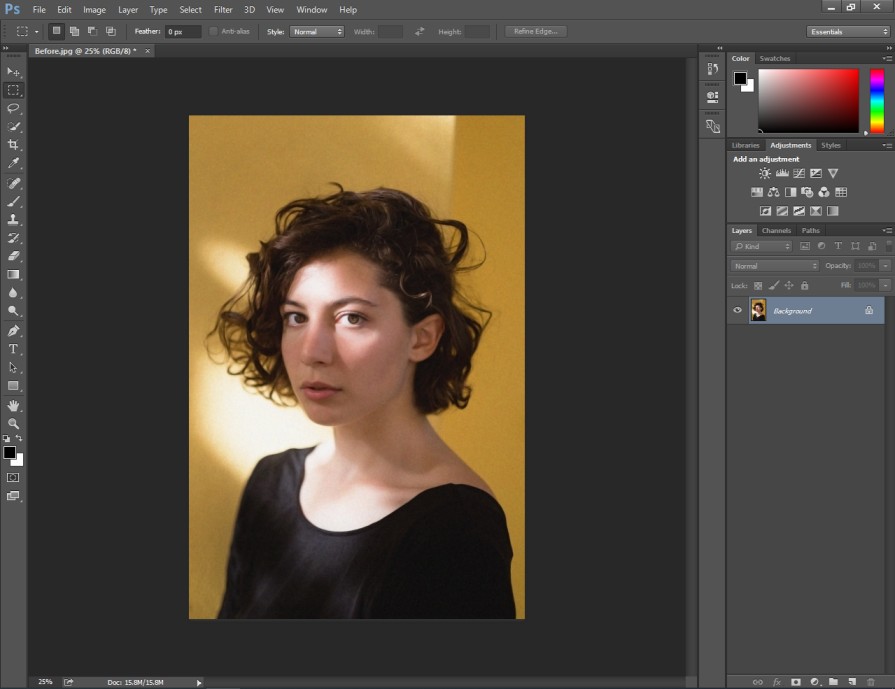
Step 1: Open grainy image in Photoshop
Firstly, you have to start by opening your grainy image in Photoshop. I am going to explain the procedure with this image.
Step 2: Go to “Reduce Noise”
In the second step, you have to open the filters menu from the top. You will find the noise option.
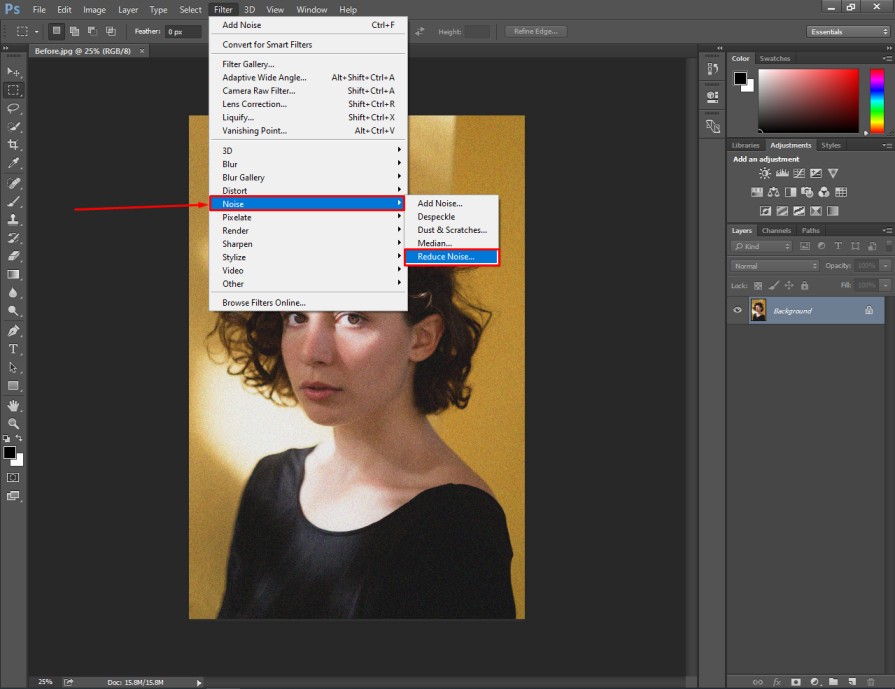
From its sub-menu, you need to select the reduce noise option.
Step 3: Adjust Reduction Noise
In this step, you will get this adjustment menu on your screen.
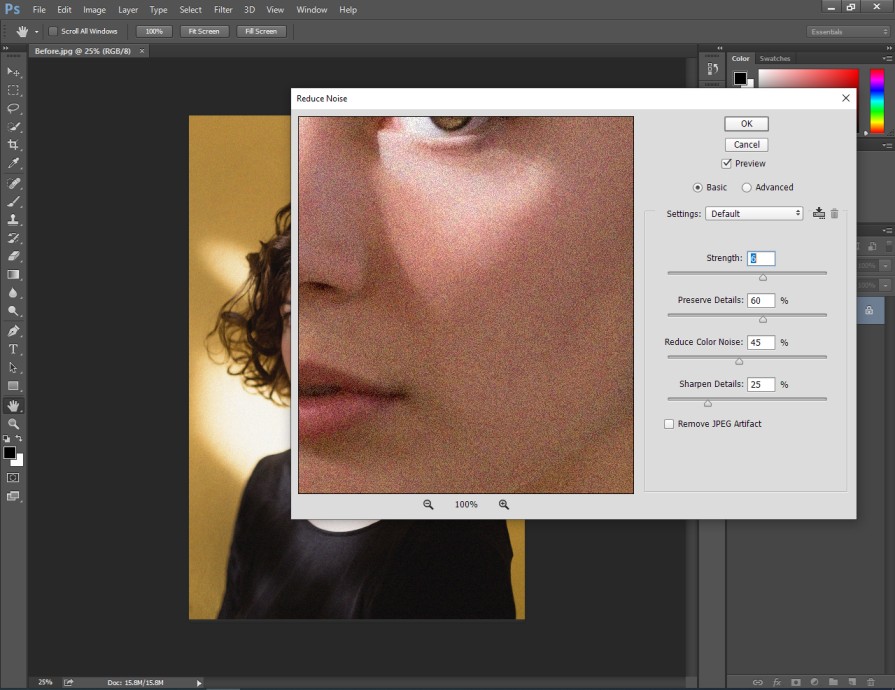
From this option, you can adjust the strength, preserve details, reduce color noise, and sharpen details.
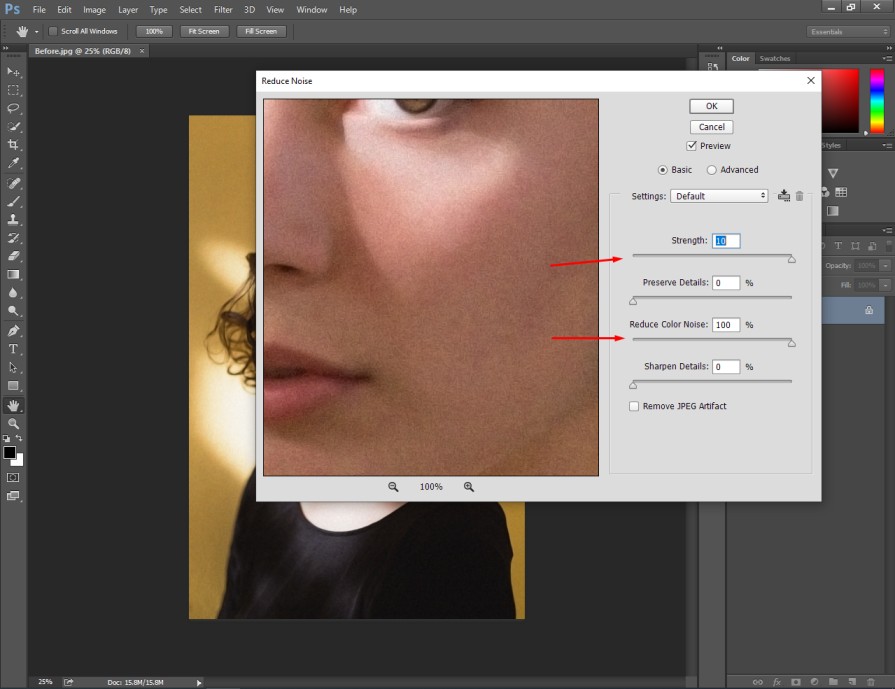
I have set the strength to 10, preserve details to 0%, reduce color noise to 100%, and sharpen details by 0% for this image.
You need to set it depending on the noise and light condition of your image. Press “Enter” to apply the changes. We have got our image in this condition after applying the changes.
Now, we have to make some further correction to make the image look even sharper.
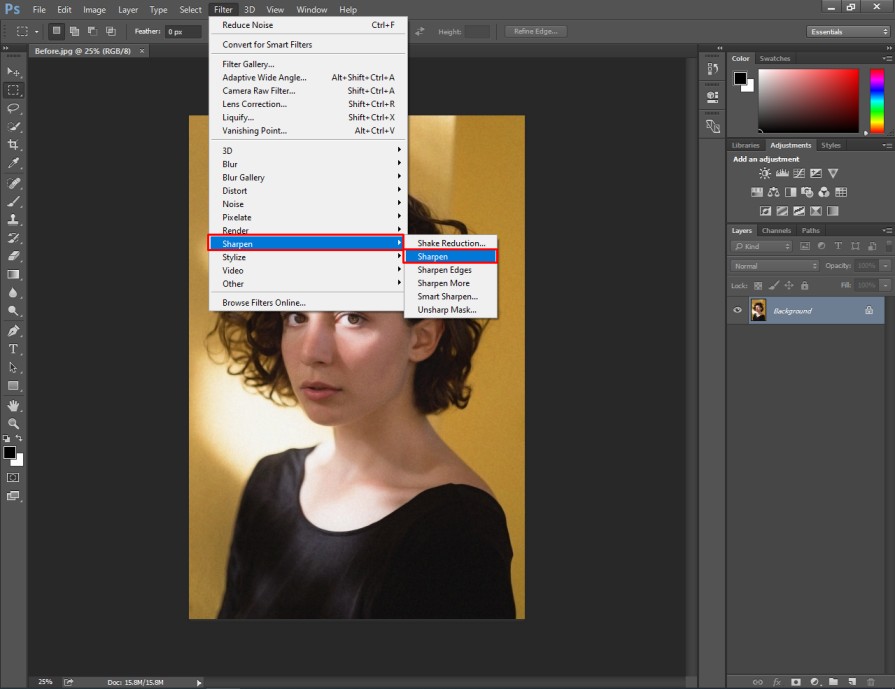
Step 4: Apply sharpen
In this step, you have to open the filter option once again and choose the “sharpen”.
This is the final look after applying sharpen.
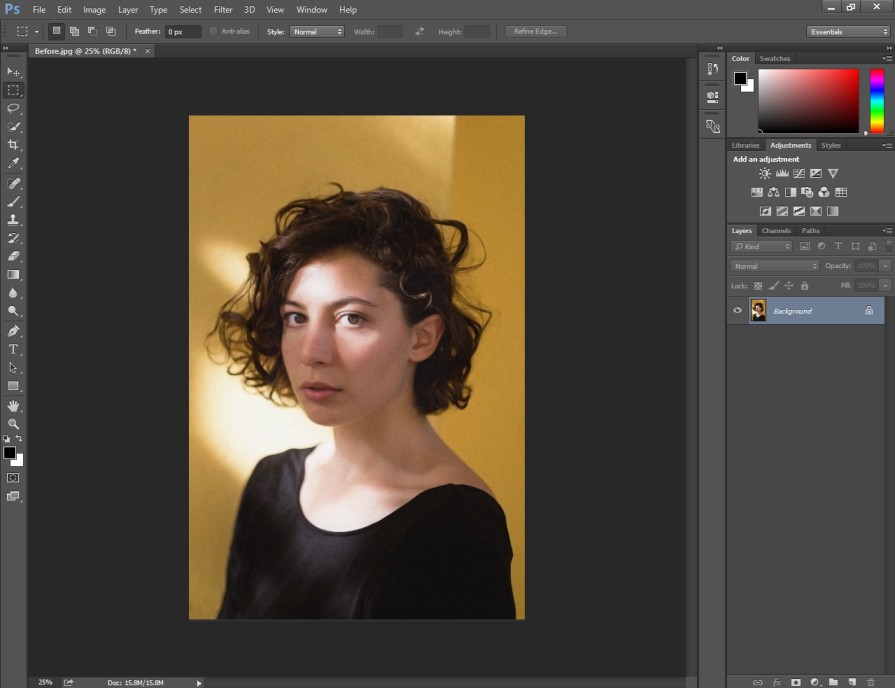
Now, the image is ready to use. We have got rid of the graininess and noises from that image. By following the same method, you can also fix the noise issue of your image. Do you want to do that using lightroom how to fix grainy? Well, the next method will be suitable for you.
How to Fix Grainy Photos in Adobe Lightroom?
Step 1: Open your grainy image in lightroom develop mode
So, you have to run the Lightroom program and open your image via “Import” option. After that, you have to select the “Develop” from the top to start editing your image.
Here you go.
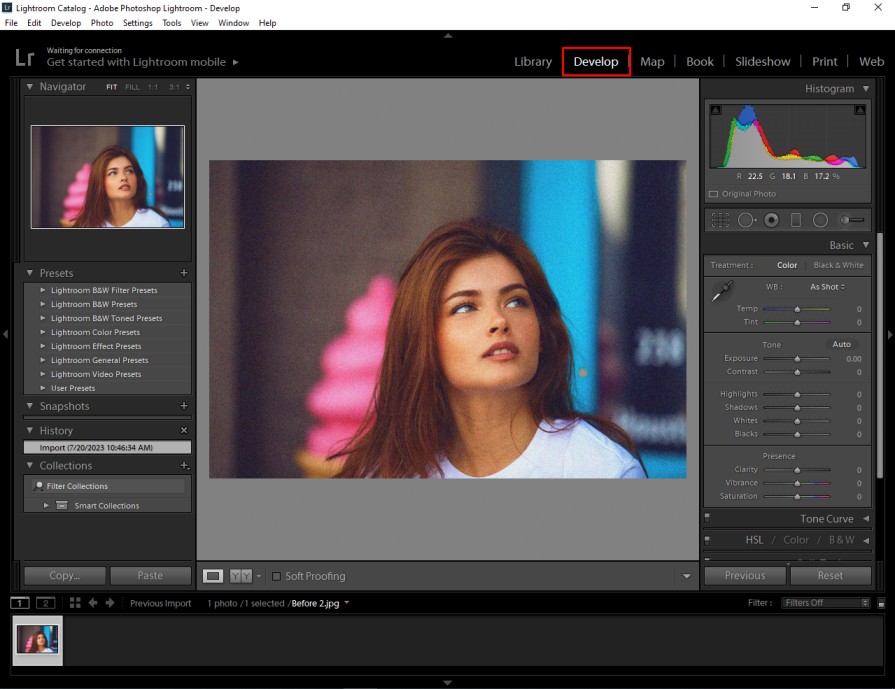
Now, we have to work on its details.
Step 2: Customize details
The noise reduction option is available within the “Details” feature. Using that setting, we can fix grainy photos.
You can get it from here.
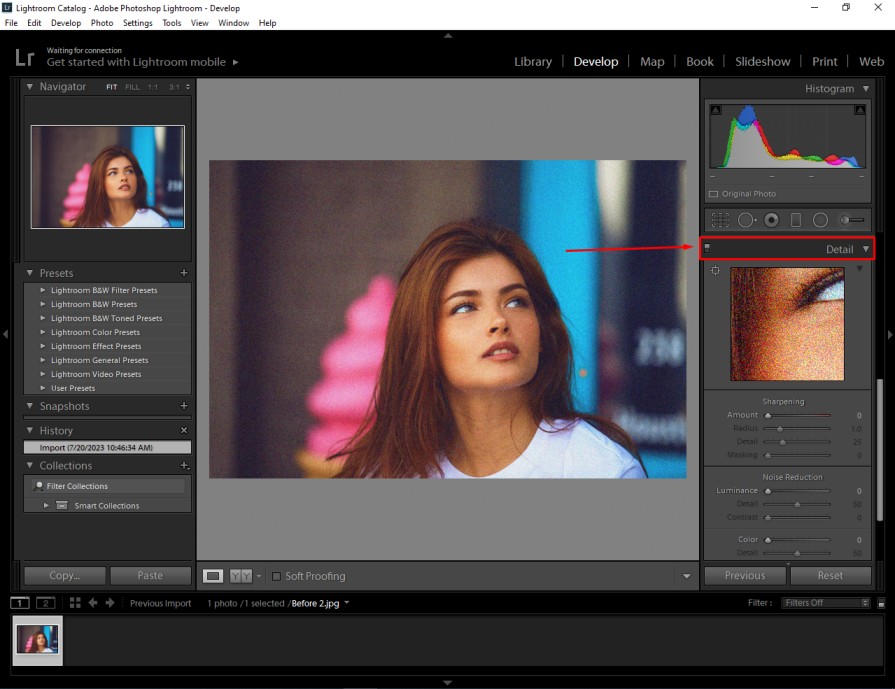
Basically, we have to change the luminance, details and contrast from this setting. It will make the image looks less grainy.
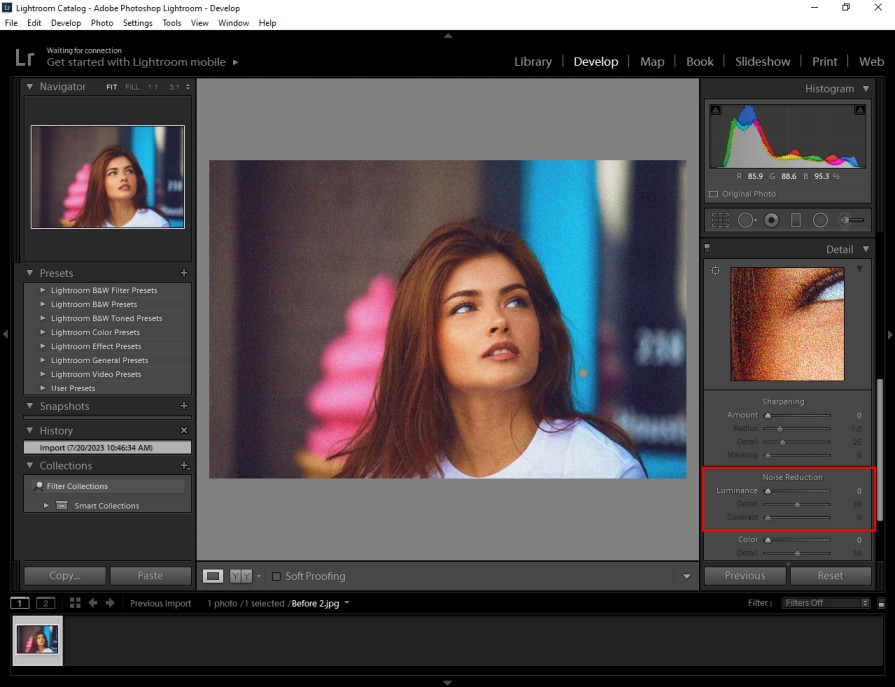
You can set the luminance around 80, and set the details around 25. If you are working on a less grainy image, you can decrease that amount. If there are extreme noises in your image, you can increase the value even more.
Step 3: Increase contrast
This is the final step to fix grainy photos in Lightroom. You just need to increase the contrast value from the noise reduction feature.
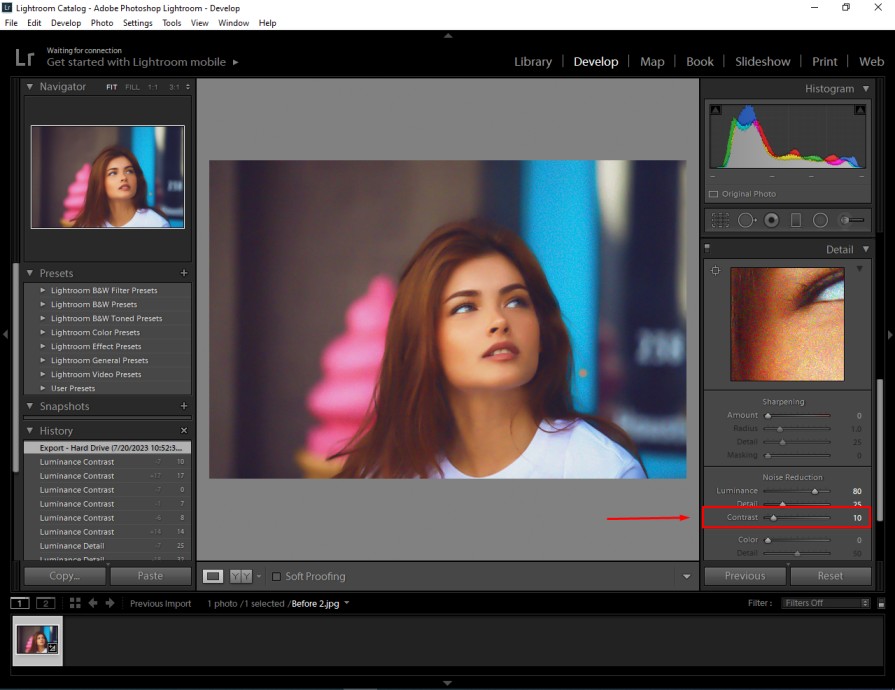
This is the final look after applying the changes.
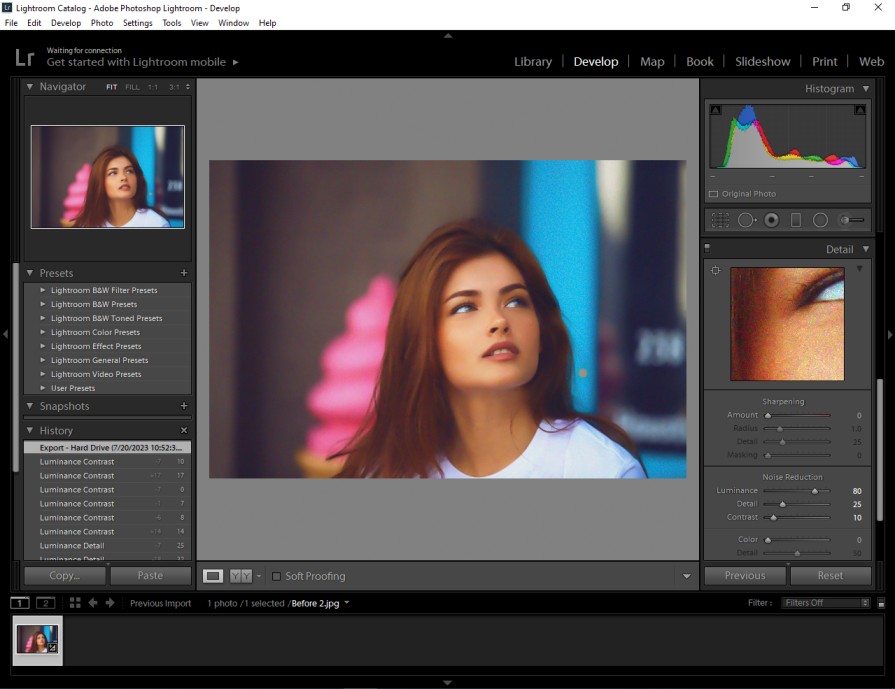
At this stage, we have got the image without having any noise in it. In that way, you can fix any of your grainy images. Now, let me tell you some key reason that makes photos grainy.
What Makes Photos Grainy?
High ISO settings
ISO refers to the sensitivity of the camera’s sensor to light. When you increase the ISO, the camera becomes more sensitive to light. As we have mentioned above, it can result in a brighter image.
Alongside this, it will also introduce grain into your photos. To prevent this, you have to try using a lower ISO setting.
Small image sensor
The camera’s image sensor size has a direct connection with the quality of your photos. Smaller sensors are more prone to noise compared to larger sensors.
They have less surface area to capture light. To prevent this, you can consider investing in a camera with a larger sensor. It will allow you to capture sharp images in difficult light conditions.
Too much editing
Image editing is a mandatory part of photography. But, you need to edit your photos professionally to get better quality photos. Otherwise, it can lead to graininess.
This can happen when you use too much noise reduction. These filters can be useful in some situations. But you should not use them excessively that produce grainy images. If you don’t have the proper skill or time to edit your photos, you can try Outsourcing Photo Editing Service.
JPEG compression
Last but not the least, JPEG compression can make your photograph grainy. JPEG format suggests that the file is compressed. Therefore, there will be fewer details of the object.
To stay away from this issue, you should shoot in RAW format. It preserves all of the original data. That allows for more flexibility in post-processing. Now, you have learned why your photos may become grainy.
From now on, you can stay alert to avoid grainy photos those issues. At this stage, I am going to provide you 4 bonus tips to capture crystal-clear images like professional photographers.
Here you go.
4 Bonus Tips to Reduce Grain in Photography
Tips 1: Optimize your camera settings
Different camera models and brands have different settings. You need to learn optimal camera settings to capture the best possible image.
To do that, you have to try shooting photos with different camera settings. It will teach you to adjust the lighting conditions. For example, you may want to use a faster shutter speed in bright sunlight.
Tips 2: Always shoot in RAW format
Shooting in RAW format allows you to capture all of the original data from the image sensor. Also, RAW files retain more detail. It is always a better option to get better noise reduction compared to compressed JPEG files.
Tips 3: Add artificial light sources
Adding artificial light sources can help you capture photos without grain in tricky light conditions. Lots of options are available in the market.
You can try using a soft box to bounce light onto your subject. If you’re shooting outdoors, you can consider using a flash to illuminate the subject.
Tips 4: Clean your lens
This simple tip can assist you to capture high-quality imagery. A dirty lens affects the overall quality of your photos. It sometimes produces unwanted grain. You have to make sure to regularly clean your camera lens using appropriate cleaning tools.
Sum Up
That’s all about how to make photos less grainy. Hopefully, you have got a better idea of how to get rid of this grain issue.
Now, you have to follow those tips and apply them practically to see the differences. From now on, you can capture the beauty of the world around you without having any grain issues.
If you need any help with image editing, Clipping Way is 24/7 available for you. Contact us now to consult with our image editing experts.
FAQ’s
Why are my photos appearing grainy?
High ISO setting, lack of light, fast shutter speed, camera shake, and dirty lens can make photos appear grainy.
How can i prevent graininess while taking photos?
You can prevent graininess while taking photos by using proper lighting. You should apply optimal camera settings.
How do i know which ISO setting to use for less grainy images?
You should use the lowest possible ISO setting considering the light condition to get less grainy images.
Can i use flash to reduce graininess in my photos?
Flash provides more light in your photos. Therefore, you can use flash to reduce graininess.


