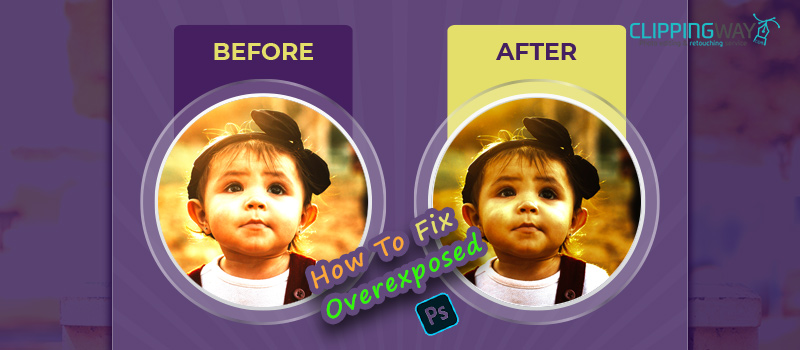
Proper lighting is essential to get a perfect picture. All photographers agree with that point. When you capture pictures outdoors, you don’t have much control over the light. Due to this reason, sometimes professional photographers accidentally capture overexposed photos.
Are you also getting worried about overexposed photos? Thankfully, I have got a solution for you. In this article, we are going to share how to fix overexposed photos in Photoshop. It can even save your ruined images. Here are the two best methods to fix overexposed pictures.
Why Do Photos Get Overexposed?
To find the answer, you need to understand the role of light while capturing an image. If too much light enters through the lens, you are going to get overexposed images. When you capture photos in strong sunlight, it makes your photo too bright. As a result, the photograph looks washed out.
You can use the Automatic Exposure Bracketing features to prevent this issue. You should also have an in-depth knowledge of aperture and shutter speed.
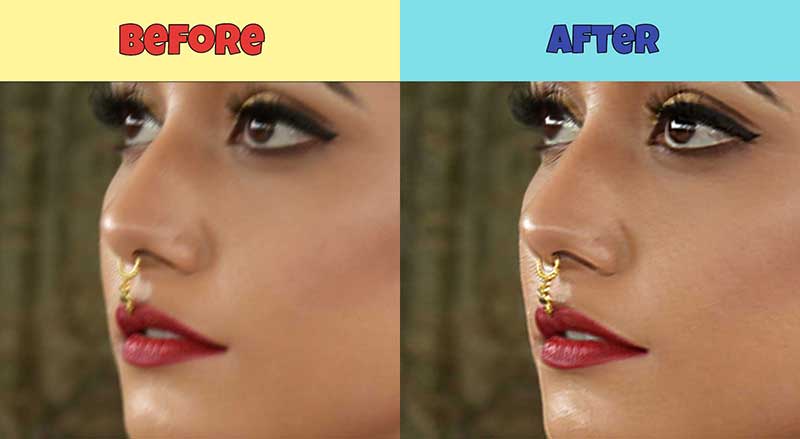
If you have already captured an image that looks overexposed, you have to work on the post-processing method to fix it. However, you can fix the overexposure from an image using Photo Retouching Service.
Method 1: Fix Overexposed Photos in Photoshop Using Camera Raw Filter
Step 1: Open overexposed photo in Photoshop
First things first, you need to open the overexposed photo that you want to fix in Photoshop. We are going to use the below image to show you the procedure.
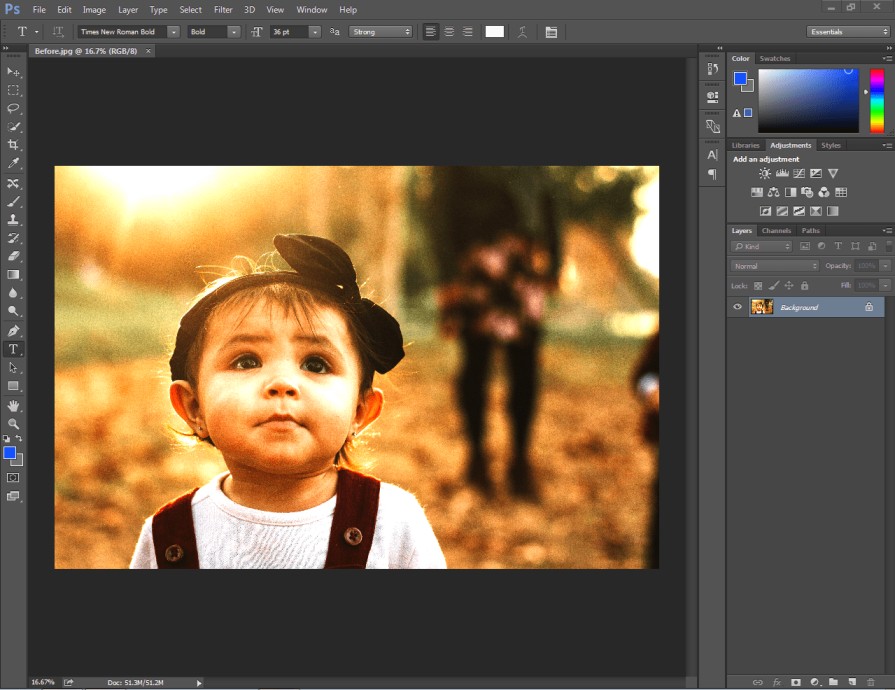
Overexposure has ruined this beautiful photograph. We are going to fix it using the camera raw filter. This is going to be an easy process. You need to duplicate the original layer. To do that, right-click on the background layer and you will get the option.
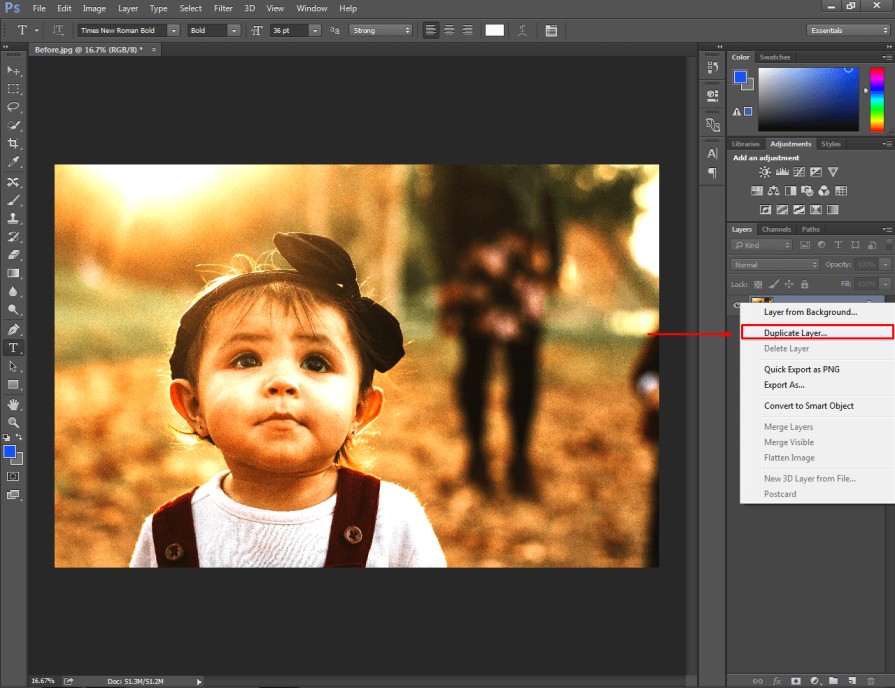
Now, let’s move to the second step.
Step 2: Go To “Camera Raw Filter”
At this step, you have to click on the top of Photoshop’s “filter” option. Here you will find the “camera raw filter” option.
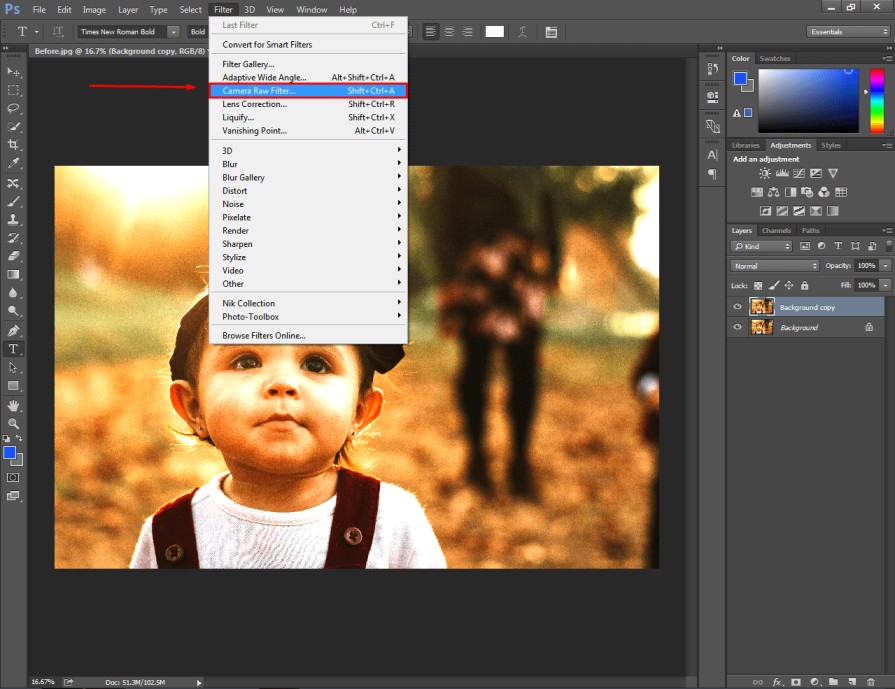
After that, you will get an interface like this on your screen.
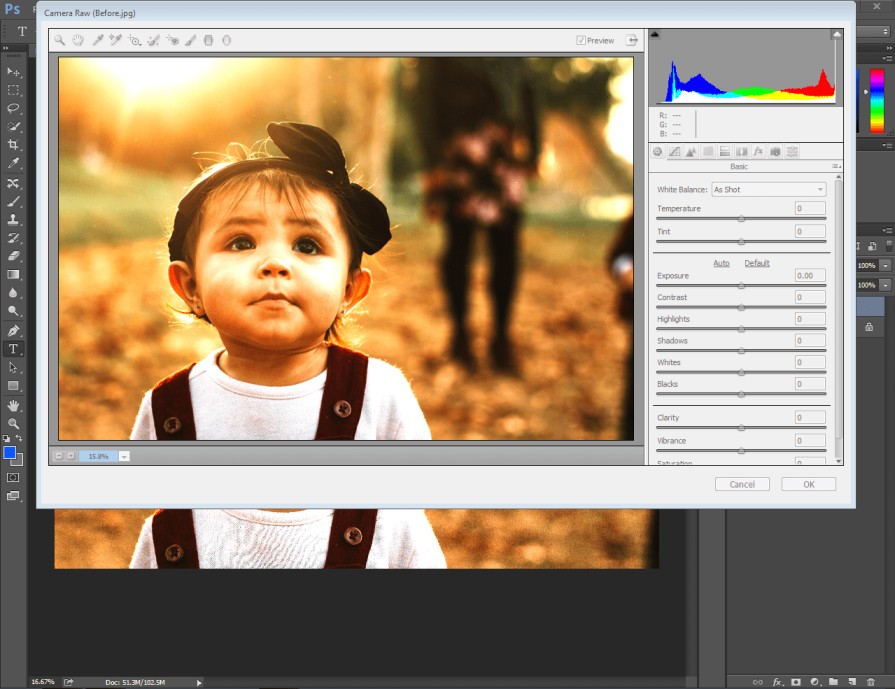
As you can see in the above picture, you can control the exposure, contrast, shadow, highlight, black and white amount of your picture.
Step 3: Fix Exposure and White
We have to start with fixing the exposure and white percentage. As the picture is overexposed, we have to reduce the amount of exposure. You can reduce it from -1.25 to -1.50 according to the light condition of your photograph.
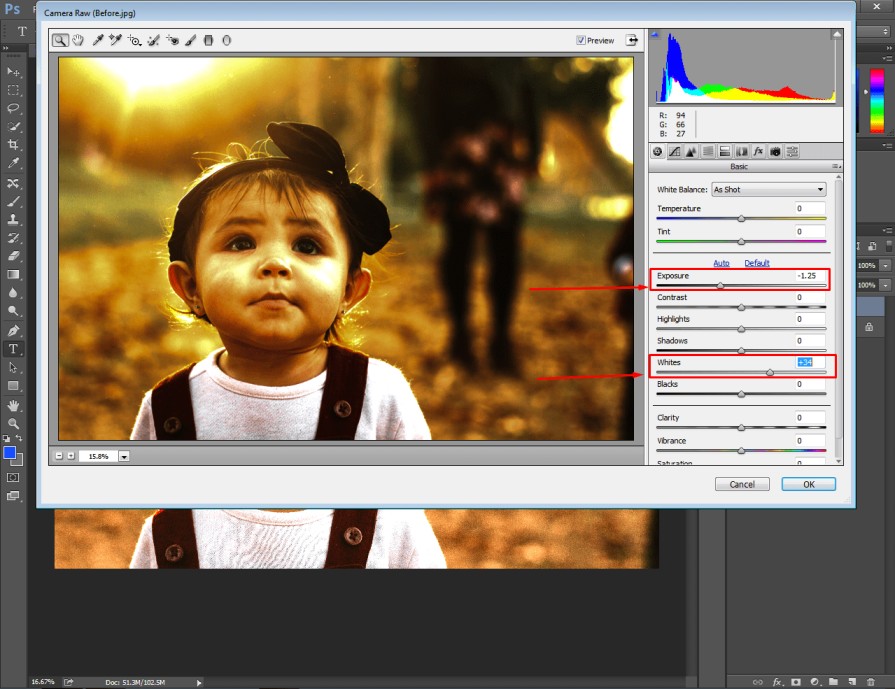
When you reduce the exposure amount of your picture, it will automatically make your image darker. As a result, we will have to increase the white options. You can set it around +35.
Step 4: Fix Contrast, Highlight, and Shadow
At this point, we have to make some adjustments for contrast, highlight, and shadow. You can make your image look better by increasing the contrast and highlight option.
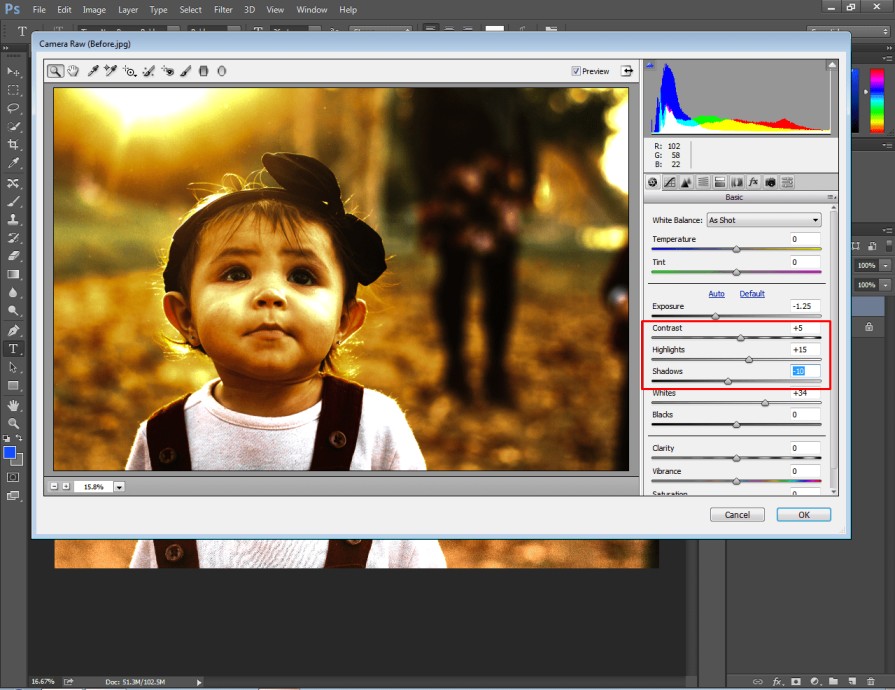
At the same time, you need to change the shadows according to the condition of your picture. For this picture, I have set it to -10.
Step 5: Overall Adjustment with Vibrance
Now, we have to make adjustments for the vibrance. To fix an overexposed picture in Photoshop, we need to increase the vibrance. Before doing that, you should adjust the exposure considering the current image condition.
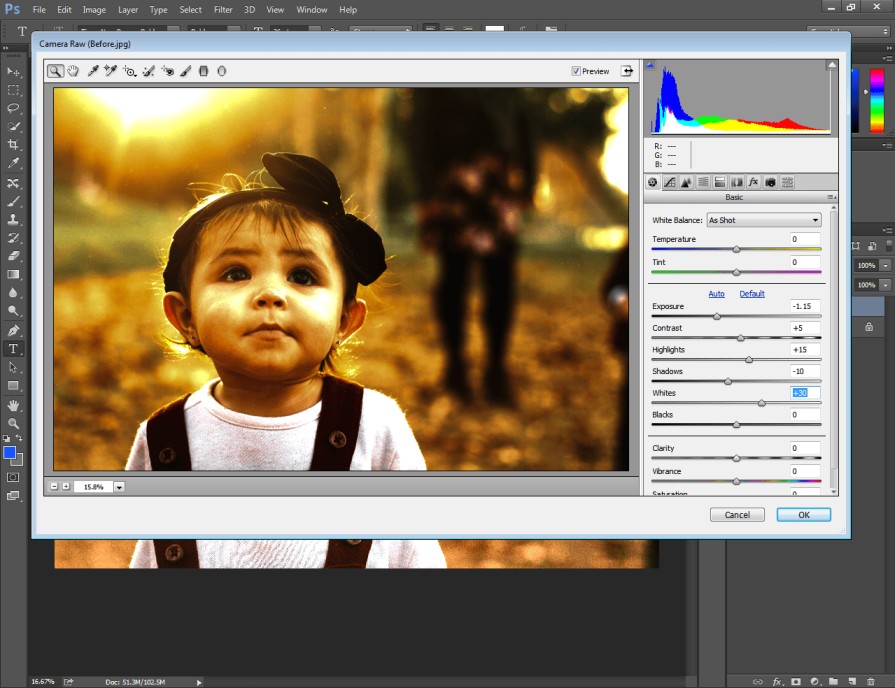
I have made the above corrections. At this stage, the image is ready to change the vibrance. You can set the vibrance to nearly +30 depending on the requirements of your picture.
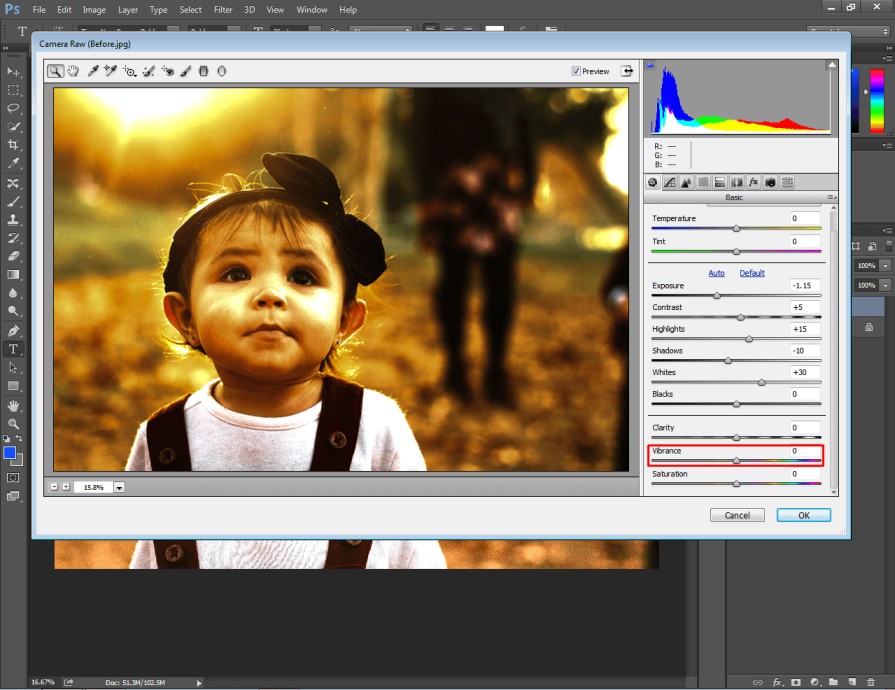
Have you done all those adjustments to your image? Alright, you have to click on the ok button to apply the changes.
Step 6: Save final result
Here’s the final look after fixing overexposed photos in Photoshop using the camera raw filter.
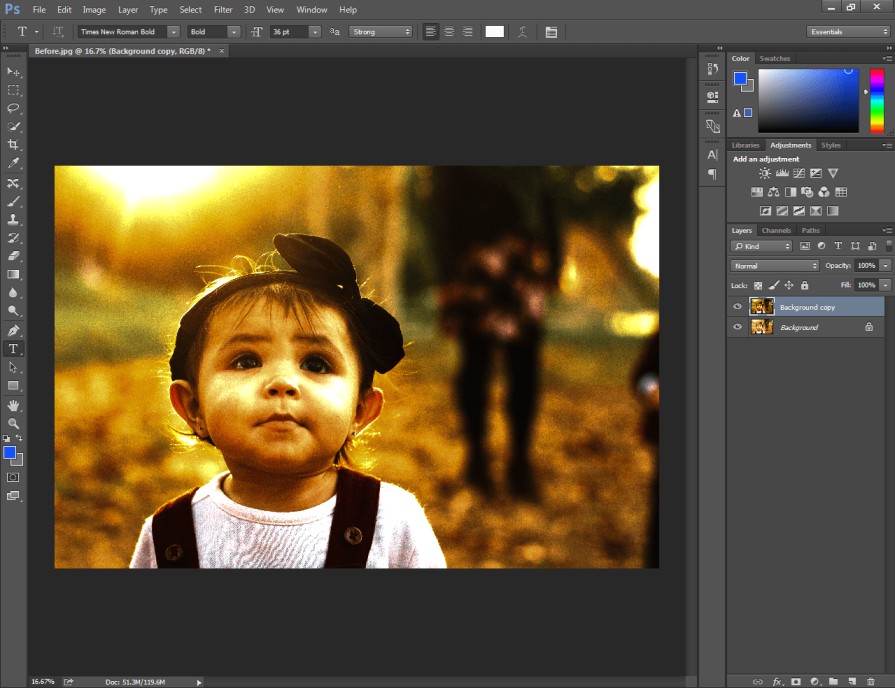
As you can see, the picture has got rid of the overexposure issue. Now, the picture is ready to use. Hopefully, you will be able to fix your overexposed imagery too.
However, you should stay aware not to allow too much light through the camera lens while capturing photos. There is another convenient method available to correct overexposed pictures in Photoshop. Let me introduce you to that method.
Method 2: Fix Overexposed Photo in Photoshop with Adjustment Layer
Step 1: Open overexposed photo in Photoshop
Once again, you have to start by opening your overexposed photograph. For this adjustment layer method, we are going to use the below picture.
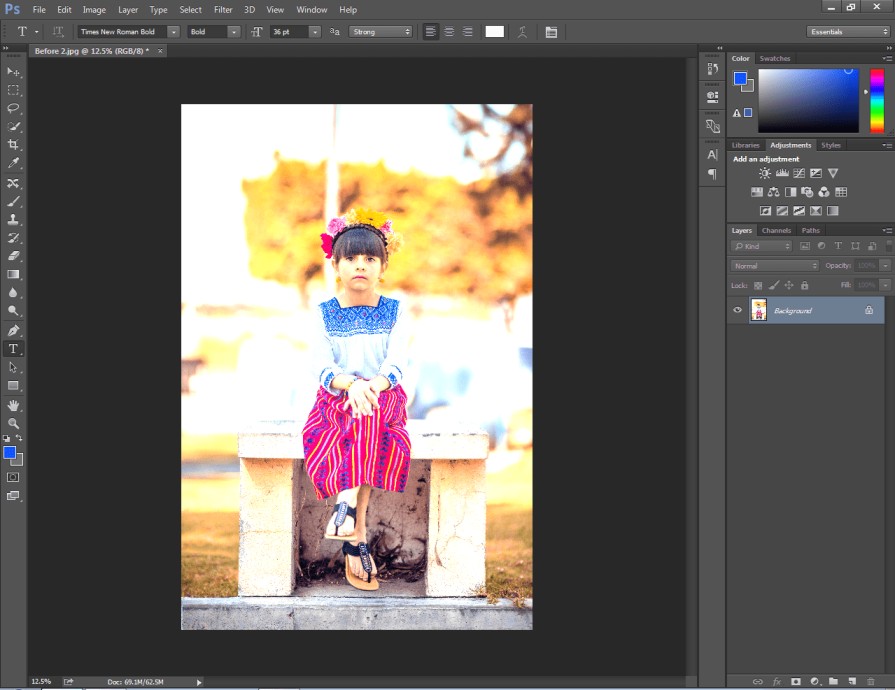
This picture looks more overexposed compared to the previous one. That’s why we need to follow this method to fix that type of overexposure.
Step 2: Add Exposure from the Adjustment layer
You have to make a copy of the original layer with CTRL + J. Then, you ought to disable the previous layer and click on the new layer. After that, you have to click on the layer adjustment option and select “Exposure” from the list.
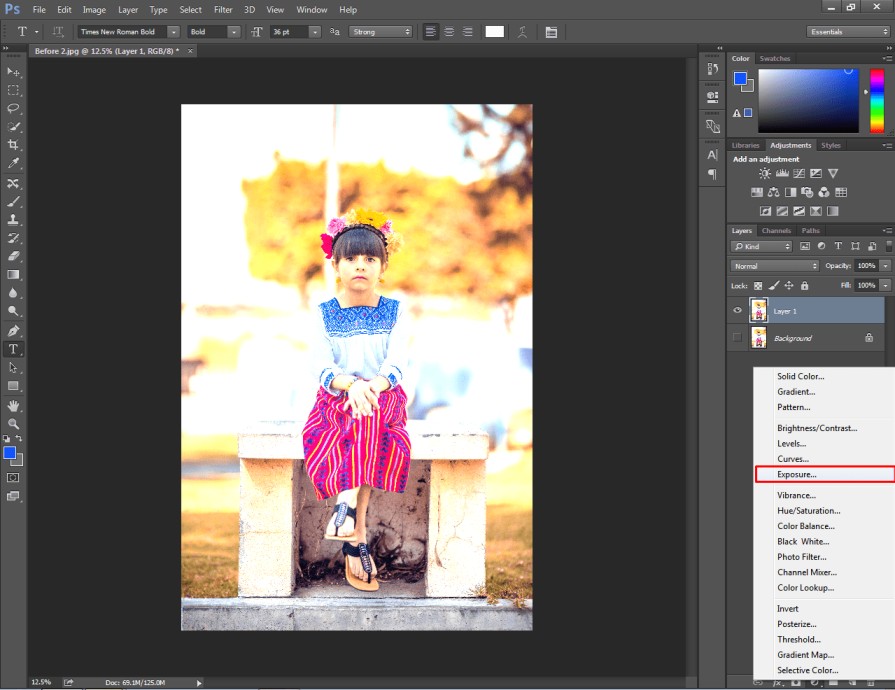
Next to that, you will get that interface to change the amount of exposure.
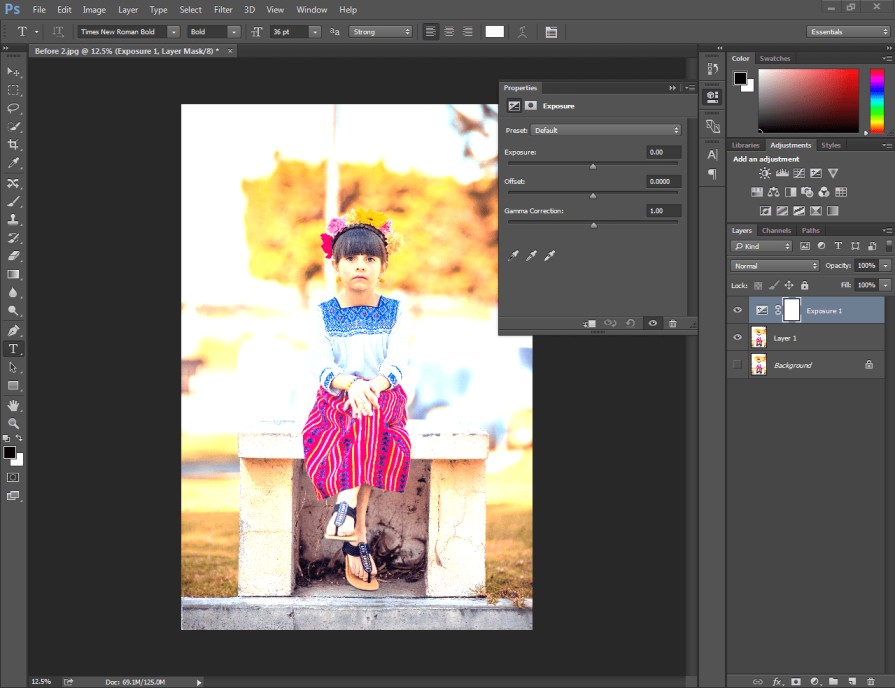
You have to reduce the exposure value according to the light condition of your picture. You should not decrease the exposure too much as it will make the image darker. There should be a balanced exposure in the image.
Step 3: Add Levels from the Adjustment Layer
Now, you have to click on the adjustment layer once again and choose the “Level” option.
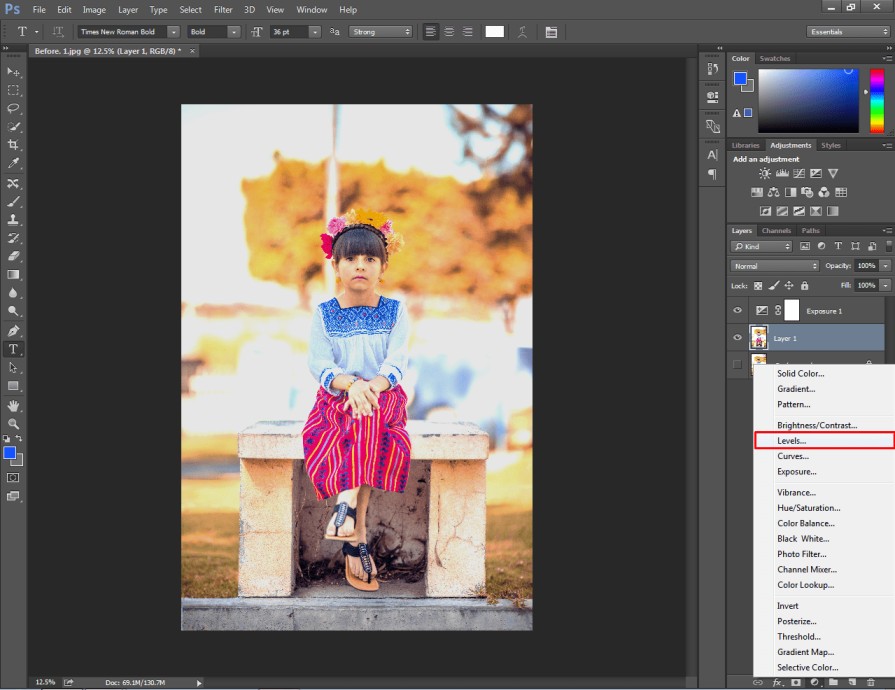
It will add a new adjustment layer on top of the previous layer. From that layer, you can adjust the white color, contrast, and brightness of your image.
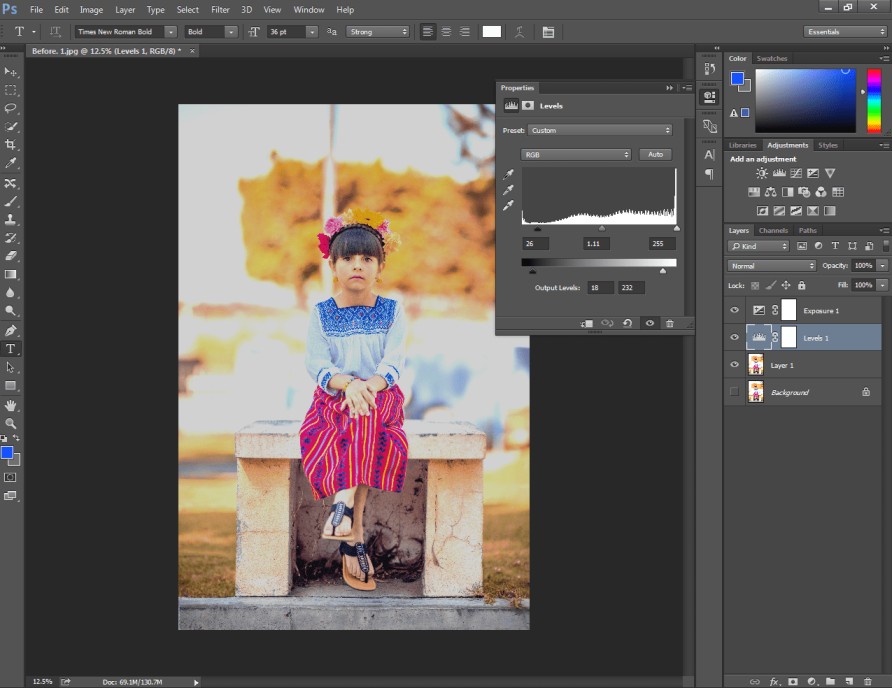
You have to make the changes based on the light condition of your image. If you are working on a dark image, you have to move the brightness slider to the right side.
Step 4: Add Curves to the Adjustment Layer
Using curves, you can fix the overexposure issue of your image. You can find this option from the adjustment layer.
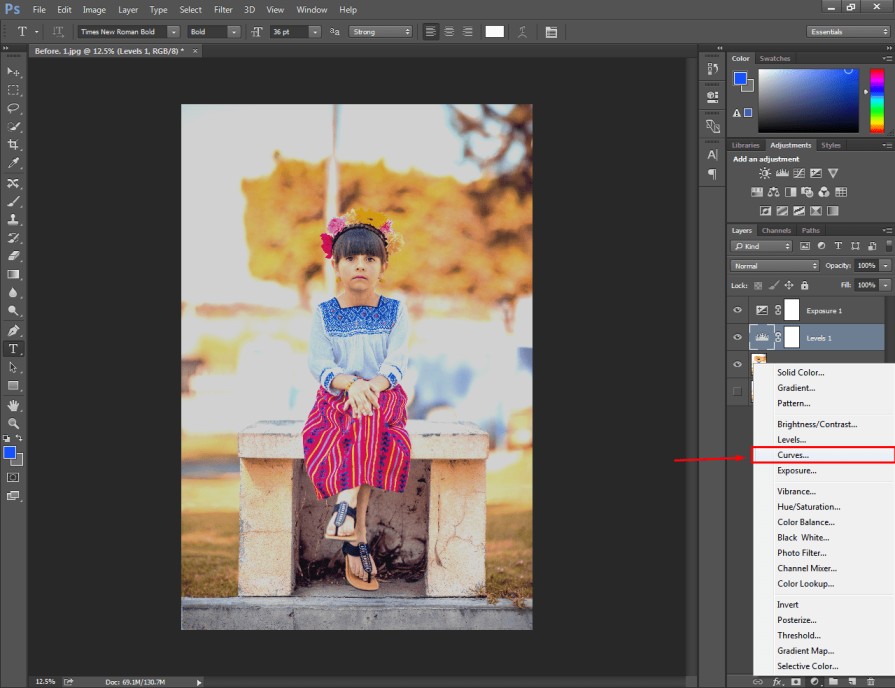
You have to move the curves towards the below. It will reduce the exposure of the photograph. Here’s the sample for you.
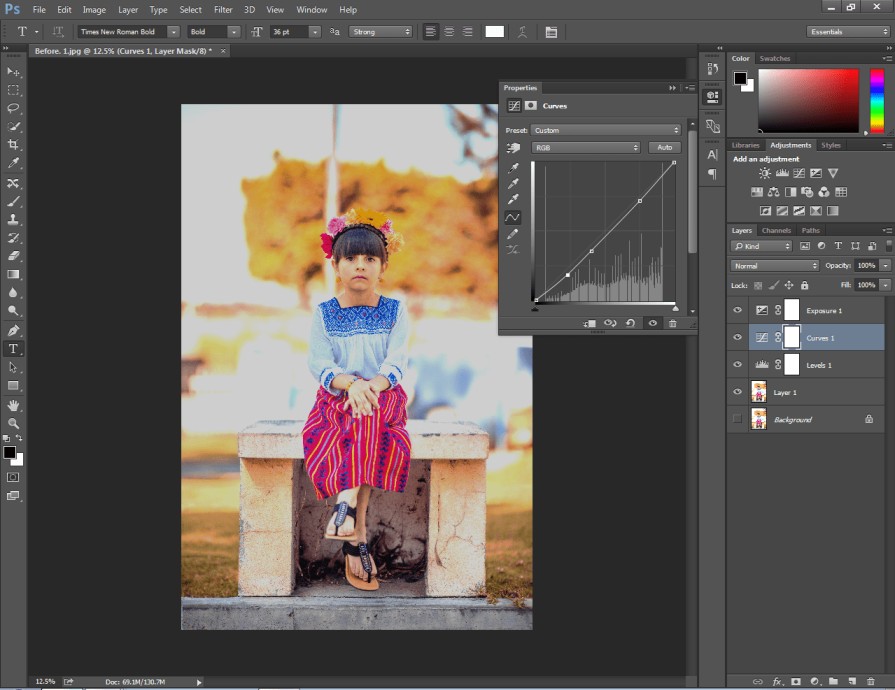
When you’re done with that step, you need to click on layer 1 and save the image. Following this method, you can fix any overexposed Photoshop within a quick time.
At this stage, I am going to share some tips with you that will make your editing much better. At the same time, you should be aware of some common mistakes that can ruin your photographs.
Here you go.
Tips To Follow
- Always increase the white from Camera Raw Filter After reducing the exposure.
- Increase Highlights to make the image looks brighter.
- Increase the vibrance before you save your image.
Mistakes To Avoid
- Do not increase the shadow too much.
- Do not increase the saturation.
- Do not use high opacity when you change the blend mode.
Before we jump to the conclusion, I would like to inform you how you can stay away from getting overexposed images. After reading this section, you can prevent yourself from capturing overexposed or underexposed photos.
How to Prevent Capturing Overexposed Images?
Prevention is always better than cure. It will be the best option if you can avoid overexposure while capturing the image. You need to follow the below steps to prevent capturing overexposed images.
Use graduated neutral density filters (ND)
Graduated Neutral Density (ND) filters are useful tools for controlling exposure in high-contrast scenes. These filters are darker at the top and gradually become transparent towards the bottom. You can position it at the darker part of the filter over the bright area. It will balance the exposure. As a result, you can avoid overexposing the highlights.
Avoid direct harsh sunlight
When you are shooting outdoors, the sunlight can be particularly harsh. It will be challenging to get balanced exposure photos at that time. To prevent overexposure, you can try shooting during the golden hour. It’s the period after sunrise and before sunset. The light remains softer during that time.
Shoot in RAW format
For professional photographers, it’s always recommended to shoot in RAW format. It will provide more flexibility while editing the image. Cause, RAW files contain unprocessed data captured by the camera’s sensor.
It offers greater latitude for adjusting exposure levels without sacrificing image quality. That’s why RAW files allow you to recover more details.
Final Thoughts
We have shared two best methods to fix overexposed photos in Photoshop. From now on, you can fix overexposed pictures without any worries. If you are a professional photographer or work in a studio, you may have a lot of images to work on.
You can try our Top Quality Image Editing Service to save you valuable time. Want to check our quality? Send us a free trial now. We won’t charge you for that.
FAQ’s
How can i fix overexposure in Photoshop?
In Photoshop, you can adjust the exposure of your photo. You need to enable “Exposure” or “Levels” from the adjustment tools. It will allow you to darken the highlights and achieve a more balanced exposure.
Can i fix overexposed areas without affecting the rest of the image?
Photoshop offers precise control over specific areas. You can use tools like the “Brush” or “Gradient” to selectively darken overexposed areas. It won’t effect other areas outside the selection.
Is there a quick way to fix overexposure in Photoshop?
Yes, you can quickly recover details from overexposed areas using the Camera Raw Filter. You can bring back lost highlights and restore the overall balance of your photo.
Can i fix overexposure in a RAW photo using Adobe Photoshop?
Photoshop supports RAW image editing. You can use the Camera Raw feature to recover details from overexposed areas.
How can i fix overexposed photos in Photoshop automatically?
You can apply “Auto Tone” or “Auto Contrast” to adjust the exposure of your photo automatically. However, manual adjustment is the best option to get better-quality photographs.
Why does my photo look washed out?
Entering too much light through the lens while capturing the image causes the picture to look washed out.
How can i fix overexposed skin tones in Photoshop?
You can use Photoshop’s “Selective Color” adjustment tool to adjust skin tones. By adjusting sliders for specific colors, you can bring back natural skin tones.
