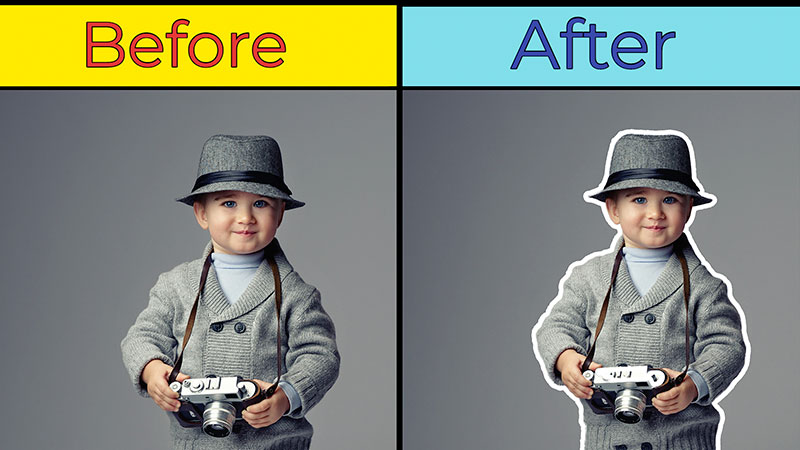
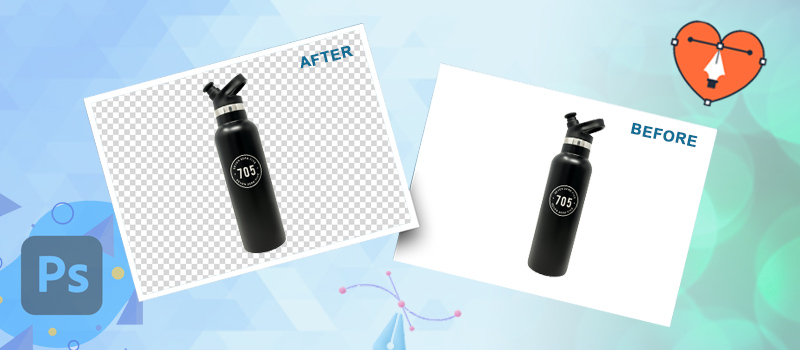
Turning a picture into a line drawing is not a tedious process in Photoshop CC 2019.
It only requires some technicalities that have been broken down for convenience’s sake in this tutorial. Quickly, you can enhance product photos quality without investing a lot of time.
Using that technique, you can turn any pictures into drawing lines in Photoshop. Some people assume that the pen tool is required for drawing lines. But the pen tool is used for Deep Etching Service.
You can convert your pictures into lines using the photo contrast adjustment technique.
Here is the step-by-step process of how to turn photo into line drawing in Photoshop.
Turning An Image Into A Line Drawing
- Photo Contrast Adjustment
- Setting up of Work Layer
- Grayscale Image Conversion Through Adjustment Layer
- Conversion into Line Drawing
- Setting up of the Background and Foreground Colors of Images
- Pencil Shading
- Cross-Hatching Effect
- Final Modifications
Before we begin this tutorial, you will be taught how to outline an image with the aid of Photoshop. Let’s say someone commissioned you to turn a photo into a line drawing without Photoshop, but you only have the basic knowledge of Photoshop.
To achieve this, you will need to do a proper preparation of your photo before any filter is applied which is why you need to immerse yourself in this tutorial. The purpose of this tutorial is for you to work like a professional even at your first time of trying.
As it is common knowledge that all images cannot be the same, a need to adjust layer opacity, filters and image blurs might arise when using Photoshop to convert an image into a line drawing. As listed above, this step by step approach will help you convert photos flawlessly.
Step 1: Photo contrast adjustment
Contrast adaption is needed when the photo in use is in contrast with its background. Therefore, it needs to be adjusted to let the image stick out away from its background.
To carry out the process, you have to pick the layer panel and check the image’s layer is selected. For example, the background layer locked, highlights the selected layer when dealing with a flattened image like those in JPEG format.
Click on the Image Menu at the top of the Photoshop window, and pick Adjustments from the dropdown menu, and then Curves. The Curves dialog box will pop up, and you should check Preview.
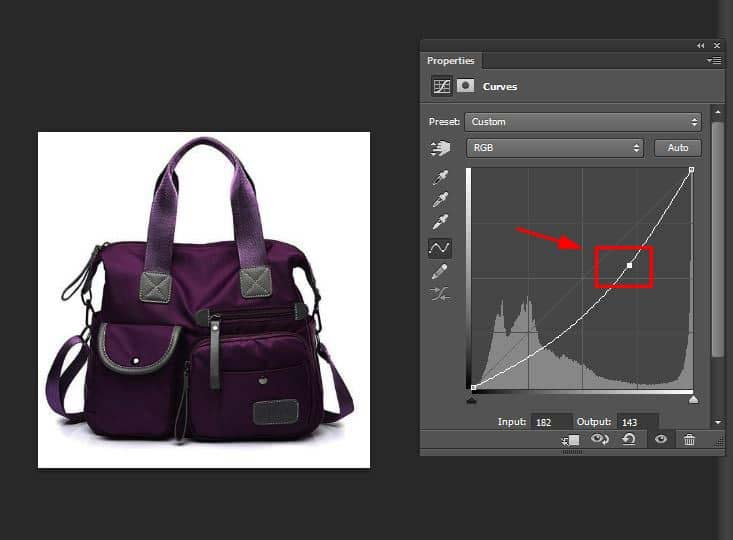
Also in its dialog box, click and drag downward on the middle point of the diagonal line piercing through the graph located on the left-hand side of the dialog box to create a curved line in the graph.
This will ensure that the black areas of the photo get darker and the lighter regions remain light. However, when working in a CMYK photo, the format is quite different. You’ll have to pull the middle line upwards instead of downwards. Proceed once you’re happy with the contrast level of the photo by clicking OK.
Step 2: Setting up of work layer
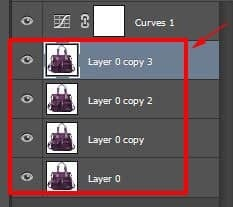
The next step after adjusting contrast is to set up the layer that will be usable for the job. You need to duplicate the layer containing your image as much as three times in the Layers Panel.
The reason for this is for you to have four identical layers. To make duplicate a layer, you select the Layer from Layers Panel, click Menu located in the upper right-hand corner of the layer panel, and pick Duplicate Layer.
Step 3: Grayscale image conversion through adjustment layer
After duplicating the layer, click on the duplicated layer situated at the upper part of the Layers panel. Select the Adjustment Layer icon at the lower part of the Layers panel.
Pick Hue/Saturation from the pull down menu, and you have therefore created an adjustment layer to be used for Hue/Saturation making all the layers that appear under the adjustment layer keep the Hue/Saturation properties set for that adjustment layer.
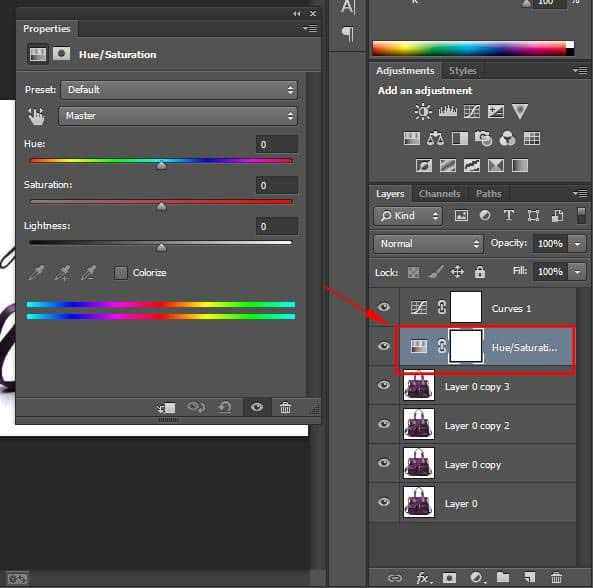
With the adjustment layer still selected, select the Properties panel at the right side of the image which is by default or click on menu and select properties.
The properties panel contains three sliders: Hue, Saturation, and Lightness for adjustment purposes. Move the saturation slider to the extreme left to give 100 in value. Then, you have a grayscale photo.
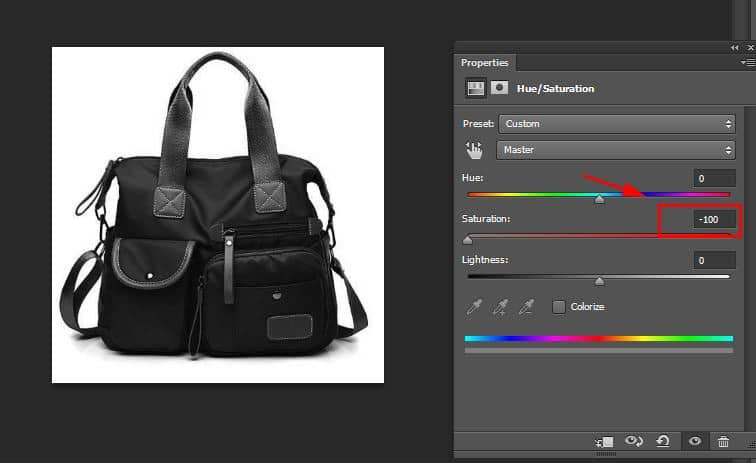
How to achieve a grayscale image goes thus:
The Hue/Saturation adjustment layer automatically allows for the image to appear grayscale, but to get rid of all colors, you need to achieve grayscale through conversion by clicking the Image Tab followed by mode in the pull down menu and then select Grayscale.
Step 4: Conversion into line drawing
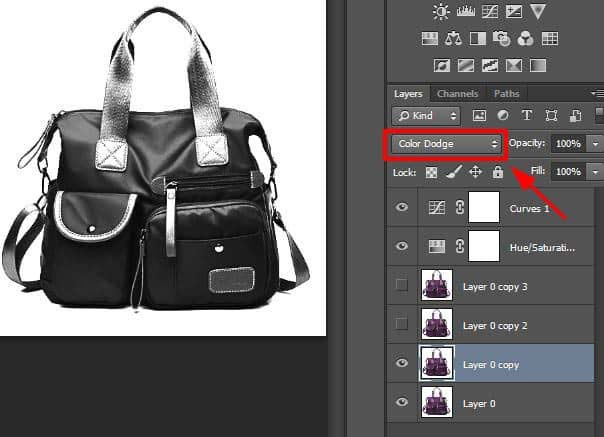
This step puts you through on how to trace an image with the use of Photoshop using many layer effects. From the duplicated layers, make the top two layers invisible by clicking the eye icon. Then click the visible layer that is located at the second from the bottom of the Layers panel.
Click on color dodge on the dropdown menu located next to Normal. Still, on the same selected layer, invert the image by pressing CTRL+I on your keyboard or select Image then Adjustments followed by Invert.
The next thing to do is to select Filter > Blur > Gaussian Blur from the dropdown menu.
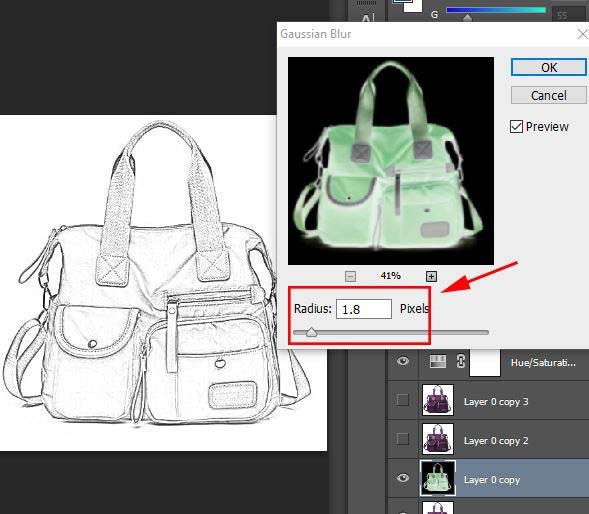
The Gaussian Blur dialog box will appear for you to move the slider until your image mirrors a line drawing.
Pushing the slider towards the right to increase the blur help thicken and darken the lines, and add some shading to the photo while moving it to the left results otherwise.
Know More: Make an Image Transparent Background in Photoshop
Since Preview in the dialog box is still checked, you get the opportunity to see how your image changes with slider movement.
How to Thicken Line Drawing Strokes
As have been talked about earlier, this tutorial gives you extensive coverage of other information as regards image conversion. To thicken line drawing strokes, you need to duplicate the original layer one last time and shift it over the adjusted layer.
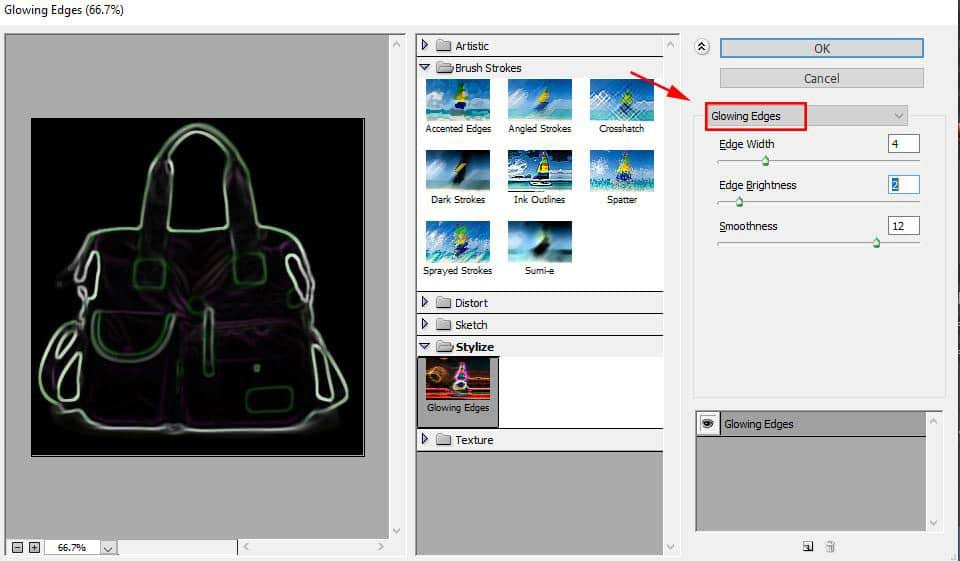
Select Filter > Filter Gallery from the dropdown menu. Pick Glowing Edges under Stylize because that is where you can adapt the Edge Width located on the right corner of the window.
By downgrading its Brightness, you get a neater edge. Click on Ok when you have completed the task.
Going back to your work layer, press CTRL+I to reverse the layer, and modify the layer blend mode to reproduce more to make the outlines of your photo thicker and darker.
Step 5: Setting up of the background and foreground colors of images
Set the Background Color to white by double-clicking on its icon placed in the toolbar. In the Color dialog box, select the upper left-hand corner of the big color box.

Then set the colour of the Foreground to a medium gray by double-clicking on its Color square in the Toolbar. Also, in the Color dialog box, click midway down the left part of the big color box.

Other colors in the large color box are irrelevant because the cursor has to be on the left hand side of the big color box.
Step 6: Pencil shading
To add pencil shagging to your photo, you have to select the upper layer above your work layer in the Layers panel. Click on the eye icon to enable visibility, and your image will now look like a black-and-white picture again.
Then, select Filter from the menu, then Filter Gallery from the dropdown. The Filter window pops up which is where you will click on the sketch folder and select Charcoal.
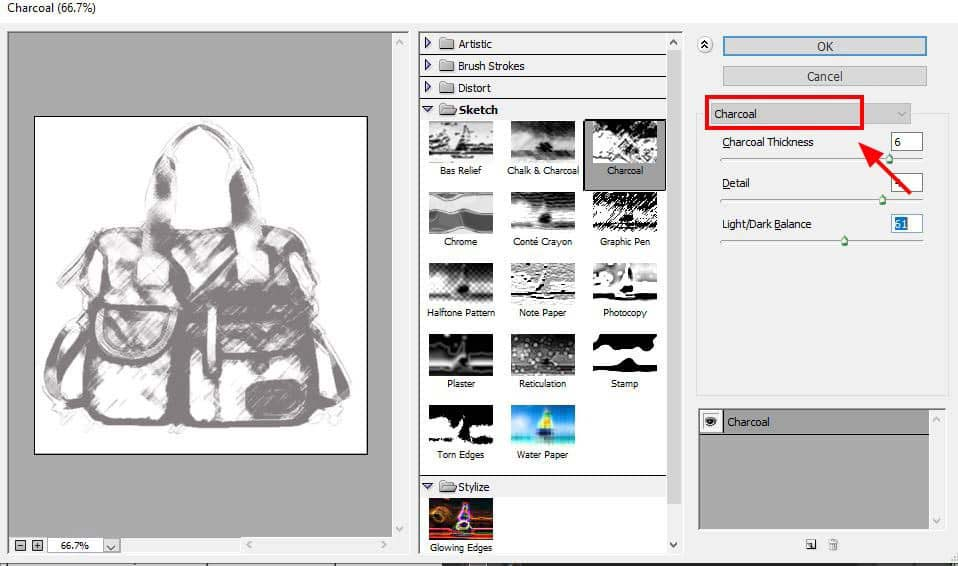
Adjust to taste the Charcoal Thickness, Detail, and Light/Dark Balance sliders appropriately using the preview window. After this, effect shading as you are aware that you already have an image line drawing in the layer beneath.
Pick OK when completed. Select normal from the dropdown menu and adjust the Layer Blend Mode of the charcoal layer to reproduce.
Step 7: Cross-Hatching effect
Furthermore, you need to add cross hatch to your image to give it some filter effect. Turn on visibility in the Layer Panel by clicking on the eye icon on the topmost layer. This enables all image layers visible. This stage is ordinarily to create shading.
Select the previous layer, pick Filter and then Filter Gallery from the dropdown menu and if it shows up more than once, select the lower option.
Click on Sketch and take Torn Edges in the filter window and adjust the toggles located on the right side of the window until the image’s details are visible.
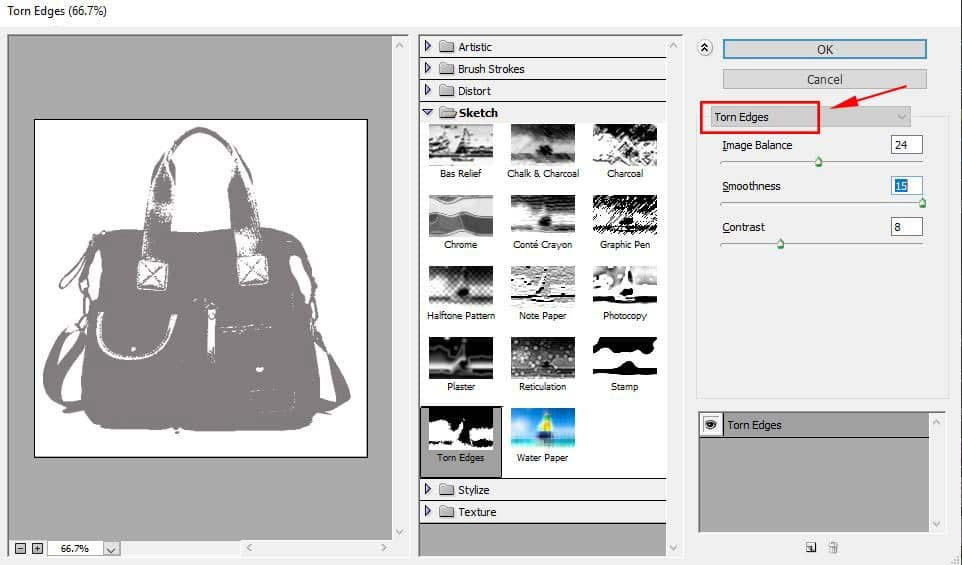
Once finished, click on new, placed at the lower right side of the Filter Window. Make sure the top instance of Torn Edges is selected, click on the Graphic Pen Filter and alter the Stroke Diagonal to Left Diagonal because Torn Edges appear twice in the right side of the Filter window. Click OK.
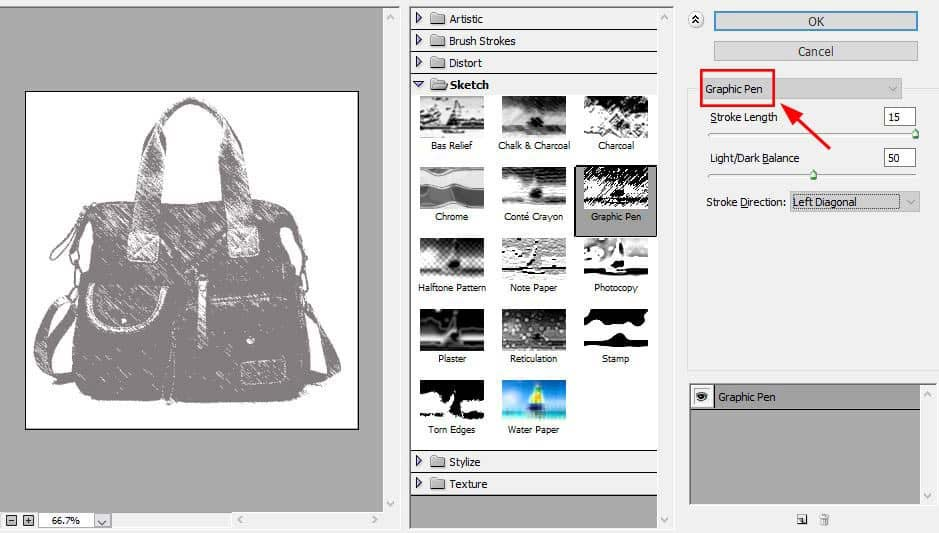
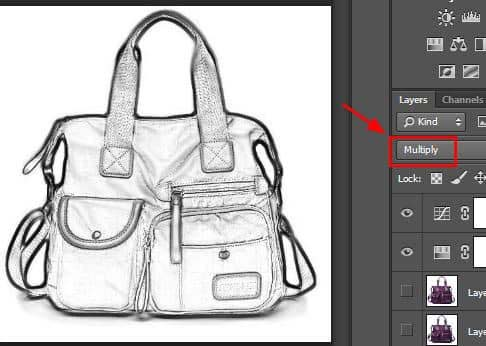
Then, change the Layer Blend Mode from Normal to Multiply like with the former layer. Finally, add a tender motion blur because, at the subordinate layer, the graphics pen filter applied is brittle than the charcoal filter.
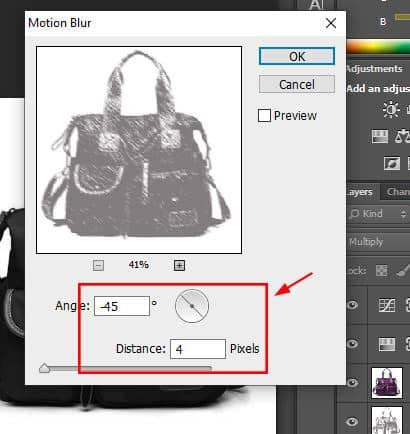
Choose Filter then Blur and Motion Blur to open a motion blur dialog box from the dropdown menu. Set the angle to -45° and push the Distance slider to the left side to fashion a very mild blur. Preview to see your progress before you apply it and pick OK.
Step 8: Final modifications
You are one step away from producing a lovely line drawing. Images require finishing touches like adjusting the opacity of your work layers and getting rid of dark spots and remnants in the image will do the magic.
You can adapt the opacity of the two prominent layers to reduce the vehemence of the pencil shading. Make sure you do not alter that of the bottom two layers as doing so could disorient the set line drawing effect.
Remove any artifacts like smudges or dark spots that threaten to affect your image.
To achieve this, you need to stamp all necessary layers by selecting all layers, including the Hue/Saturation, adjustment layer, found within the Layers panel. Press CTRL+A+E and the stamped layer will unfold at the top of the Layers panel.
Modify its foreground color by changing it to white in the Toolbar and select the Brush Tool from the Toolbar to carefully paint over any smudges within the new stamped layer. It is then that you can have a finished image that will now look like a pencil sketch.
Final Words
Now that you know how to turn a picture into a line drawing using Photoshop give it a trial and be marvelled at how simple clicks can create something that is worthy.

