Photoshop is the best image editing software for changing the color of an object because of its pixel-perfect precision. It has several selection tools and masking options to make sure that you can change the color specifically without having any impact on other portions. That’s why professional designers use Photoshop for the Color Change Service.
By Changing the color of an object, you can save your photography budget as you don’t have to shoot multiple pictures of the similar object. You can showcase the object in multiple color variations just like the real product. It will be a time-saving and budget-friendly option for photographers and eCommerce people.
So, how to change the color of an object in Photoshop? Here’s the process to follow.
How To Change The Color Of An Object In Photoshop?
Step 1: Open The Image in Photoshop To Change The Color
We are going to use the below image for this Photoshop how to change color in this tutorial. We will change the color of the sofa without affecting other colors of the image. So, open the image that you would like to change the object color.

As we are going to change the specific object’s color, we have to make a precise selection of the object.
Step 2: Select The Object Precisely
Now, you have to select the object precisely using the Photoshop selection tool. So, which selection tool should be used for this image? We need to choose the selection tool based on the object type.

For objects like sofas, eCommerce products, and interior designs, the Quick Selection Tool will be a suitable choice or color replacement tool is also available. You can get the tool from the toolbar on the left.
Step 3: Cover The Object Using The Quick Selection Tool
At this stage, we have to cover the object by using our suitable selection tool. As we have picked the quick selection tool for this object, we have to apply it to the object. To make a precise selection, zoom in on the image by pressing “CTRL +” together.
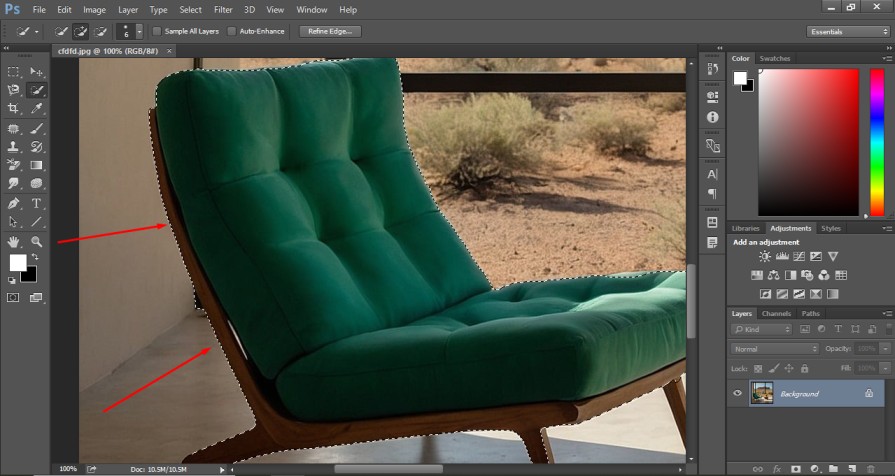
You should have a clear view of the edges of the object. It will allow you to make precise selections without including anything from the background and excluding anything from the object.
Step 4: Refine Your Selection
After making the initial selection with the Quick Selection Tool, you may not get the perfect selection and some areas won’t get proper selection. You have to zoom in on the selection and press the ALT key to exclude unnecessary portions from the selection.

You have to make sure that only the object that you would like to change the color in Photoshop should be included in the selection. Only then, you can change the color of an object in Photoshop perfectly.
Step 5: Create A New Group And Layer Mask
After making a precise selection, you have to click on “Create A New Group” from the layer panel. Then, you have to choose the “Create a layer mask” from the indicated section.
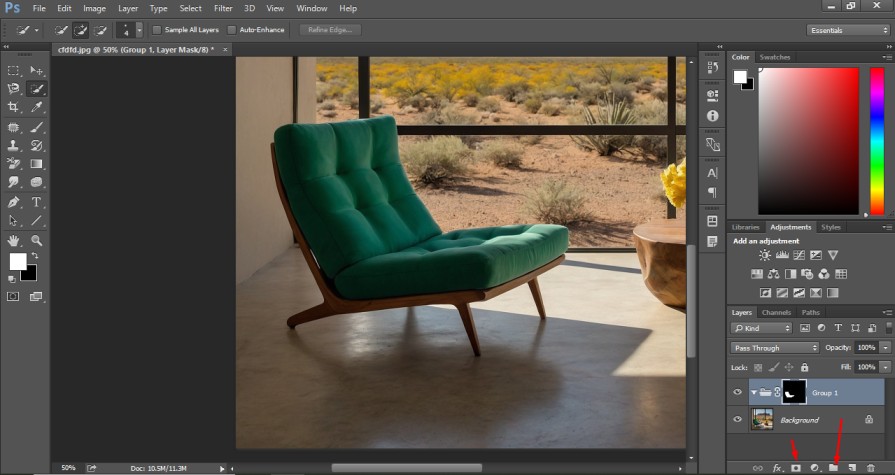
It will create a new group and layer mask for the selected object. So that we can change the color of an object in Photoshop specifically for the selected portion.
Step 6: Apply A Solid Color Layer
From the adjustment layer option, you have to choose the “Solid Color” option. Then, you will get the color picker plate to choose any custom color.
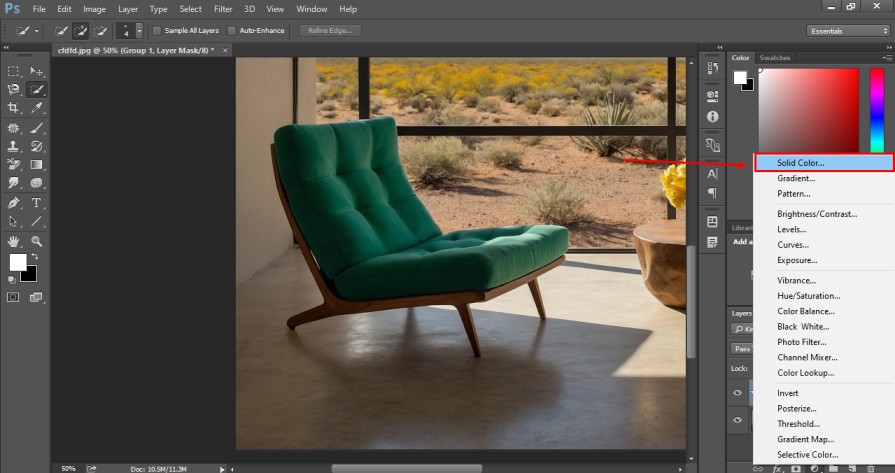
We are going to pick the red color from this option. You can choose any of your preferred colors. But it won’t look realistic at this point. So, you have to click on the blending option from the layer panel and choose the “Color” option from the list.
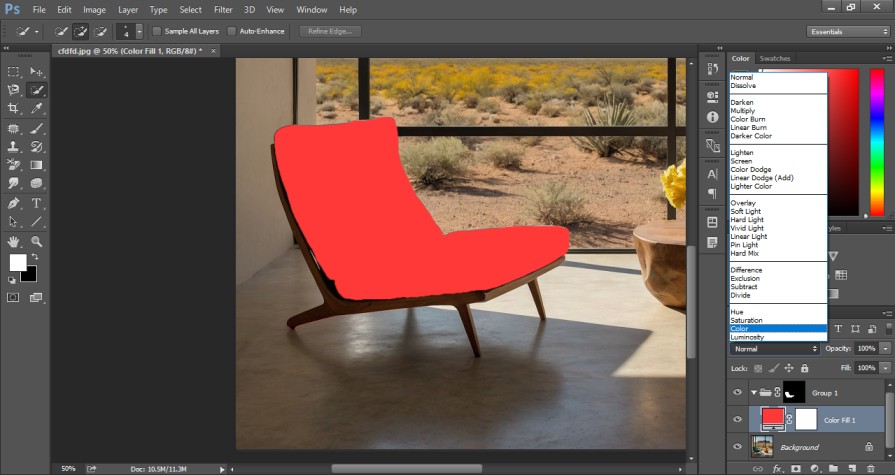
Then, the object color will be changed. You have to position the color fill layer below the create group and layer mask.
Step 7: Make The Color Change Realistic
At this stage, we have got our object in this form after changing the color in Photoshop.
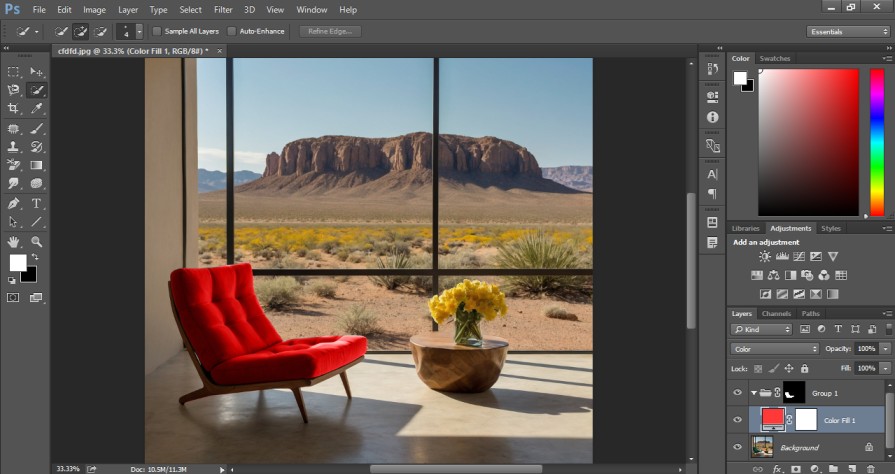
It’s looking pretty realistic but we are going to make it even more realistic and appealing. To do that, we have to select the “Levels” option from the layer adjustments. You can enable this option from here.

Step 8: Make Adjustment Using Levels
After that, you have to change the brightness, contrast, and lightness of the object based on the changed color. There should be a perfect balance between light and shadow. When you get your required color, you have to press the Enter key.

This is the final look at how to change the color of an object in Photoshop. By following this simple process, you can also change the color of your object perfectly.

This is the process to follow when you want to change the specific color of your images by using the selection tool. When you are in a hurry and don’t have the time to make a selection, you can use another technique to change the color without making any selection.
How to change the color of an object in Photoshop without making a selection?
Step 1: Choose The Selective Color
You have to open the image in Photoshop and go to the adjustment option from the top. It will show you the “Selective Color” option.

With this option, you can change the color of your object based on a specific color.
Step 2: Select The Color Of Your Object
You will get different color options from the color preset box to choose the object color. As we have now got the sofa in red color, we have to select red from the color options.

It indicates to Photoshop that only the red color will be changed. You can adjust the slider in different directions to get different changes in the object.
Step 3: Final Result
In this method, you can change the color instantly by adjusting the selective color sliders. When you get your desired color, you have to press the Enter key to confirm your changes.

The sofa color has been changed from red to pink. So in this process, you can change any color of an object in Photoshop without making any selection.
3 Best Tips
- Make sure that you create a layer mask for the selected object so that you can fix edges and make corrections to the color-changing areas.
- You must change the color blending mode from normal to the color to make the changing effect realistic and properly balanced.
- Always copy the original layer so that you can always have a look at it for reference of changing color as the original picture.
3 Big Mistakes
- You should not apply the levels or color adjustment layer without enabling the selection. Otherwise, it will apply changes to the entire image.
- Don’t only focus on the color. You should also focus on the shadow to make your color changes look natural, realistic, and trustworthy.
- Don’t over-edit or over-adjust the color changes by applying severe changes. You should try to maintain how it would look in real with that color.
Why Change the Color of an Object in Photoshop?
Product Customization
In e-commerce, businesses need to show the same product in different color variations without photographing each product. Changing the color using Photoshop saves time and costs while providing customers with realistic images.
Brand Consistency
E-commerce brands and companies want to change colors to match their brand’s theme or marketing materials. It is important to maintain brand consistency across advertisements, websites, and promotional content.
Creative Graphics Design Projects
Designers and photographers need to change colors for artistic purposes. This allows for flexibility in creating visually attractive images to explore different visual concepts without finalizing the actual project.
Correction of Color Mistakes
Due to lighting or photography conditions, colors may not appear accurately. Changing the color in post-production helps to correct these errors for a more realistic result. You can match the actual color of the product.
Getting More Attraction
Changing colors can help an image to get more attention than unedited images. It is essential to improve contrast, color balance, saturation, and shadows. It will draw more attention to the image by fixing color-related issues.
Final Words
The color-changing process is highly beneficial for product photographers and eCommerce people to save their valuable time and photography budget. As you don’t have to take multiple shots, it will save you money from paying extra for the models. When you have bulk images to change the color, it will be difficult for you to spend that much time.
Clipping Way is the go-to solution for you to get the best color-changing service at the lowest price. You can check the quality with a free trial now. No credit card information is required.
FAQ’s
What is the easiest way to change an object’s color in Photoshop?
The simplest way to change an object’s color in Photoshop is by using the Hue/Saturation Adjustment Layer after selecting the object with the Quick Selection Tool.
Can I change an object’s color without affecting the rest of the image?
Yes, by using a Layer Mask feature you can precisely control which parts of the image are affected by the color change. There won’t be any changes in other areas.
Is the color change in Photoshop permanent?
No, using an Adjustment Layer you can make the changes non-destructive. It can be reverted back to the original image anytime in the editing process. After saving the image file, you cannot go back without the original file.
How can I change the color of complex objects with detailed edges?
You can refine your selection using the Select and Mask tool to handle complex edges like hair or complicated shapes. In this method, you have to spend a lot of time in object selection.
How to do basic color adjustments in Photoshop?
Saturation and Lightness sliders in the Hue/Saturation panel are the best options for making basic color adjustments to fix minor color issues. If you want to make specific changes, you have to make a selection for that.
How to change multiple objects to different colors in the same image?
You need to create multiple Adjustment Layers for each object and customize the colors individually to change multiple objects to different colors in the same picture. It will take more time than the regular color-changing process.


