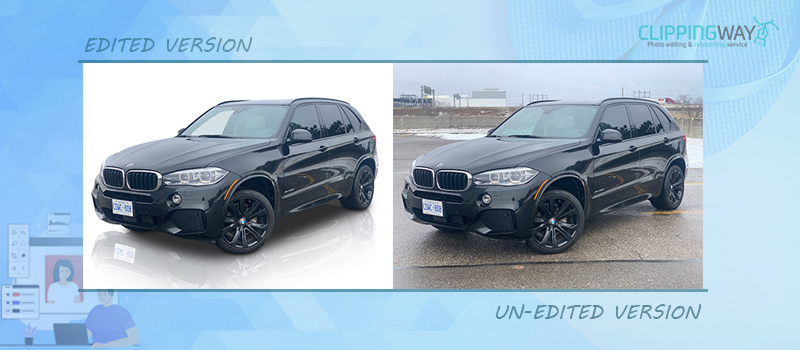
Professionally edited car photos play a vital role in the car-selling industry. Car Image Editing Service is the sell-deciding factor for car dealers, sellers, advertising agencies, and photographers.
With the help of professional editing, you can represent your car photograph with a mesmerizing look.
If you are also involved with the automotive industry, this article is going to assist you a lot in the post-processing steps. In this article, you will learn how to edit car photos in Photoshop.
We are going to show you the best way to edit car photos. After reading this article, you can also edit your car photos professionally.
Table of Contents
How to Edit Car Photos in Photoshop?
Step 1: Open car photography in Photoshop
We are going to use this image to show you how to edit car photos in Photoshop. You can use any recent version of Photoshop to follow this step-by-step car photo editing tutorial.

So, you have to start with opening your car in Photoshop. First things first, we have to replace the background as it looks unsuitable. To do that, we have to select the car accurately. Therefore, we have to use the pen tool to do the selection task.
Step 2: Select the car using Pen Tool
You will get the pen tool from this section.

After enabling the tool, you have to zoom in on your image with the “CTRL +” keyboard shortcut. After that, you need to left-click on your mouse surrounding the car body to create paths.

While doing the path creation, you have to ensure that the selection covers the entire car excluding the background portion. To cover the bend area, you have to hold and drag the mouse to get a bend vector line.
Also, you can use the ALT key to change the direction of the line. You need to select your vehicle like this one.

There are some reflections of the background in the front windscreen. If we keep it like this, it will look awkward after changing the background. So, we have to fix it to keep the look natural.
Step 3: Select background reflections of front windscreen
You have to zoom in on the reflected area and create vector lines for those portions. Let’s have a look at this one.
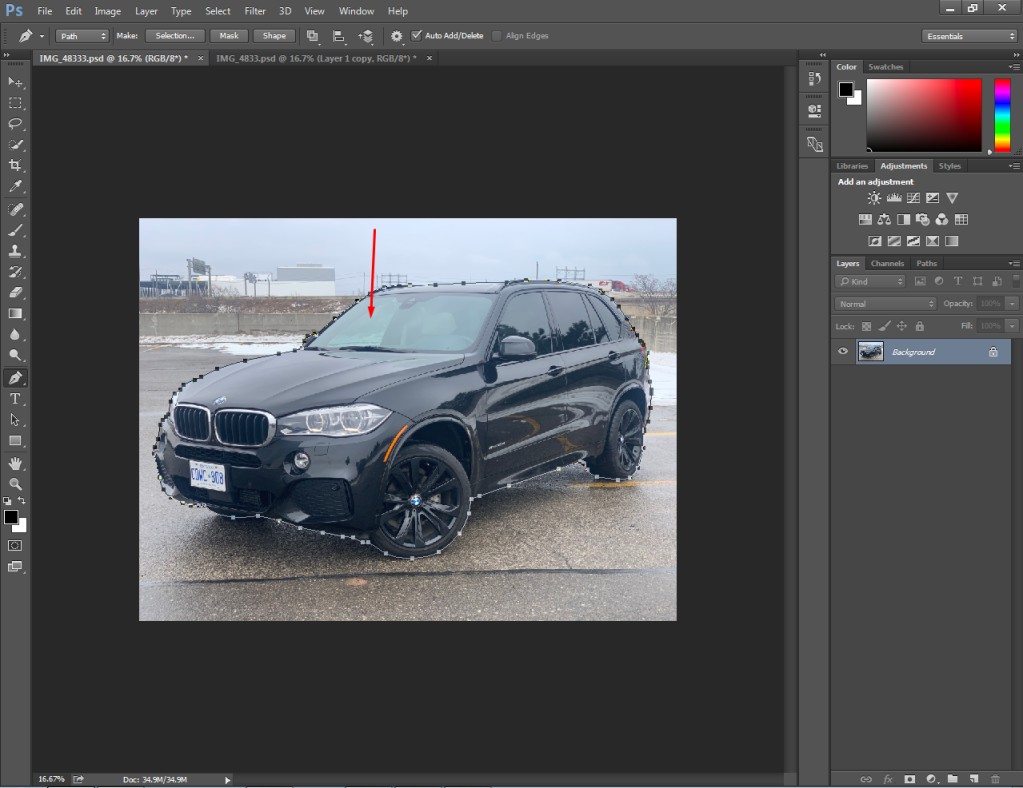
Save this portion as a new work path. You have to double-click on the work path to rename the path and save it.
Then, we are going to make a selection of the created path. You have to double-click on the picture and select “Make Selection”.

You can set the feather radius to 0.5 pixels to get a smooth result. Press Enter to confirm the command.
Step 4: Create a new layer to separate the background
In this step, we are going to separate the unsuitable background from this image. Go to the layer option from the top and select “Layer Via Copy”. That will create a new layer having the selected portion.

Next to that, you have to press CTRL + J to make another copy of the duplicate layer. Then, you have to select the middle layer and press the “CTRL + DELETE” key to make the layer blank. It will change the car photo background color to white.

At this point, you need to create a new transparent layer to adjust the front windscreen look with the background.
From the layer panel, you will get the option of creating a new layer. After that, you have to reduce the opacity of that layer to 50%. You will get the option here.

At this point, we have fixed the background. Now, we need to make it look more attractive and eye-catchy. Adding a shadow will be effective for that. Let’s do it.
Step 5: Add shadow to the car
To add a shadow, we have to create a new work path and add a new transparent layer. It will make the shadow look realistic.
Go to the path section and create a new path. Then, draw vector lines at the bottom of the car so that it looks like a shadow.

From the “Make selection” option, you have to set the feather around 45-50. Then, you have to create a new transparent layer and paint with the brush tool.
Here is an example of how you should create the shadow to edit car photos in Photoshop.

This is the initial look of the shadow. In the next step, we will work on it to make it more realistic. Here’s the process.
Step 6: Add gaussian blur to the shadow
First of all, you have to reduce the opacity of the layer by around 75%. Then, go to the blur option from the top and click on the Gaussian blur option.

It will improve the overall appearance of the car by having a realistic shadow. To make it look a bit more perfect add some black marks at the bottom of each wheel.

Now, the shadow looks astonishing. At this point, we are going to create a reflection of the car. It will improve the quality of car photography.
Step 7: Create reflection of the rear wheel
We are going to start by copying the first layer that has the selection of the car. You have to click on that layer and press “CTRL + J” to copy the layer. Next to that, you have to reposition the copied layer at the bottom of the shadow layer.

To create a perfect reflection, we have to make a selection of different car parts like wheels, the car body, and the front side.
Let’s start from the rear wheel. You have to zoom in on the car and pick up the pen tool to create a selection accurately. You should create vector lines just like this one.

After creating vector lines, you have to right-click on the mouse and select “Make Selection” from the list. For this step, we need to set the feather radius to less than 1 pixel. You can apply 0.5 pixels. After making a selection, press “CTRL +J” to copy the selection in a new layer.
Then, you ought to click on the new layer and enable free transform for the layer. “CTRL + T” is the shortcut key for free transform. Right-click on the selection and select “Flip Vertical” from the opinion menu.

Now, drag the mouse to replace the wheel at the bottom and position it like a reflection. As the left side of the wheel isn’t visible, we have to create lines for those portions and paint those areas black color.

Take the brush tool from the left side and select the original color of the wheel as the foreground color. Then, hold the left key and move the mouse over the wheel missing portion. You should bring a look like this one.

So, we have got a nice reflection of the rear wheel. We have to do it for the car body shell too.
Step 8: Create reflection of the car
Click on the copied layer that has the entire car selected. Pick the pen tool once again and create a path around the body shell. Want to have a look at the sample image? Well, here you go.

After selecting those portions with the vector lines, right-click on the mouse and select “Make Selection”. Later on, you have to press “CTRL + J” to copy the selection of the car body to a new layer. Once again, go to the free transform option and select “Flip Vertical” to create a reflection.
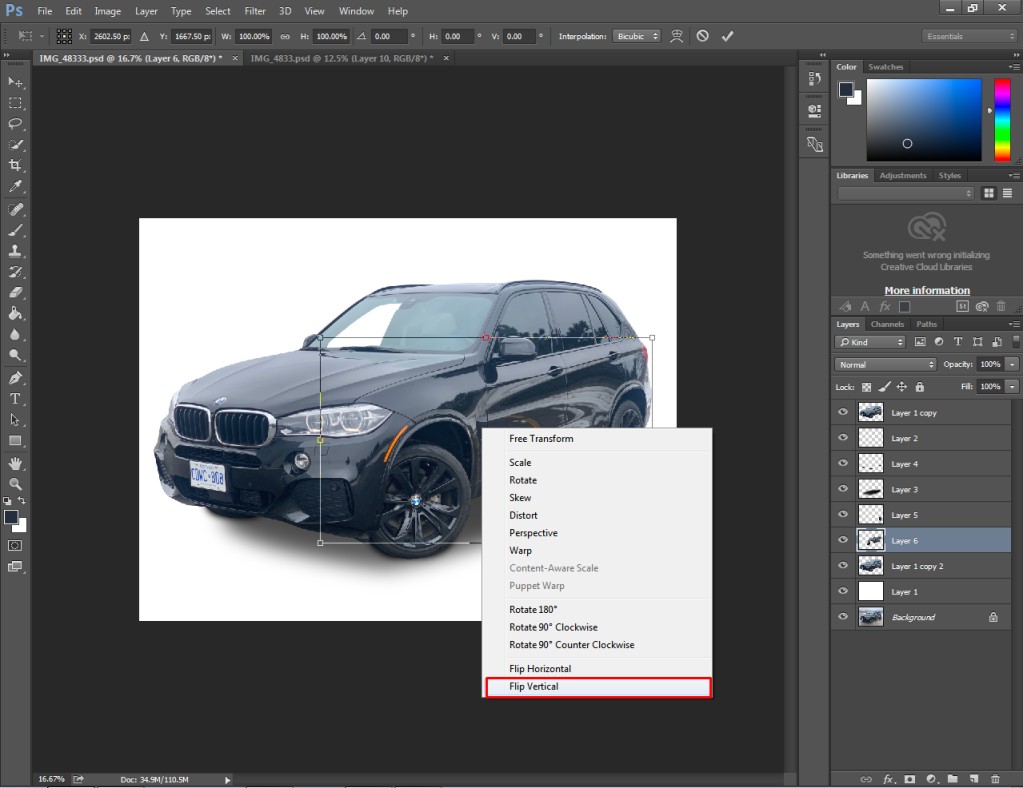
After that, you need to drag down the selection portion and use the left mouse key. Make sure that the body shell reflection should align with the rear wheel. You need to place it this way.
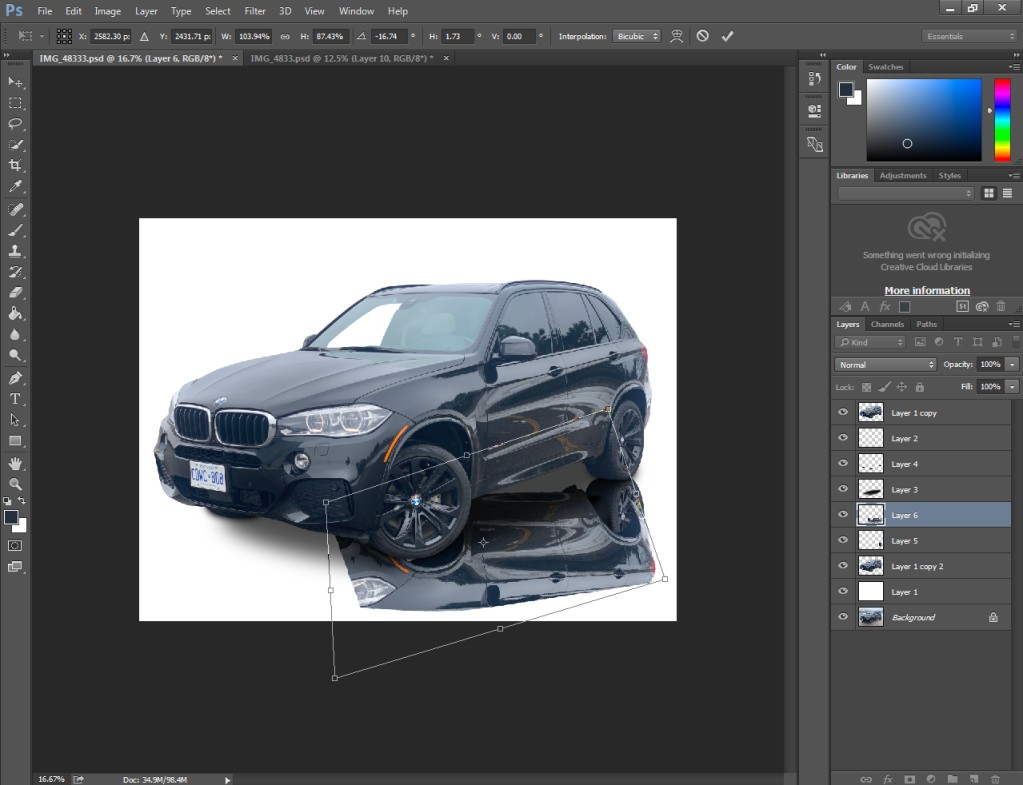
Drag the selection portion up and down to place it perfectly.
Step 9: Create a new layer for the front reflection
Now, we are going to create vector lines for the car front area and create a new layer for that portion. To do that, pick up the pen tool and select the front area. I have included those portions for this step.

When you have done the selection, create a new layer by pressing “CTRL + J”. Later on, enable the free transform option and adjust the front portion with the previous reflection.
You should use the skew and warp option to match the front reflection with the car body. The entire look should be like this one.

At this point, the reflection is looking pretty nice. We just need to work on it to merge layer altogether.
Step 10: Merge layers
At this point, we have got a proper reflection of the car photo. But the reflection is divided into several layers. We need to merge those layers together. Before doing that, create a new layer and paint it with the brush tool using black color.
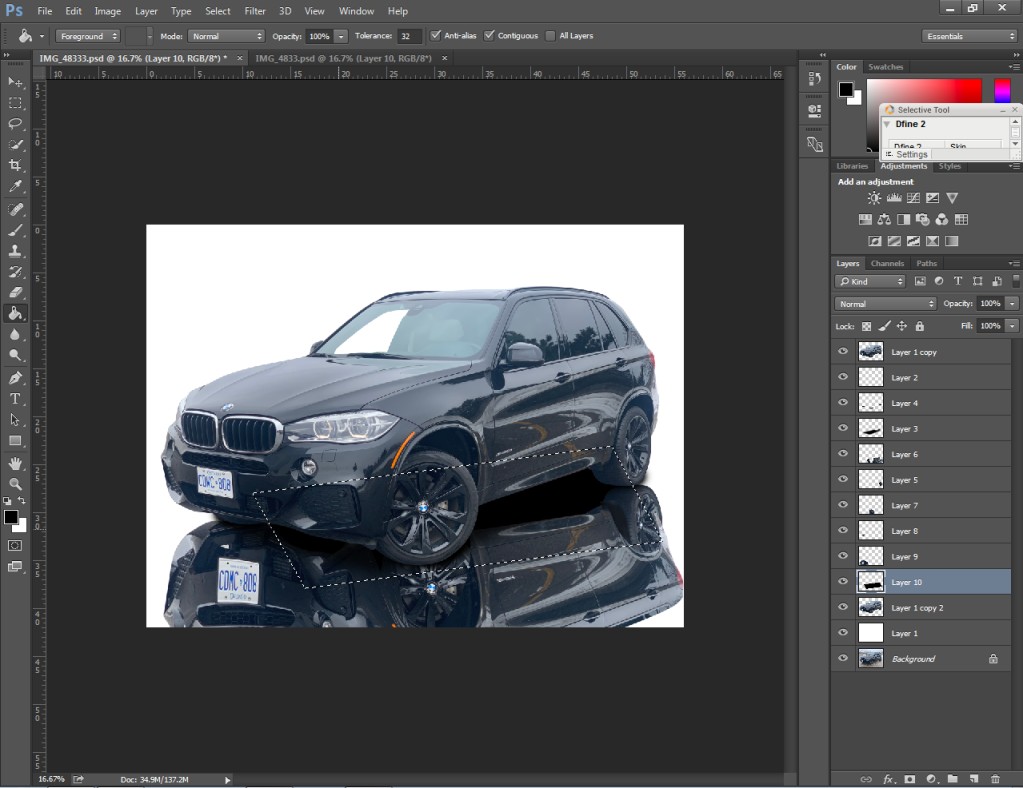
It will make the reflection relatable to the car. Now, you can proceed to merge those layers having reflections. Hold the ALT key and click on those layers that have the reflections. After that, you have to press the right mouse key and select “Merge Layers” from the list.
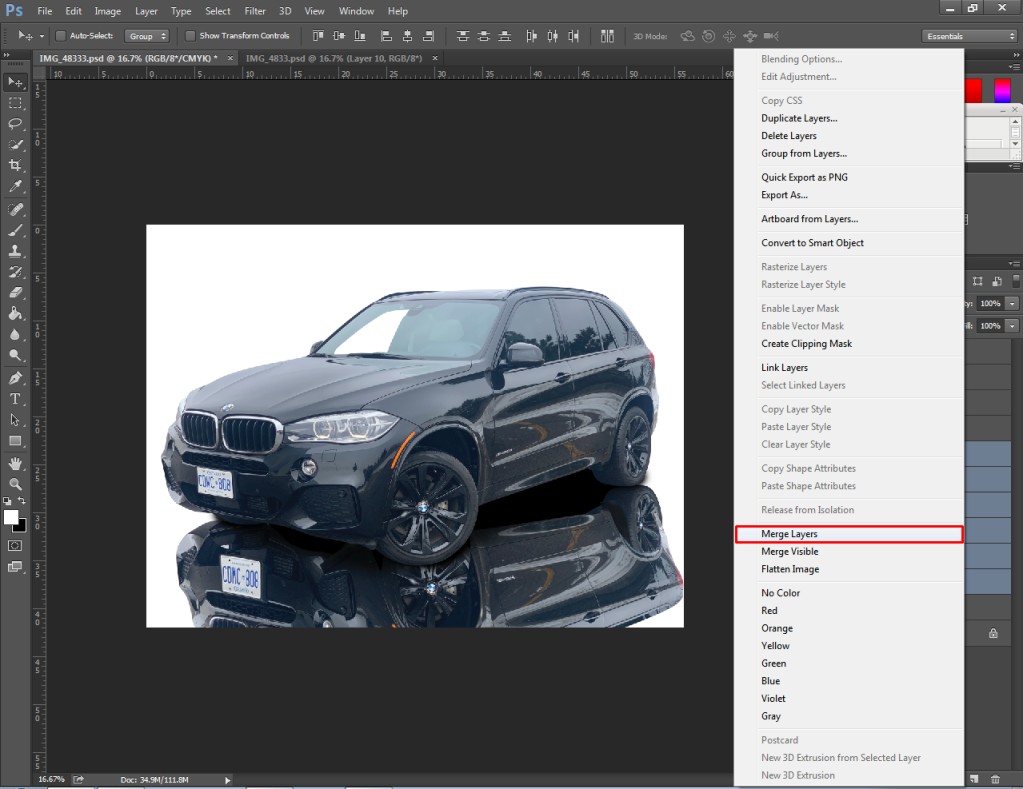
At this point, we are just one step away from getting professionally edited car photos in Photoshop. Here’s the final step.
Step 11: Reduce opacity
To provide the final touch, we need to reduce the opacity of the merged layers. Go to the layer panel and decrease the layer opacity to 30%. After that, your car photograph will get a look like the below image.
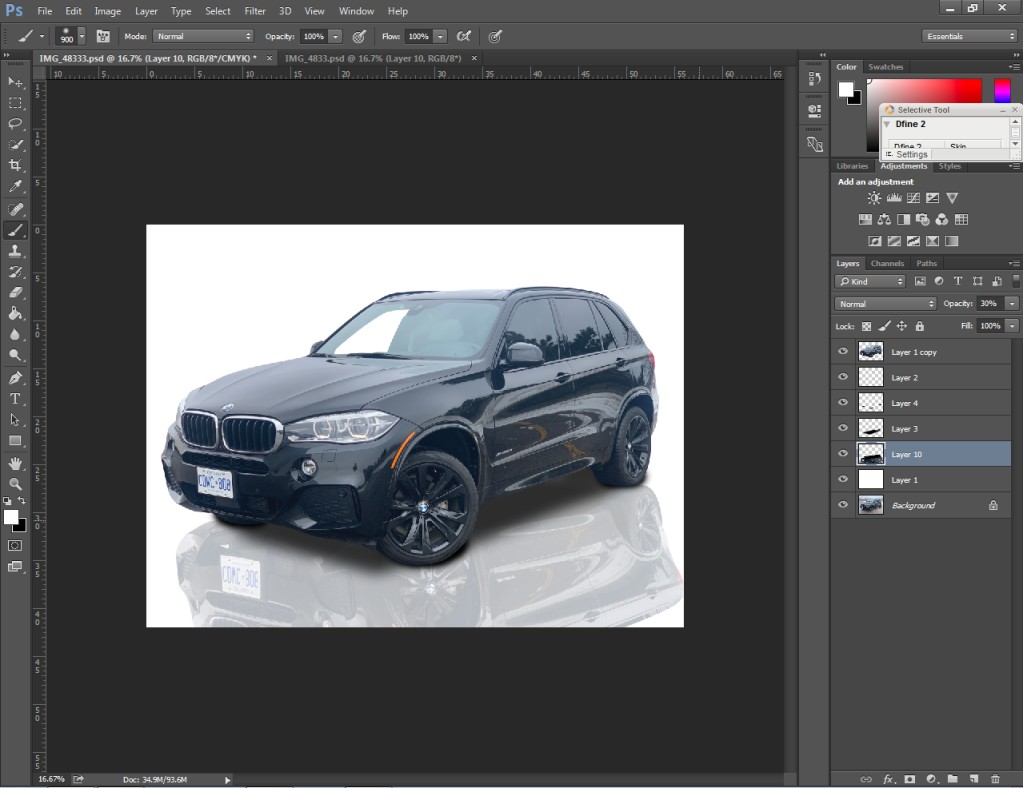
At this stage, we just need to erase the outside area of the reflection to get a perfect-looking car photo. You have to pick the eraser tool from the left side and reduce the opacity to 20%.
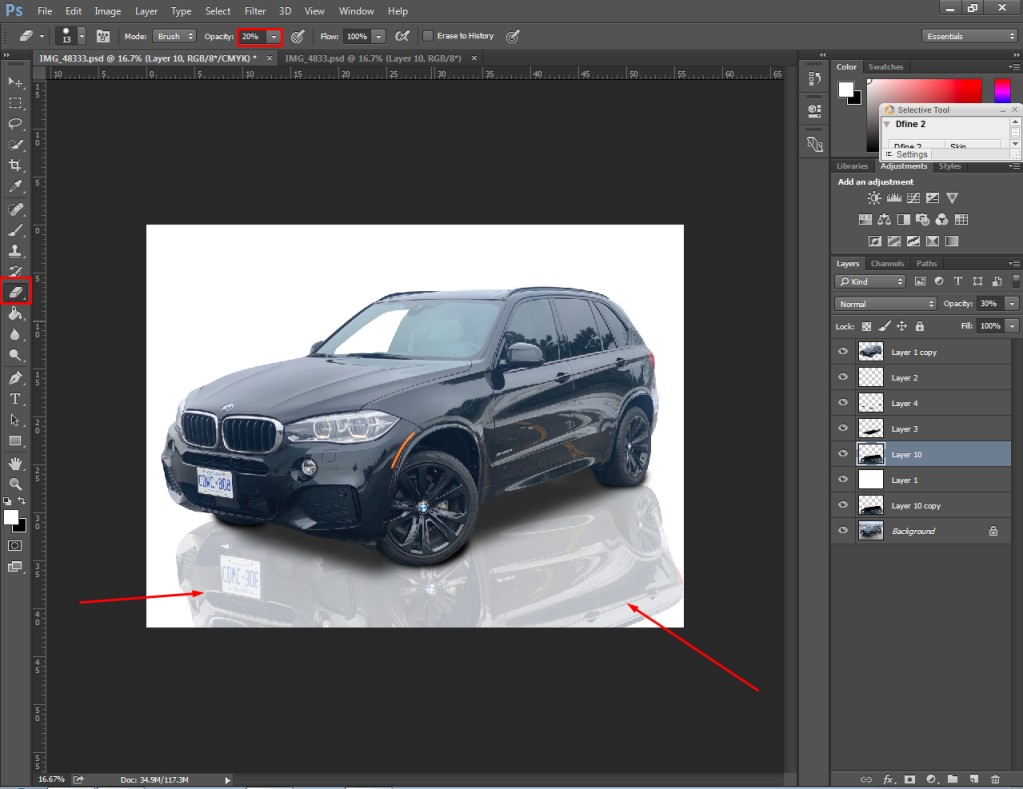
Here’s the final look after doing all the corrections.
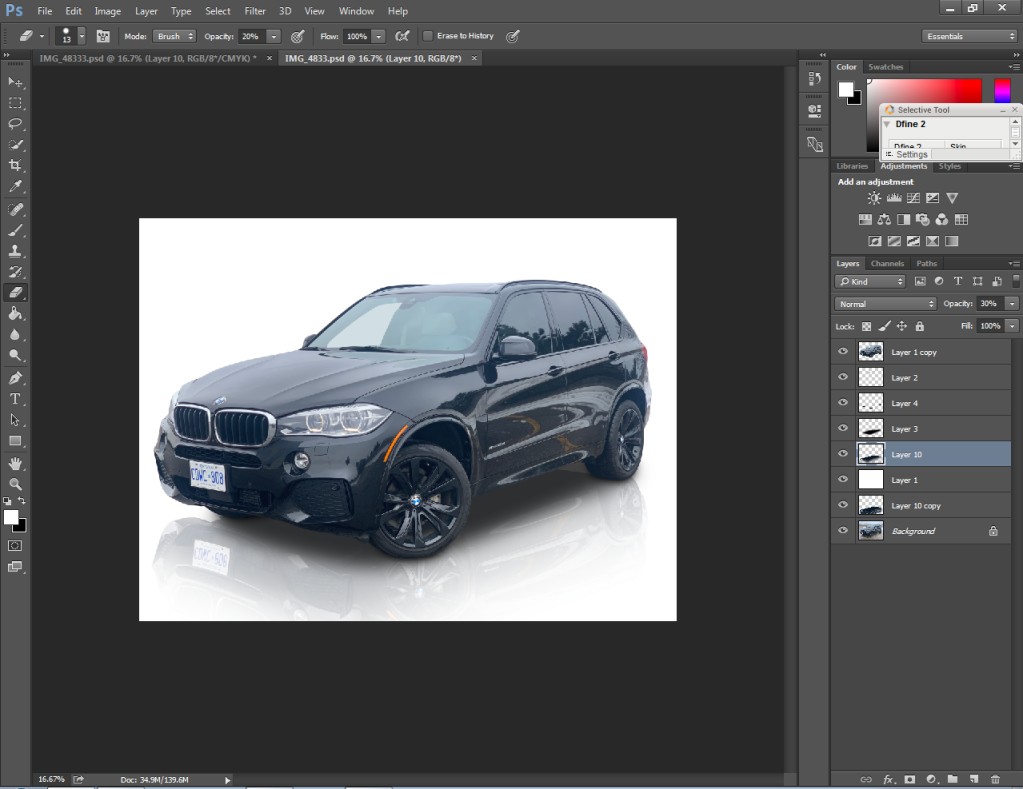
These were the step-by-step guidelines for how to edit car photos in Photoshop.
Pros & Cons
Tips You Should Follow
- Use The pen tool to select any portion of the car.
- Keep the opacity low for creating shadows.
- Increase feather radius to get realistic shadows.
Mistakes You Should Avoid
- Do not select the entire car in a single layer for the reflection.
- Do not delete the original layer while editing.
- Do not use the lasso tool to make a selection.
Final Words
That’s it. At this stage, you have learned the best way to edit car photos in Photoshop. Now, you can apply those guidelines to your photograph to get professional-looking car photos.
If you need any assistance from our highly skilled editor, feel free to contact us.
FAQ’s – I’ve Got Some Questions
You have to separate cars from unsuitable backgrounds, add shadows, and reflections to make the photograph look professional.
The Gaussian blur is the best blur option for car image editing.
Polarizing filter is the best option to use for car photography.
You need to edit your photos, change the background, remove unnecessary elements, and retouch the car body to improve your car pictures.
