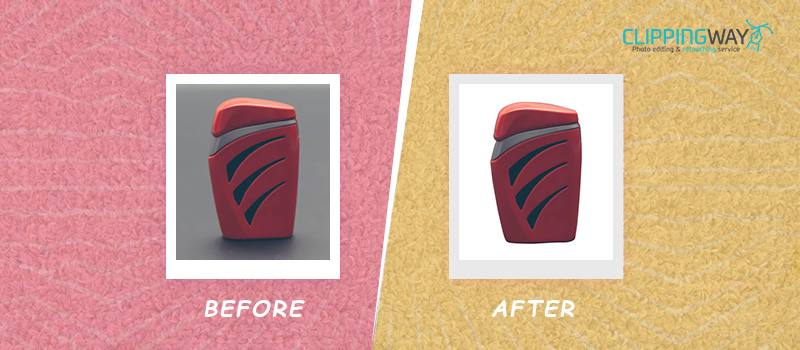
Traditional photography without having any specific effect is not capable enough to attract viewers. That’s why photographers sometimes try to implement different image post-processing techniques to make their photography stand out. Blurring the background is such an effect that is pretty helpful to bring focus to the subject.
To make it easier for you, we are going to share how to blur backgrounds in Photoshop. We are going to show you two different ways to use the blur tool in Photoshop.
This is going to be a fast and easy process. We are going to show a straightforward and to-the-point procedure to apply to your professional photography.
How to Blur Background in Photoshop in 6 Easy Steps
Step 1: Open the photograph to blur a background in Photoshop
You need to get the image opened in Photoshop to blur its background. We are going to use the below image for this tutorial.
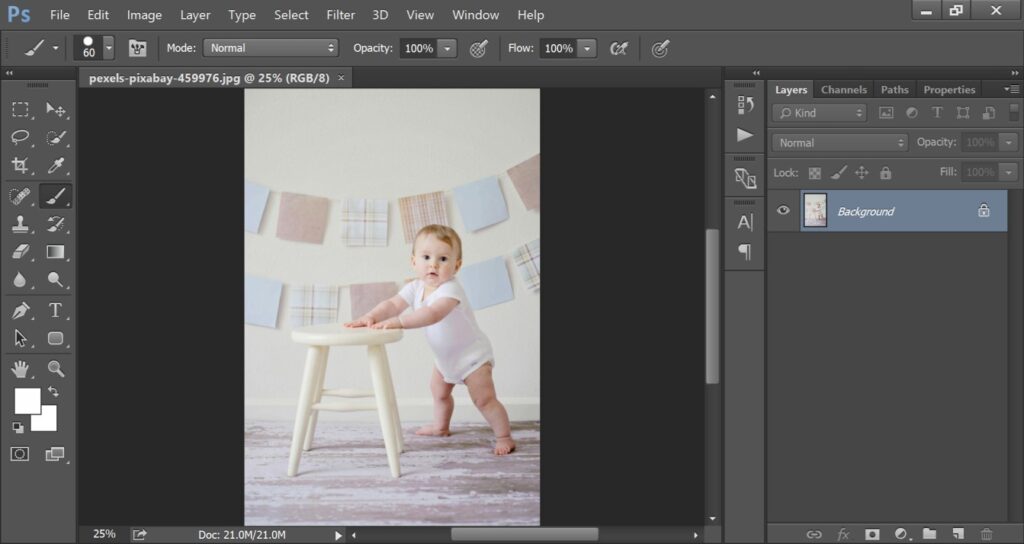
As you can see, the focus is not on the objects and it’s not looking that attention-grabbing. We can fix it by adding blur to the background. Sometimes the process is used for Background Removal Services.
Step 2: Duplicate background layer
We have to duplicate the image background. We can do it by pressing CTRL + J. After that, you have to disable the previous layer.
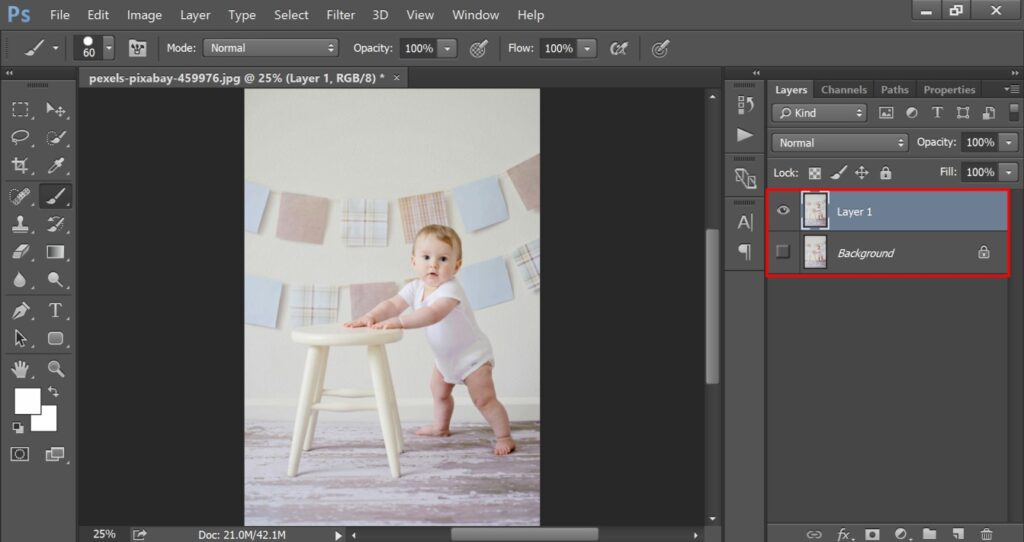
Then, select the copied layer and move forward to make a selection of the subject.
Step 3: Subject selection
At this point, we are going to select the subject so that we can add blur on the background only. In Photoshop, you can select objects in several ways. For this image, we are going to use the Quick Selection Tool.
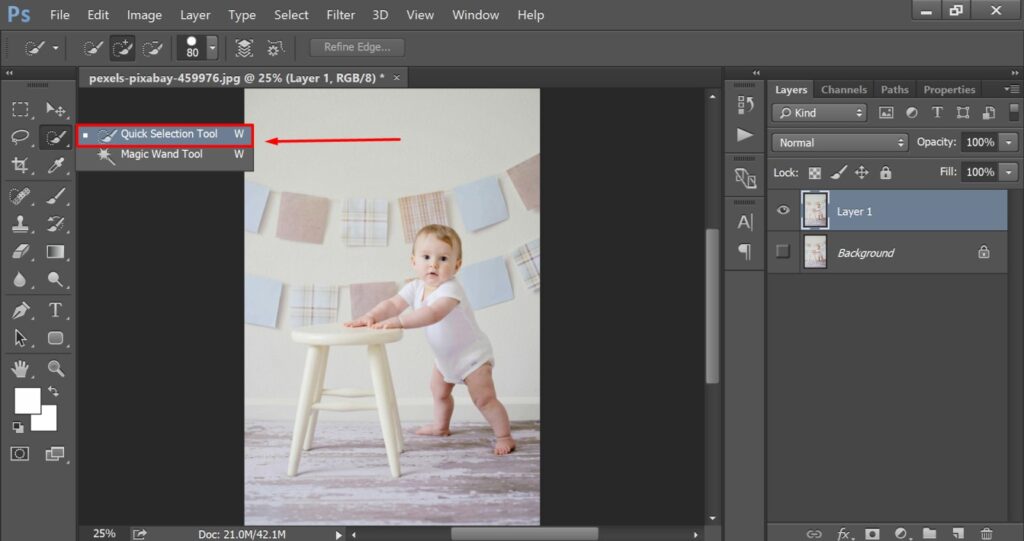
To select an object in Photoshop with that tool, you have to press and hold the left mouse key and operate it on the object. After the initial selection, you may not get the selection in perfect shape.
Let’s have a look here.
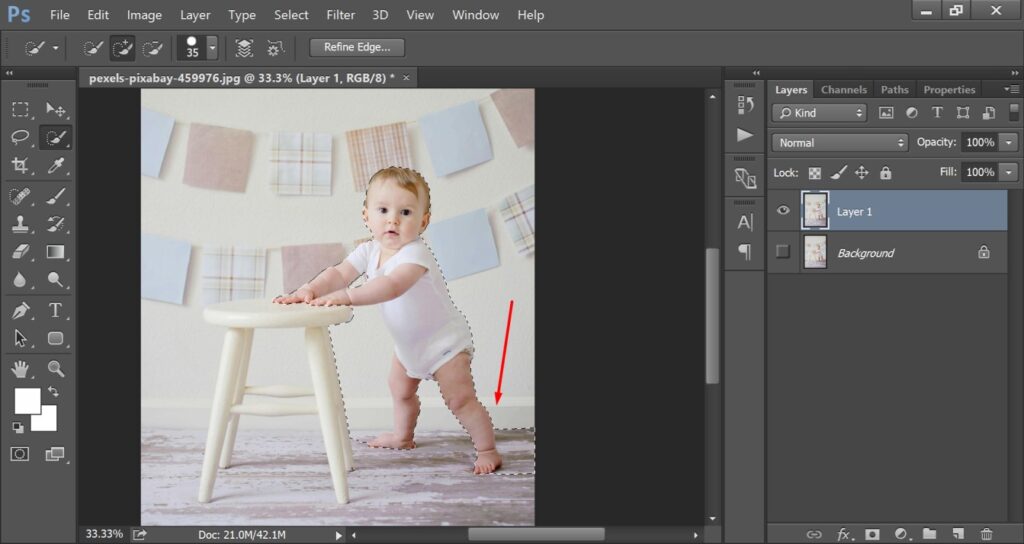
You have to hold the ALT key and eliminate unnecessary portions to bring the selection in perfect shape. You need to bring the selection in this form.
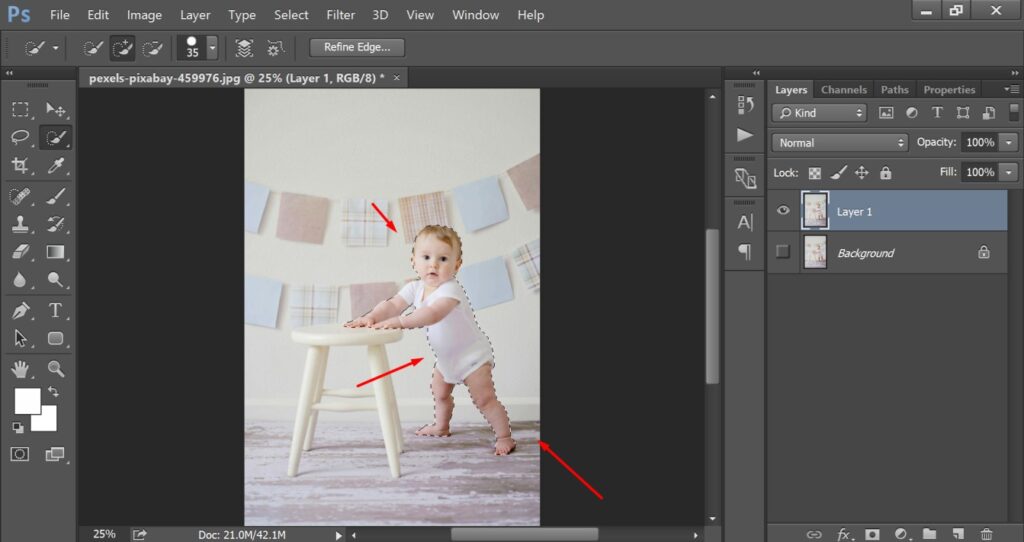
Now, we are going to separate the object on a new layer.
Step 4: Output to new layer
You have to click on the refine edge option from the top and select “New Layer With Layer Mask” from the output option.
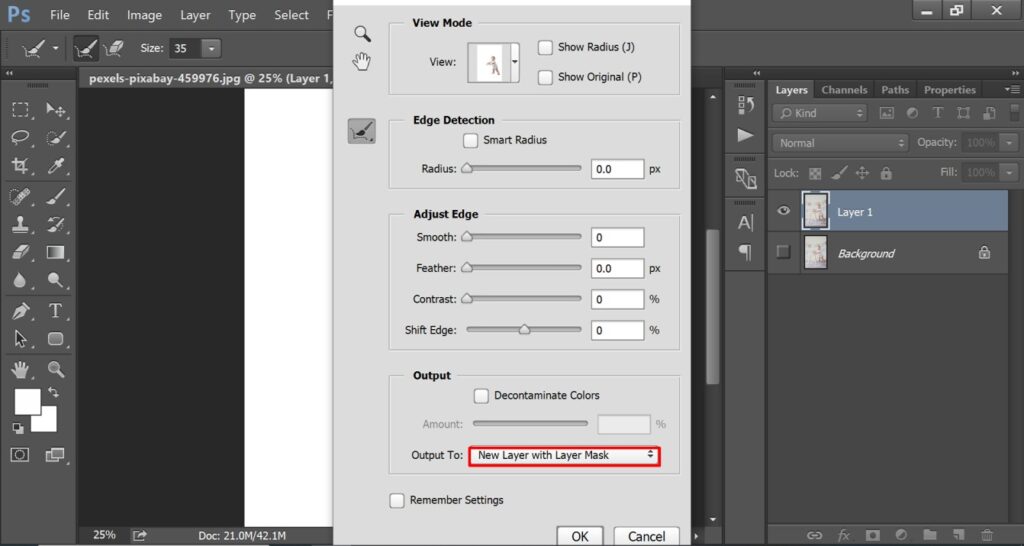
It will remove the background and showcase the object on a separate transparent background.
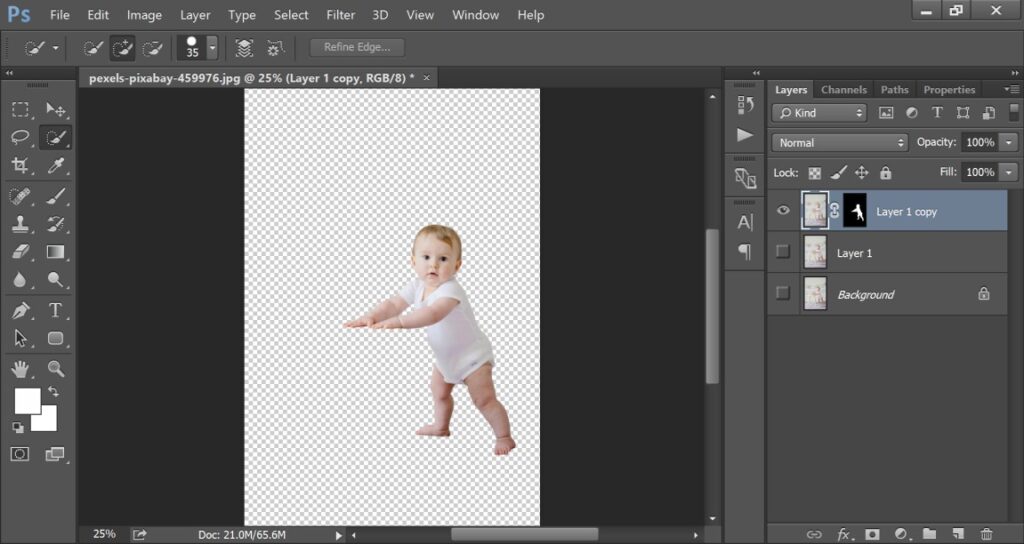
Now, you have to disable this transparent background layer and select the duplicate layer located in the middle.
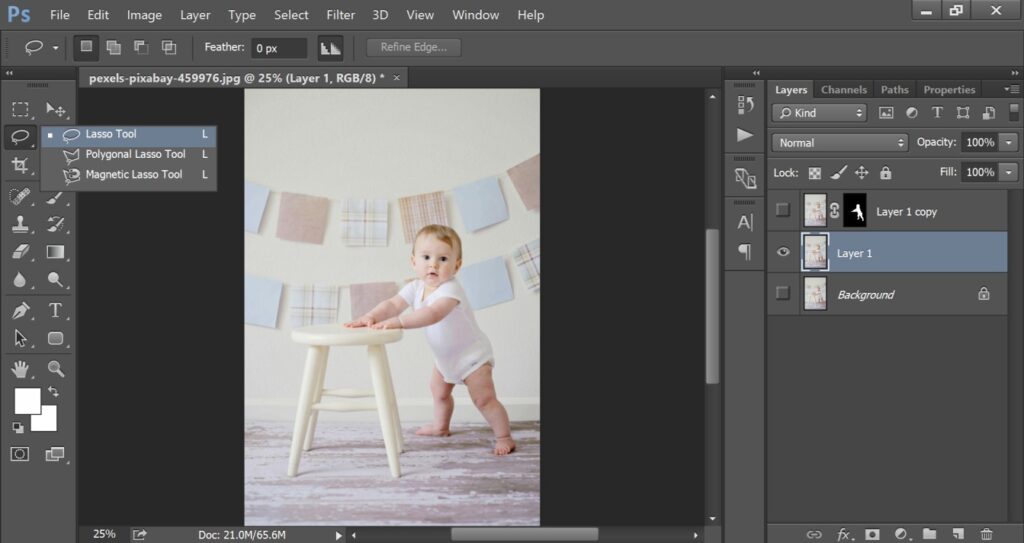
Then, you have to pick the lasso tool from the left side toolbar.
Step 5: Apply content aware effect
You have to make a selection around the subject using the lasso tool. You should do it like this one.
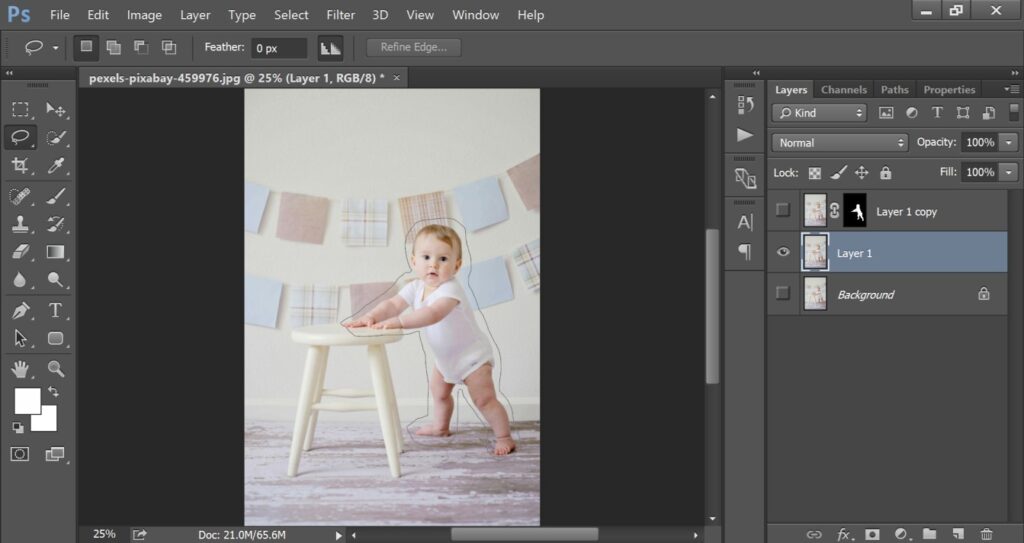
Then, you have to go to the Fill Option from the Top and choose the “Content-Aware” option.
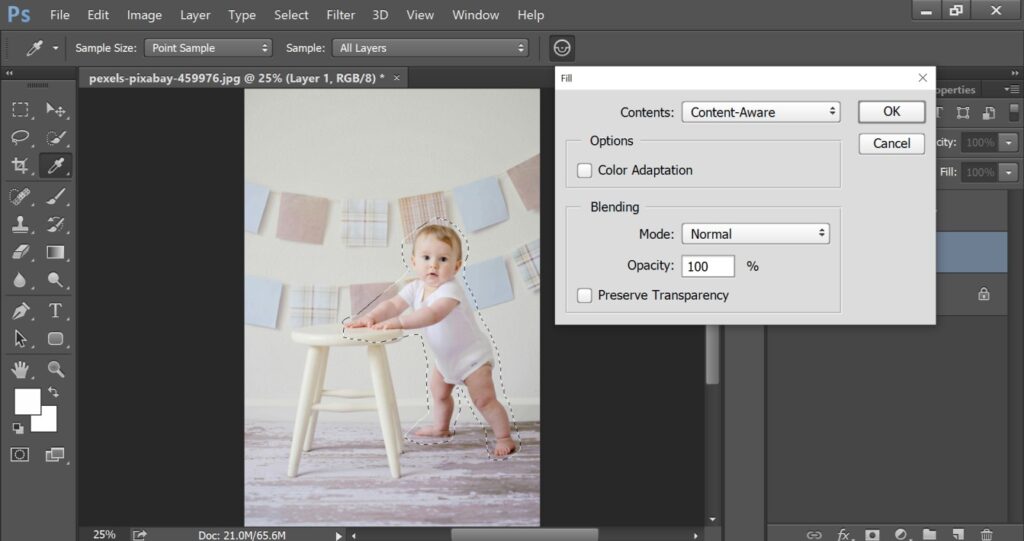
It will remove the object from your image. Let’s have a look here.
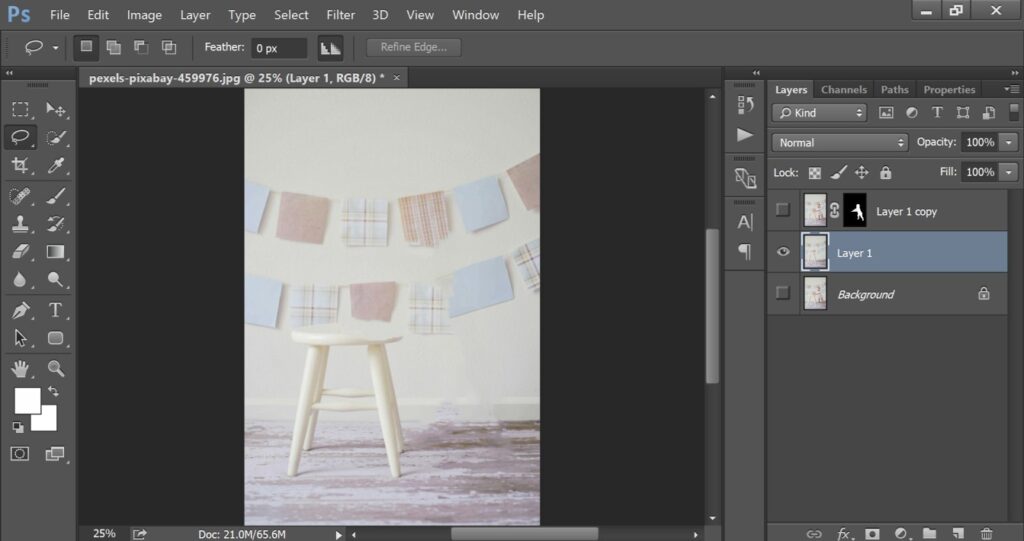
Now, we are going to show you how to blur the background of a picture in Photoshop using the blur tool.
Step 6: Apply lens blur from the blur option
You have to go to the blur option from the top and choose “Lens Blur”. This is the best blur tool to make a background blur for portrait photography.
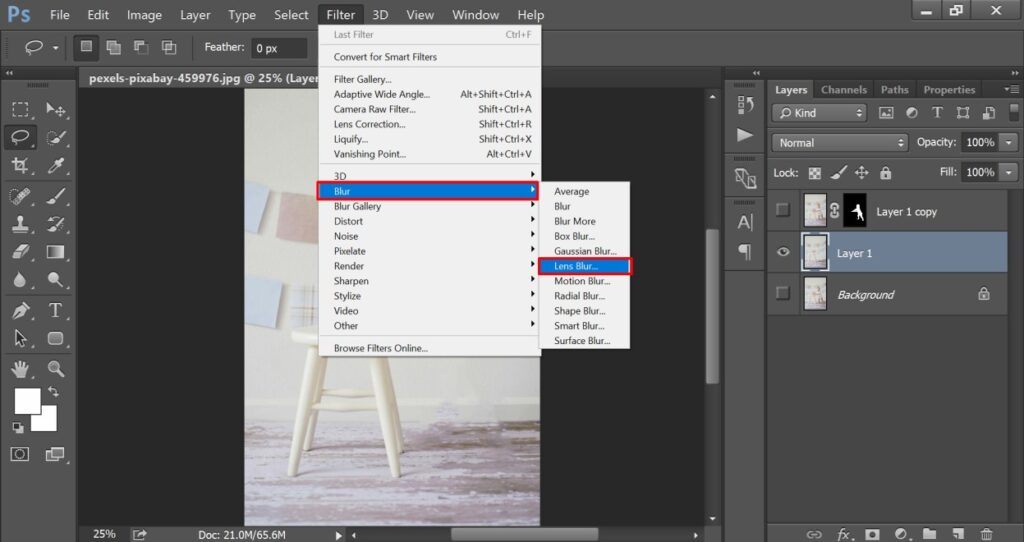
Next to that, you have to choose the “Hexagon 6” option from the right side and increase the radius to 100%. Then, you need to increase the threshold option to 255.
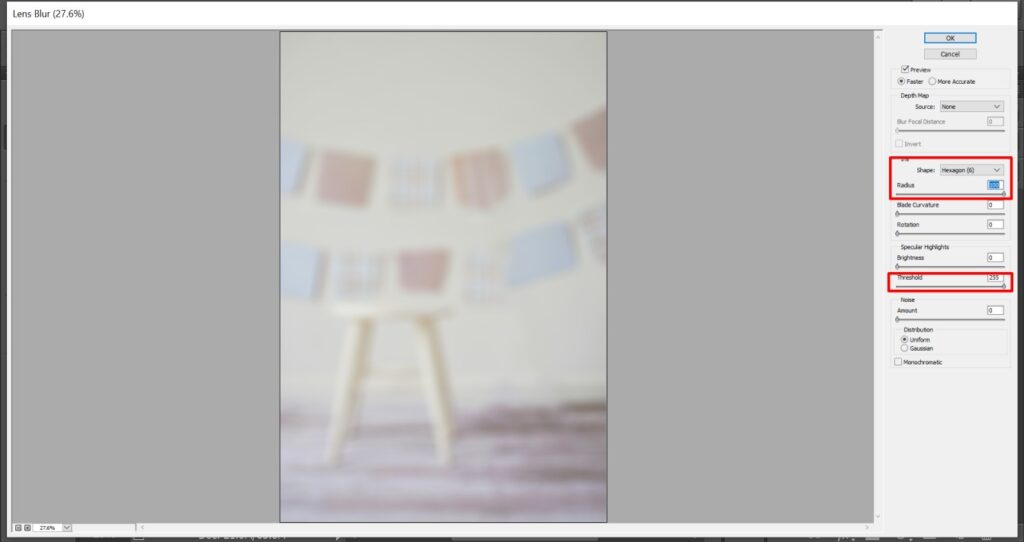
As you can see, it will blur the background in Photoshop. When you are happy with the blurry effect, press the OK or Enter Key to apply the blur effect. At this point, you have to enable the previous layer to see the final result.
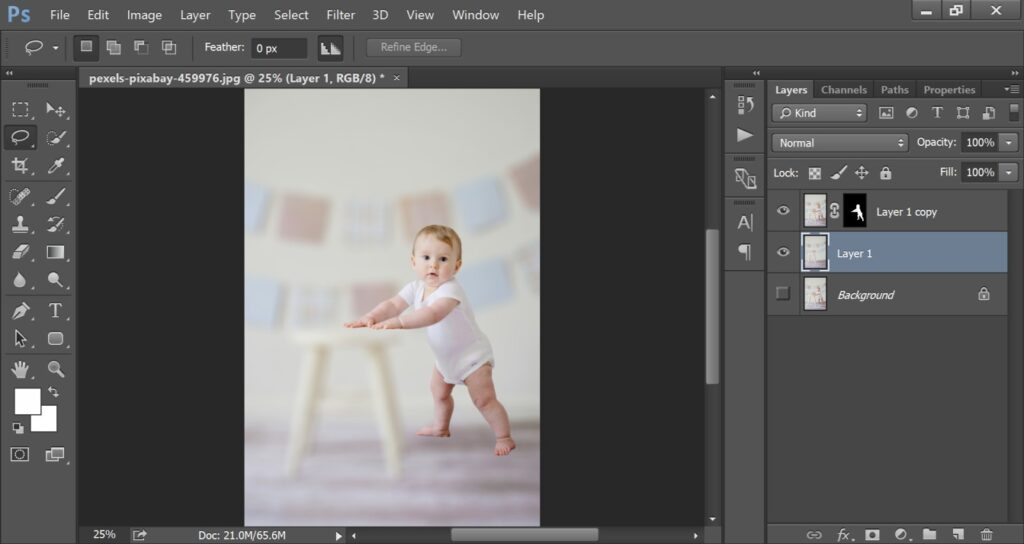
This is the final result of how to use the blur tool in Photoshop. Now, you can save the image from the “File” option. Using this wonderful image background blur in Photoshop technique you can easily blur background in your images.
As you may know, there are some other blur options also available in Photoshop. Are you in a hurry and want to blur the background without selecting the subject? The next method is going to be helpful for you.
How to Blur A Background Using Blur Gallery Effect?
Step 1: Open the image to add blur using blur gallery
For this process, we are going to use this image.
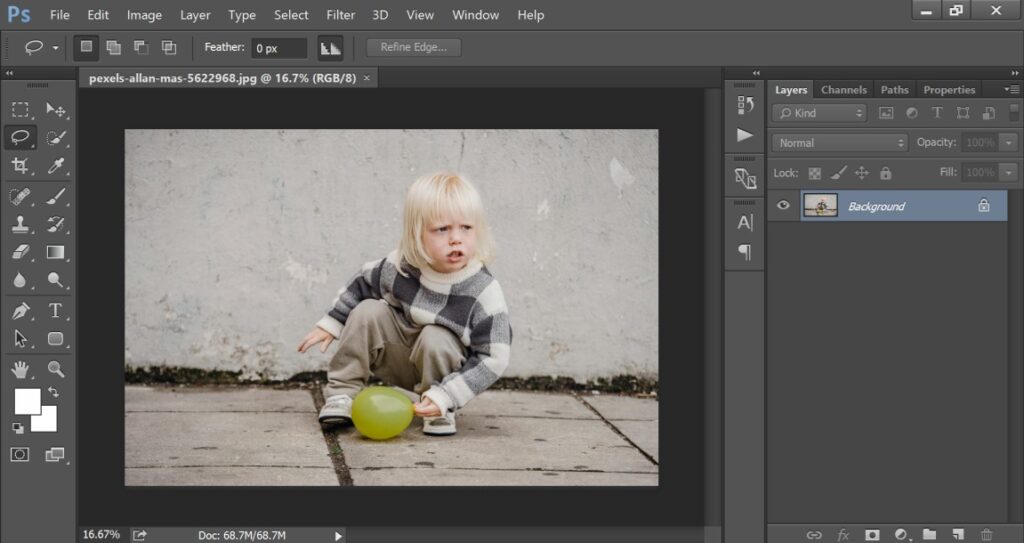
This is going to be a short and absolutely fast way to blur your image background in Photoshop. You need to press CTRL + J to duplicate the original background layer. Now, we are going to apply the blur tool without object selection.
Step 2: Apply Iris blur from “Blur Gallery”
You have to go to the Blur Gallery option from the “Filter” option. There will be field blur, iris blur, tilt-shift, path blur, and spin blur. You need to choose the blur option according to the object’s shape. For this image, we are going to apply the IRIS blur option.
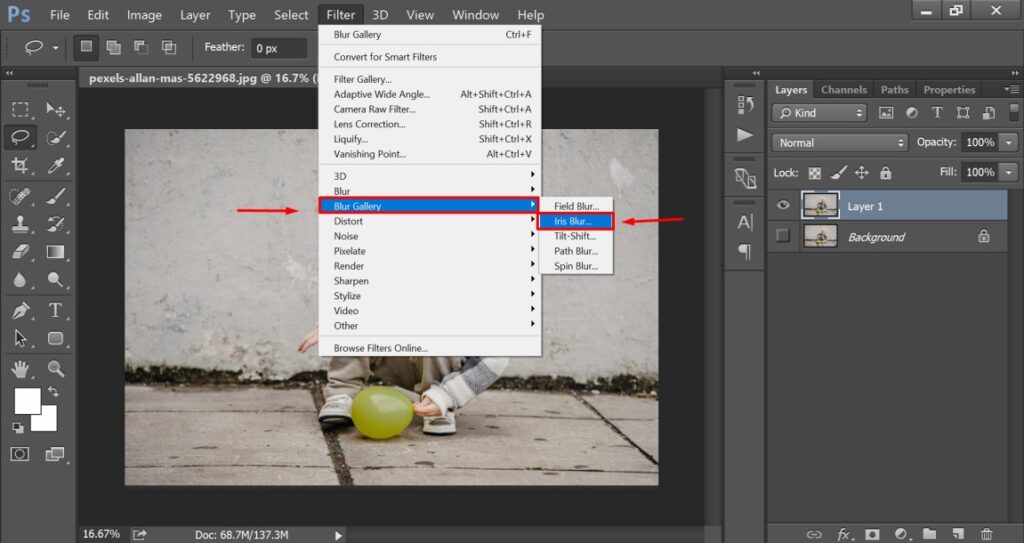
Now, we have to make some adjustments for perfect blur placement.
Step 3: Adjust Iris blur placement
After choosing the iris blur, you will get a blur option like this one.
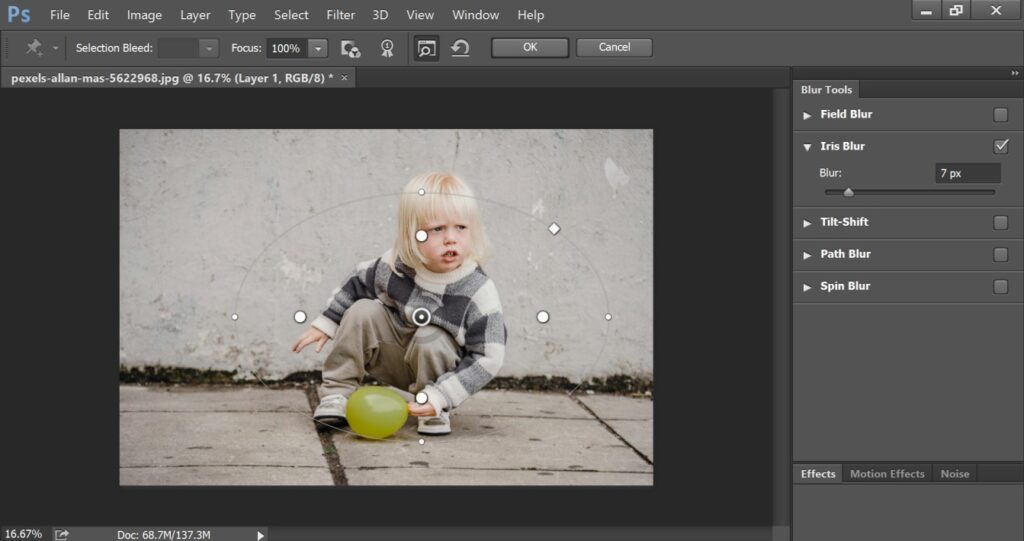
Click on the round point on the Iris blur shape and adjust the round shape according to the object. Also, you can adjust the blurriness from the middle.
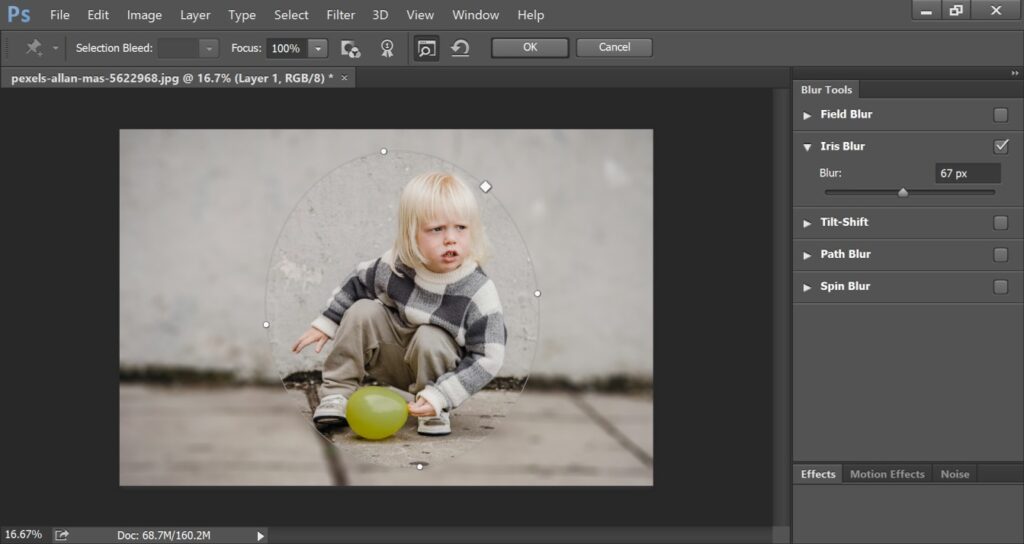
At this point, the blurred background is looking pretty perfect. Press the Enter key and wait for a while to get the image background blur in Photoshop. Let’s have a look here. This is the final look of the image after making the background blurry.
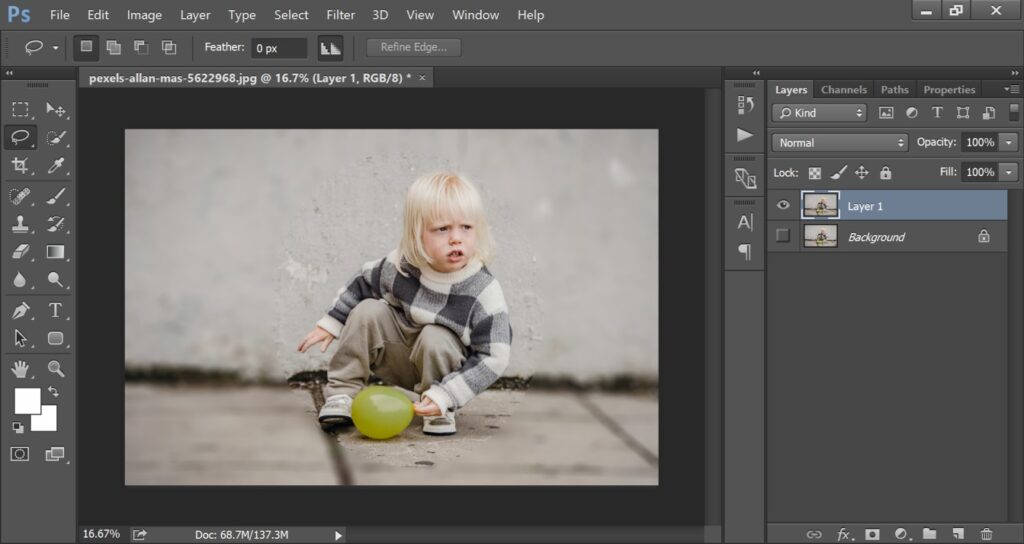
At this point, you have to choose the “File” option from the top and select “Save as” to save the blurry background photography in your required format.
3 Tips To Follow
- Add the color look-up option from the adjustment layer to enhance the image’s color.
- Reduce color lookup layer opacity to soften in image color.
- Vanish the object with Content Ware to get a Sharp blurred background.
3 Mistakes
- Don’t reduce the opacity of the original layer or duplicate the copied layer.
- Don’t apply the blur effect without isolating the object in your image.
- Don’t apply a similar blur effect for all types of images.
Why to Blur Background in Photoshop?
Bring Focus On The Subject
A blurred background inspires the viewers to focus on the object rather than giving attention to the background. If you are craving for attention, this is the go-to way for you.
Highlight the Targeted Object
Blurring an image background in Photoshop is an effective way to highlight the targeted object of your photography. That’s why you can use it for portrait photography and product photography.
Improve Image Composition
When you add blur to the image background, it improves the overall image composition. It makes the image look more professional in all aspects.
Remove Imperfection
There might be some unsuitable and imperfect elements in the background. You can remove those imperfections by blurring the background in Photoshop.
Wrap Up
So, you have learned two best and fastest ways how to blur background in Photoshop. If you want to do it professionally, you have to follow the first method.
When you are in a hurry and want to do it in real quick time, you can opt for the second method. However, when you have a lot of images to adjust the background, it will be nearly impossible for you to do that while maintaining high-quality.
On that note, you can choose our image background removal service to get the expected and suitable backgrounds for your photograph. Would you like to check the image quality? You can try our free trial now.
FAQ’s
How do you blur out the background in Photoshop?
You have to separate the object with the selection tool and apply the blur effect from the filter to blur out the background in Photoshop
How do I blur the background of a picture?
You have to copy the background layer and apply the lens blur, Gaussian blur, iris blur, or spin blur option according to the object shape to blur the background of a picture.
How do you blur part of an image in Photoshop?
You have to select a specific part of your image to blur that particular section of your photograph in Photoshop.
Where is the blur tool in Photoshop?
The blur tool is available within the “Filter” option on the top. You can choose blur or blur gallery to apply different types of blurriness.
Why can’t I blur in Photoshop?
You might not have selected any layer that’s why the blur options are not active yet. You have to select a layer to apply the blur tool.
What is the best blur in Photoshop?
The “Lens Blur” option is the best blur tool to blur an image background in Photoshop. You can adjust the hardness and density of the blur.
