Photographers, studio people, and online sellers often have to modify specific parts of an image. Have you ever wanted to customize or replace a particular element of an Image? Well, the Multiple Clipping Path is the best solution for that.
Beginner designers often get confused about creating a multi-clipping path. Hopefully, you can clarify all of your confusion related to multi-path through this article.
I am going to discuss everything in detail about how to create multiple clipping paths.
Read this article from first to last and creating multiple clipping paths won’t be a tough task for you anymore. So, allow me to start.
How to Create Multiple Clipping Paths in Photoshop?
Step 1: Open image via Photoshop
First of all, you have to open Photoshop and click on the “File” option from the top.
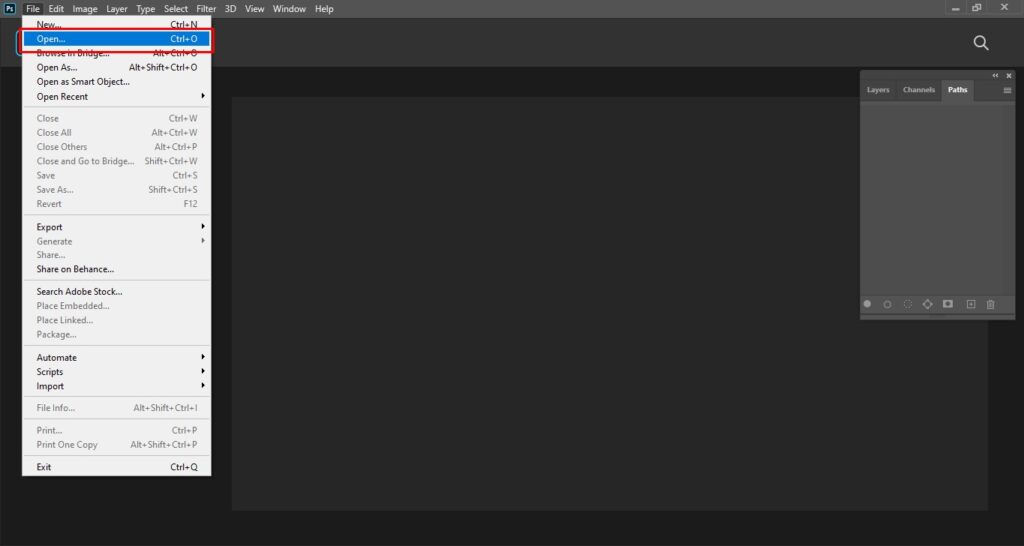
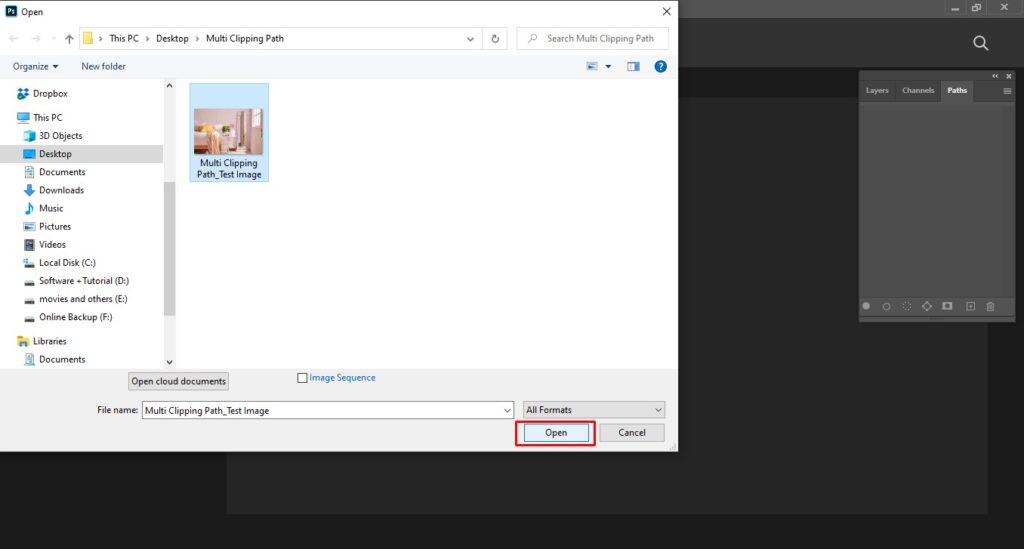
After that, click on the ‘open” to select your image for the multi-clipping path. Have you selected the image? Alright, you need to click on the “open” to open that image via Photoshop.
Now, we need to make the selection.
Let’s go ahead.
Step 2: Create A Path
To create multiple paths, you have to pick the pen tool and zoom on the image. After zooming in, you ought to left-click on the object’s outer line and cover the object with vector lines.

You have to finish the anchor point at the starting anchor point. That will cover the object perfectly. Here you can see the example.

But, what should you do now? Follow me in the 3rd step.
Step 3: Save work path
After selecting each object, you have to save the work path. All you need to do is press “CTRL + S”.

While creating multiple paths, you have to save the work path for each object.
Step 4: Create new path and select another object
As we have already selected the mirror, we have to select the rest of the objects available in the image. Therefore, we will be able to modify, customize or change those objects specifically. You have to click on the “add new path” icon from the right side and select the object using paths.

You can save this path as path 2. Also, you can rename the saved path by the name of the object.
Step 5: Create multiple paths for remaining objects
At this point, you have to start by creating a new work path and start selecting the remaining objects with the help of the pen tool. For our sample image, we are going to select those cushions specifically.

I have started from the left cushion. You have to zoom in on the image and make sure that the path selection doesn’t include anything from other objects. To create a multi-clipping path, you have to select each item specifically.

Have to get the idea about the way you should approach it? Well, I think so. Now, jump to the next step.
Step 6: Repeat the technique for specific item
By following the same technique, you should also cover other items available in your picture. For example, create a new path and cover specific items with the path.

Also, we’ve covered the cushion from the left side.

As we have created multiple paths for all those cushions, we have to work on the towel, table, small tree, and those books. Literally, we are going to create an individual path for every object available in the image.

Let’s have a look here too.

Also, we have covered the wooden area separately.

At this point, we have to focus on the right side and select the objects on the table. After making those selections, we’ll have the flexibility to customize any of those objects without making changes to others.

Now, it’s time to create multiple clipping paths for the small tree on the top of the table. We have to zoom in the image to 300% to make this happen accurately.
While multiple path creation, make sure that you’re taking a new work path for each element. Here is the look after creating multiple paths.

As we’ve covered it perfectly, we have to save the work path and create a new work path for the remaining objects.

Let me take you to the 7th step.
Step 7: Inspect created multiple paths
You’ll get your image in this form while taking multi clipping path service. Let’s have a look here.

All objects are covered with multiple paths. As we have saved paths in different layers, you can manually inspect different paths for correction or modification.
You might be wondering how to select a path layer for the inspection. Well, permit me to explain this. You just need to press the “CTRL” key and click on the work path layer. The object will be selected.
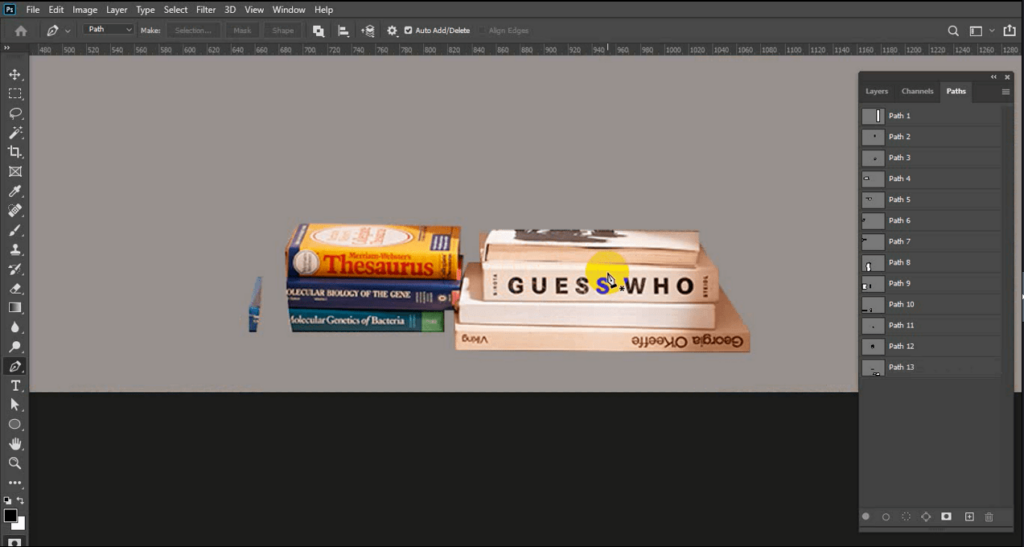
After that, you have to press “Q” to inspect the object in Quick Selection Mode. Would you like to make the anchor point visible? You can do this Q by pressing the “CTRL” and dragging the mouse over the object by pressing the left key.

So, that’s the complete process of how to create multiple clipping paths for any images.
If you have a lot of images to work on, it will be difficult for you to manage your work schedule. In that case, you should try Multiple Clipping Path Service for the best results.
However, let’s know when you should use the multiple clipping and when you should avoid it.
Multi clipping path when to use & when to avoid?
Online sellers want to make their products look standout and attract probable buyers. Raw images are not the safest option to upload online as there are lots of corrections needed.
You have to prepare your image and make it online presentable. When you want to modify your products separately, Multi Clipping Path Service is the best option to choose.
For example, you can separate different subjects of an image. The multi-clipping path is applicable for fashion accessories photos, portrait photography, real estate photography, and clothing photos.
Now, you might be thinking when a multi-clipping path is not applicable. Particularly, a multi-clipping path doesn’t produce the best shot for transparent and furry objects.
In those cases, it would be better to try Photoshop masking services. Otherwise, multiple clipping paths can assist your product images to achieve the look that online buyers expect to see. The decision is yours.
Advantages of Multiple Clipping Path
# Color Separation
The multi-clipping path is the best option for color separation. Particularly, this image editing method is suitable for E-commerce product photos. You can separate different colors of a product.
Besides, you’ll have the option to replicate any specific color as per your requirements. This will save you money and time.
You don’t have to spend additional time on the photoshoot. For example, you can separate the color of a suit, shirt, pants, tie, and shoes from a portrait photograph. Next to that, you can change or replace those colors to get the best possible look.
#Color Enhancements
Along with the color separation, multiple clipping paths are going to assist you with color enhancements. There are a lot of things to improve when it comes to photography. Colors are such an important element of a picture that reflects its quality. Multi clipping paths will ensure the quality of your image.
If you compare a professionally edited image with a raw image, you will feel the difference. Capturing a product photo is the primary step to getting a perfect shot. Ultimately, you need to focus on the post-production work to get an image with enhanced colors.
#Better Visualization
Last but not the least; more than 81% of buyers add a product to the cart when they find the product visually attractive. Therefore, you should upload premium quality photos to your online website.
How to improve your photos to match the quality? Multiple Clipping Path Services can bring solutions at this point.
Professional designers will create multiple path layers for your photos. That makes the further editing work precise and visually eye-catchy. Overall, it will make your business’s online presence more noticeable. Would you like to get all of those advantages?
Let’s have a try.
Who provides the best multiple clipping path service?
There are many companies that provide multiple clipping path services. But which one is the best? Actually, it depends on your budget, needs, and preferences.
We’ve done some research and find that Clipping Way will be one of the best options to hand over your image editing tasks. Along with that, they can also take care of your other photo editing requirements.
Clipping Way has a team of skilled Photoshop editors who can provide supreme quality outcomes. Starting with a free trial will be a smart decision. No need to pay for that.
Final Words
How to create multiple clipping path?- Is that confusing for you anymore? Hopefully, you are ready to create multiple clipping paths for any photos at this moment.
However, if you find any problem while following the above method, don’t hesitate to contact us for the solution. Clipping Way is always ready to be your virtual image editing assistant.
FAQ’s
How do i create multiple clipping paths?
You can use the pen tool to create multiple clipping paths. Also, you can use the lasso tool.
What is the best way to create multiple clipping paths?
Professional designers use the pen tool to create multiple paths.
What are the benefits of using multiple clipping paths?
The main benefit of using multiple clipping paths is that you can create more complex clipping masks. This can be helpful if you want to isolate multiple objects in an image.
Can i use a clipping mask with multiple layers?
Yes, you can use a clipping mask with multiple layers. To do this, select the layers you want to use as the clipping mask and click the “Create Clipping Mask” button in the layers panel.
How do you manage multiple clipping paths?
You have to create several path layers for each item.
How do you delete a path layer while creating multiple paths?
You need to select the path layer and press the “Delete” key.


