Centering the text in any image makes it a bit more noticeable. It is an effective way to apply when you are willing to catch attention.
Sometimes, we find it mandatory to center the text within an image. After reading this article, you will be able to place text in the center with any shape.
In Photoshop, several easy ways are available to center any text within an image. I am going to introduce you to some of those excellent methods. So, read this article till the end and learn how to center text in Photoshop.
It will be helpful for you if you are eager to try Outsourcing Photo Editing Service. Here’s the first method to center text in Photoshop.
How to Center Text in Photoshop?
Method 1: Center Text in Photoshop by Making Selection
At the very first, I am going to inform you how you can center any text in Photoshop by making a selection. Let’s have a look at this picture.
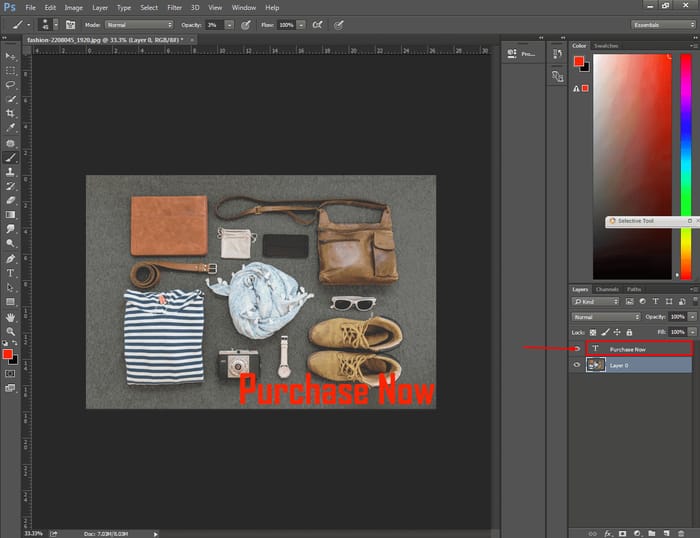
To place it at the center of the picture, click on the text layer. Then, you have to choose the “Move” tool from the left toolbar.
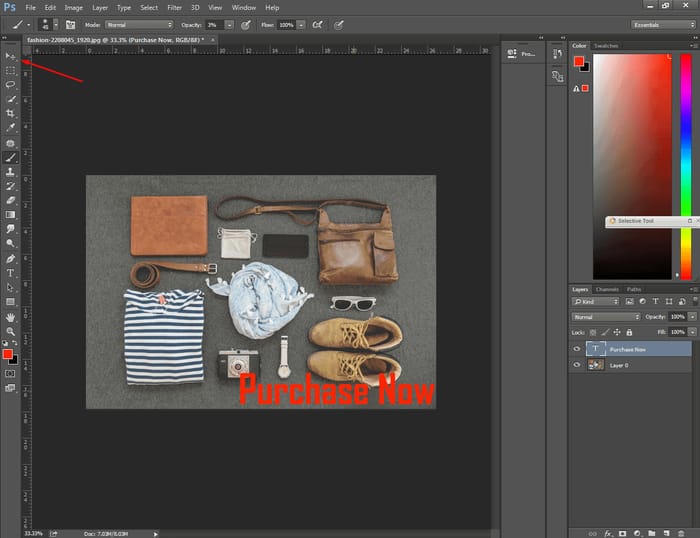
Afterward, use the shortcut CTRL + A to make a selection of the whole canvas. You will see these options at the top bar.
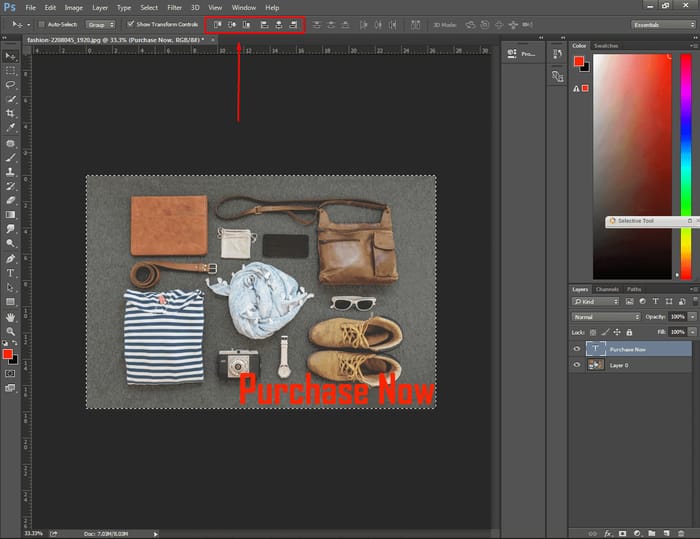
These options will assist us in centering text at the middle. Hit on the “Align Vertical Center” and “Align Horizontal Center”. It will place the text in the middle, isn’t it cool?
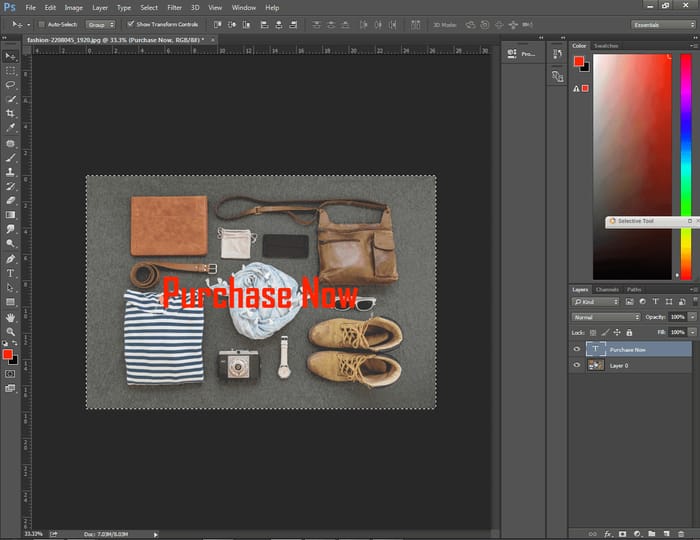
So, that was our first method of how to center text in Photoshop by making the selection. Hopefully, you have learned the procedure.
Now, it is time to move to the 2nd method.
Know More: How to Draw Curved Lines in Photoshop | How to Vectorize An Image in Photoshop within 2 minutes
Method 2: Center Text in Photoshop within a Specific Selection
In Photoshop, you have the option to center text within a specific selection. Let’s see how to do it.

I am going to place the text in the middle of the picture. I don’t want to keep the background behind the text to catch the attention of the viewers.
For making a specific selection click on the “Rectangular Marquee tool”

After that, select the area where you want to place the text. When you are done with the selection, erase that area with the eraser tool. As I am looking for placing it in the middle, I have cleared the middle area.

Next, click on the “Move” tool once again and drag the text in the blank section. Later on, select that area with the Marquee tool and you will find alignment options visible at the top.

At this stage, you have to click on “Align Vertical Center” and “Align Horizontal Center” to place it right at the middle from both ends. Want to have a look at our sample picture? Here you go.

See, the text is positioned right at the center. Comment below to share your opinion about this procedure.
Now, allow me to dive into the 3rd method which is also easy and helpful.
Method 3: Center Text to an Elliptical Shape in Photoshop
While editing a photo, we have to deal with different shapes. Sometimes, you may have to center text to an Elliptical shape. So, how can you cope up with this tricky situation? Our 3rd method will teach you how to do that with perfection. Allow me to start the procedure.

To place the text in the middle of the ellipse, click on the text layer from the layer panel on the right side. Then, bring the text within the elliptical through left-clicking. Let me show you where I have placed the text.

After putting the text within the ellipse, select the “Elliptical Marquee Tool” to create a selection in Elliptical shape. Take the mouse pointer on the existing Ellipse and create a similar selection.
To move the shape while selecting, press the space button. Click and hold the left button to change the size of the Ellipse.
When you are done with it, you have to click on the “Move” tool.

So, the alignment options are visible at the top. By clicking on “Align Vertical Center” and “Align Horizontal Center” we can bring the text to the center.

The text has come to the middle but still, there is a problem with its size. To give it a perfect look we have to change the size of the text. Let’s do that. It will take less than two minutes.
Double click on the text layer to enable the text editing mode. At the top, you will see the text size box. Change the size of the text according to the shape so that it fits perfectly within the shape.

It’s looking perfect, what do you say about it?
You have learned 3 different ways of how to center text in Photoshop through making selections. How will it be if you center text in the middle without making any selection? That sounds interesting. Want to try this? Let’s move to our final method.
Method 4: Center Text in Photoshop without Making Any Selection
All of the above procedures were easy to follow. This one is even easier to follow.

We will bring this text in the middle without creating any selection. First, double click on the text layer.
After that, click on the showed icon from the top.
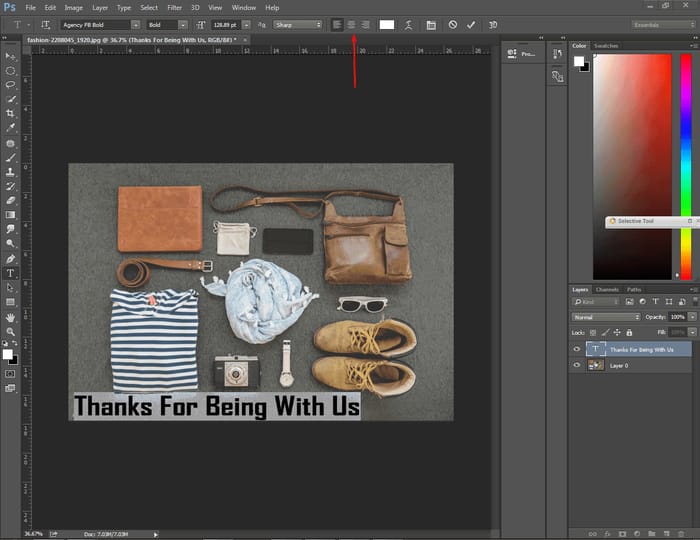
It will bring the text in the middle just like this.
Remember that, this method will align the text horizontally not vertically. To align the text both vertically and horizontally you have to follow any of the top 3 procedures.
Get Introduced to the Alignment Options in Photoshop
It is not necessary that you only have to place a text in the center. You might also need to align the text in other positions. At this stage, I am going to introduce you to all Alignment Options in Photoshop. After reading this section, you will be able to align a text in any position. Getting excited to know about it? Permit me to start.
Basically, six types of alignment options are available in Photoshop. I am going to give you a brief introduction to all of those.
The first 3 options from the left control the Vertical alignments and the next 3 options control the horizontal alignment.
Vertical alignment
Align Top Edges: It will place texts at the top of the picture
Align Vertical Centers: It will place texts in the center vertically
Align Bottom Edges: It will place texts at the bottom of the picture
Horizontal alignment
Align Left Edges: It will place texts at the left of the picture
Align Horizontal Centers: It will bring the text in the center horizontally
Align Right Edges: It will place texts at the right of the picture
Conclusion
Hopefully, you have learned useful steps from this article. From now on, you should be able to center any text in Photoshop without worrying about the shape.
Willing to read more articles related to Photo Editing? Keep connected with Clipping Way, we will keep you up to date with exciting Photoshop editing tutorials.
If you have anything to ask, feel free to comment below. We will respond soon.
FAQ’s- I’ve Got Some Questions
How do i center align text in Photoshop?
To center text in Photoshop, you have to use alignment options from the top menu of Photoshop.
Why can’t i align text in Photoshop?
If the text layer is not selected, you won’t be able to align text. Make sure that you have selected the text layer.
How do i center text within a circle in Photoshop?
To align texts within a circle, you have to use the Elliptical Marquee Tool.
How do you make the selection of a circle in Photoshop?
For making a selection of a circle choose the Elliptical Marquee Tool. After that, press & hold the “Shift” key. Then start making the selection.
How much time does it take to align texts in Photoshop?
Basically, it takes less than 5 minutes to align texts in Photoshop.


